
Using high-quality repair materials and properly prepping the repair area are prerequisites for making long-lasting repairs to an EPDM roofing system. Since EPDM roofing membranes are made of synthetic rubber, they cannot be used with asphalt-based materials.
Roof cement flashing is included, in addition to asphalt-based roof coatings like aluminum-based ones. Due to the EPDM rubber membrane becoming contaminated by these impurities, more frequent maintenance will be required.
For EPDM roofs, you can choose between traditional membrane materials, which call for an additional adhesive, and pressure-sensitive materials, which have an adhesive already applied to the back. Either kind of stuff is available for purchase.
Kits for securing patches are available, and often include not only the patch material itself, but also a cleaning solution, priming paint, and a roller. While these kits may be costly, they often include everything you'll need to address a wide variety of issues.
What You'll Need
Machinery and Devices
- A measuring tape
- Both scissors and utility knives will do the job.
- Choose either a paintbrush or a roller with a medium-nap cover and get to work.
- Roller
Materials
- Universal cleaner for use around the house
- Patching fabric for EPDM
- EPDM roofs, the basics.
- Joint adhesive
- An antiquated credit card.
Instructions
Prepare The Roof Surface
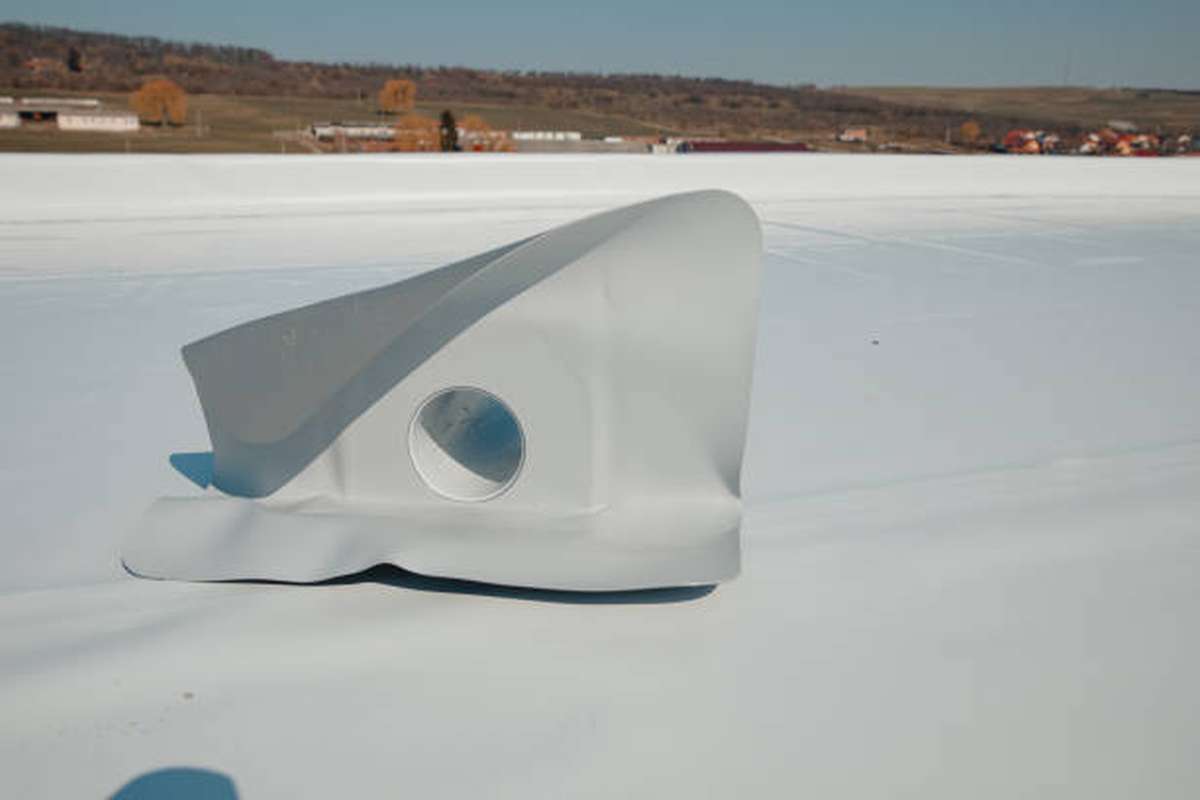
The first step in repairing an EPDM roof is to get the roof surface ready for the patch. EPDM has carbon in it, and a carbon coating will build on the sheet as the membrane ages; this will be seen if you run your fingers across the membrane.
To ensure the patch sticks and functions effectively over time, the surface must be cleaned of the carbon film, dirt, and other forms of oxidation.
To clean the roof, choose a product that will not leave behind any smears or streaks. Many producers advocate using a general purpose cleaner, such as Simple Green or Spic-and-Span. Cleanse the area thoroughly, especially the targeted area for the patch. Use dry towels to wipe away any remaining moisture and oxidation from the EPDM surface.
Preparing the roof surface for the patch is the first stage in repairing an EPDM roof system. Unlike certain other membrane materials, carbon is present in EPDM's.
A thin layer of carbon forms on the membrane's surface as it ages. You can show this by rubbing your hand across the sheet. If you're holding black EPDM, your skin will have a carbon-black appearance. The carbon black layer, along with debris and other oxidation, must be removed from the surface of the sheet before the patch may adhere to the roof membrane.
Use a cleaner that will not leave a residue on the membrane after wiping off the roof's surface. Both Simple Green and Spic 'n' Span are recommended by several manufacturers. Cleanser for weathered membranes is also available locally (see above links on where to purchase).
Clean the roof to a size larger than the patch before applying it. To eliminate oxidation from the EPDM membrane, scrub the surface with a cloth. Once the oxidation is gone, wipe down the surface to get rid of any residual moisture from the repair.
The roof surface needs to be cleansed of the dirt, oxidation, and carbon black that has accumulated there. A new patch or adhesive used for the patch will cling to the film on the roof surface rather than the membrane if they are allowed to remain.
If the roof is cleaned properly, the patch will adhere directly to the membrane, improving the membrane's durability.
Adjust the Size of the Patch
Find out how big of a hole needs to be repaired. The EPDM patch material should be cut with heavy shears or a utility knife so that it overhangs the damaged area by at least 2 inches in all directions. Corners should be trimmed or rounded off so that they don't catch on shoes and cause the patch to lift.
It is recommended to take measurements of the roof repair patch before spraying the primer. If you need to figure out how big of a patch you'll need, simply place the patch over the damaged area. In order to prevent the patch from falling short, the material should be allowed to expand beyond the damaged area.
When repairing a roof, it's best to work at least two inches away from the advancing edge of whatever is causing the issue.
Roof patching materials should be custom-cut after being positioned on the roof. The corners of the patch should be trimmed or rounded off so that they don't get caught on roof traffic and get lifted up.
Set the Stage for Maintenance and Restoration
Apply a light coat of EPDM roofing primer to the membrane surface in the area where the patch will be applied, using either a paintbrush or a roller with a medium-nap roller cover. The primer needs to reach the edges of the patch and soak in.
It is recommended to clean the roof surface thoroughly before applying a thin coat of primer to the membrane surface, and then to place the patch. With a paint roller with a medium nap or a paintbrush, apply a thin coat of primer to the area where the patch will be applied.
Be sure to use enough primer to cover the entire patch when applying it. The EPDM patch's leading edges will adhere to the roof membrane better if you do this.
Apply a light coat of EPDM roofing primer to the membrane surface in the area where the patch will be applied, using either a paintbrush or a roller with a medium-nap roller cover. The primer needs to reach the edges of the patch and soak in.
After pressure washing the roof, apply a light coat of primer to the membrane surface, and then instal the patch. With a paint roller with a medium nap or a paintbrush, apply a thin coat of primer to the area where the patch will be applied.
It is important to use enough primer to cover the entire patch, not just the area around it. The EPDM patch's leading edges will adhere to the roof membrane better if you do this.
Put in the Fixing Update
There are two types of repair materials: those with adhesive on the back of the membrane (normal membrane materials) and those without (pressure-sensitive materials).
The patching procedure will vary with the type of repair kit you have:
After removing the paper or film backing from a pressure-sensitive patch, the patch should be applied to the roof membrane with firm pressure. You can get rid of any remaining air bubbles and ensure a strong bond by rolling the patch in a variety of directions.
To instal a glue-down patch, simply follow the manufacturer's instructions for applying the adhesive to the patch's underside and the roof's surface in the patch's location. Let the glue dry in the flash until it's no longer tacky.
Once the patch has been applied to the roof, it should be rolled with a steel roller in a number of directions to remove any air bubbles and secure it in place.
It's worth noting that special glue has to be created for fusing EPDM to EPDM. For sealing EPDM to substrates or insulation boards, use only the yellow adhesive made for that purpose.
Close Up The Frayed Edges Of The Patch
The patch's seams should be sealed by applying a thick bead of EPDM lap sealant around their perimeter. Use an old credit card or another instrument made of similar plastic to flatten and smooth the sealant, ensuring that it completely seals the edges and feathers over the surrounding area.
Patch for Leaking Roofs That Responds to Pressure
In order to apply a pressure-sensitive roofing repair compound, you must first remove the paper or film backing from the patch. Verify that the patch has been firmly pressed into place.
It is advisable to use a steel roller to apply the patch to the roof's surface. In order to get rid of any trapped air under the repair patch, a steel roller is rolled back and forth across the patch at regular intervals.
For added defence against water intrusion, run a bead of EPDM lap sealant along the leading edge of the repair. To do this, simply roll the bead out on the surface of the patch. Lap sealant, after applied, needs to be feathered to ensure a good bond.
Insensitive Roof Patch Repair
If the patch material you're using doesn't come with a pressure-sensitive backing, you'll need to use single-ply EPDM adhesive to secure it to the roof's surface. Even if the patching material has a pressure-sensitive backing, this holds true. Because of the need to seal EPDM to substrates or insulating boards, the adhesive can't be a bonding adhesive, also known as yellow glue. Instead, you should use an adhesive made for sealing EPDM to EPDM.
To repair a hole in a membrane, you'll need to apply adhesive to both the back of the patch and the surface of the hole. Just be patient and the adhesive won't be sticky anymore when touched. After the adhesive has fully set, you can carefully put the patch to the roof.
To ensure proper adhesion of the patch to the preexisting EPDM roof membrane, roll over the entire area with the steel roller after installation. You should also use a bead of EPDM lap sealant to seal off the patch's leading edge to prevent water from seeping in. To do this, roll the bead of sealant out across the surface of the patch.
What Should I Avoid Using On My Rubber Roof?
When discussing the materials you should not use to fix the rubber roof on your EPDM roof system, it may be easiest to start with the materials you should not use. EPDM roofing membrane is a kind of roofing membrane that is made of synthetic rubber.
Rubber, or EPDM as it is more commonly known, is not compatible with asphalt-based materials. Roof cement flashing and asphalt-based roof coatings, such as aluminium roof coatings, fall into this category. Maintenance and repairs on an EPDM roof membrane system should therefore be performed using alternative materials.
If an EPDM roofing system is ever serviced or repaired using asphalt products, the membrane will become contaminated and need to be replaced.
If the pollution was severe enough to affect the entire area, it may be necessary to replace the roof. When a roof membrane becomes contaminated, it is usually necessary to replace the membrane rather than attempt to clean it.
Use of Epdm: Pros and Cons
Because EPDM is one of the newer and more widely used roofing materials, it's important to understand how it works and what you can expect from it. This is true for roofing professionals as well as homeowners searching for a simple, do-it-yourself roofing solution.
We'll list the main pros and cons of this option below, so you can make an informed decision about how to proceed with your project.
Plus: It's a low-maintenance, aesthetically pleasing option that lasts a long time.
EPDM roofing is far superior to more conventional and antiquated options for flat roofs like felt. One of the most dependable and long-lasting roofing solutions is rubber roofing since it is resistant to weather damage. Their average lifespan is 30-50 years.
One day you might come across a flat roof covered with moss and algae; however, the synthetic rubber does not support moss growth, therefore your roof will remain pristine. In addition, dirt is less likely to be seen on it, reducing the amount of time spent cleaning the roof.
Potentially Complicated Rooftop Installation
If your roof is completely flat and of a particular size in square metres, installing solar panels will be a breeze. If your roof has obstructions like chimneys, vents, or lanterns, solar panels won't work as well.
Rubber must be cut, reflective tape must be used, and the entire construction must be kept watertight in order to face difficulties like those listed above. In most cases, professional assistance should be sought out for the installation process if the roof is not exactly flat.
Plus: It's good for the environment.
EPDM rubber roofing's eco-friendliness comes from the fact that it is manufactured from waste products, making it a more sustainable option than other roofing materials. The EPDM system's BBA Certification further ensures that the items you receive are of the highest standard.
Damage is possible.
Rips in the membrane can be caused by both foot movement and falling objects (such as tree branches and all sorts of things from the outside). It's true that EPDM membranes are extremely sturdy, but that doesn't make them indestructible.
Keeping a close check on your roof will help you see any damage quickly so you can get it repaired and returned to an adequate degree of waterproofing.
Despite the product's tearing capability, this is no guarantee that it will tear easily. The best way to prevent your roof from showing signs of wear and tear over time is to use thicker membranes. Obviously, larger membranes will cost more, so keep your budget in mind while you shop.
Damage can be easily repaired if necessary.
- To ensure that the rubber bonds properly, it is important to thoroughly clean the damaged surface.
- First, make sure you're using the right primer and applying it properly to the surface.
- You may completely cover up the damage with your 9-inch flashing tape.
One of the numerous benefits of EPDM is the peace of mind that comes from knowing that repairs may be made with minimal fuss in the event of damage.
Negative: Needing to Search for an Appropriate Installer
When compared to the long history of other roofing materials and procedures, the forty years that rubber roofing has been in use is quite brief. Because of this, it may be harder than you think to find a local roofing professional who is capable of completing your project.
The best approach to track down a certified set-up specialist is to visit the manufacturer's website or get in touch with them straight. In fact, many of them can boast thousands of trained professionals and an impressive body of work that they are happy to share with you.
On the plus side, we offer a bespoke service where you can have items cut to your exact measurements.
To make installation as easy as possible, we will custom-cut the EPDM membrane we provide to the dimensions of your roof, including any overhang.
If you have the rubber roofing cut to size beforehand, you can finish a regular roof with a single membrane. However, five-inch wide flashing tape is required to join together multiple membrane sections.
Advantage: There Will Be No Rotting, Cracking, or Blistering!
After installation, the rubber's inherent properties ensure that it will be impervious to blistering, cracking, and decay. Because of this, EPDM rubber roofing has many advantages beyond those of traditional flat roofing, and you have fewer things to worry about as a customer.
Conclusion
Using high-quality repair materials and prepping the repair area are prerequisites for making long-lasting repairs. EPDM roofing membranes are made of synthetic rubber, and cannot be used with asphalt-based materials. Preparing the roof surface for the patch is the first stage in repairing an EPDm roof system. Roof patching materials should be custom-cut after being positioned on the roof. To eliminate oxidation from the EPDM membrane, scrub the surface with a cloth.
Once the oxidation is gone, wipe down the surface to get rid of any residual moisture from the repair. After pressure washing the roof, apply a light coat of EPDM roofing primer to the membrane surface. It is recommended to clean the roof surface thoroughly before applying a thin coat of primer. The patch's leading edges will adhere to the roof membrane better if you do this. In order to apply a pressure-sensitive roofing repair compound, you must first remove the paper or film backing from the patch.
It is advisable to use a steel roller to apply the patch to the roof's surface. Lap sealant, after applied, needs to be feathered to ensure a good bond. EPDM is a kind of roofing membrane that is made of synthetic rubber. Maintenance and repairs on an EPDM roof membrane system should be performed using alternative materials. One of the most dependable and long-lasting roofing solutions is rubber roofing since it is resistant to weather damage.
If your roof is flat and of a particular size in square metres, installing solar panels will be a breeze. If your roof has obstructions like chimneys, vents, or lanterns, solar panels won't work as well. The best way to prevent your roof from showing signs of wear and tear over time is to use thicker membranes. EPDM rubber roofing has many advantages beyond those of traditional flat roofing. After installation, the rubber's inherent properties ensure that it will be impervious to blistering, cracking, and decay. It may be harder than you think to find a local roofing professional capable of completing your project.
Content Summary
- Using high-quality repair materials and properly prepping the repair area are prerequisites for making long-lasting repairs to an EPDM roofing system.
- Kits for securing patches are available, and often include not only the patch material itself, but also a cleaning solution, priming paint, and a roller.
- Roller Materials Universal cleaner for use around the housePatching fabric for EPDM EPDM roofs, the basics.
- Instructions Prepare The Roof SurfaceThe first step in repairing an EPDM roof is to get the roof surface ready for the patch.
- Cleanse the area thoroughly, especially the targeted area for the patch.
- Preparing the roof surface for the patch is the first stage in repairing an EPDM roof system.
- A thin layer of carbon forms on the membrane's surface as it ages.
- The carbon black layer, along with debris and other oxidation, must be removed from the surface of the sheet before the patch may adhere to the roof membrane.
- Use a cleaner that will not leave a residue on the membrane after wiping off the roof's surface.
- To eliminate oxidation from the EPDM membrane, scrub the surface with a cloth.
- The roof surface needs to be cleansed of the dirt, oxidation, and carbon black that has accumulated there.
- Adjust the Size of the PatchFind out how big of a hole needs to be repaired.
- It is recommended to take measurements of the roof repair patch before spraying the primer.
- If you need to figure out how big of a patch you'll need, simply place the patch over the damaged area.
- Apply a light coat of EPDM roofing primer to the membrane surface in the area where the patch will be applied, using either a paintbrush or a roller with a medium-nap roller cover.
- The primer needs to reach the edges of the patch and soak in.
- It is recommended to clean the roof surface thoroughly before applying a thin coat of primer to the membrane surface, and then to place the patch.
- Be sure to use enough primer to cover the entire patch when applying it.
- The EPDM patch's leading edges will adhere to the roof membrane better if you do this.
- After pressure washing the roof, apply a light coat of primer to the membrane surface, and then instal the patch.
- Put in the Fixing UpdateThere are two types of repair materials: those with adhesive on the back of the membrane (normal membrane materials) and those without (pressure-sensitive materials).The patching procedure will vary with the type of repair kit you have:After removing the paper or film backing from a pressure-sensitive patch, the patch should be applied to the roof membrane with firm pressure.
- To instal a glue-down patch, simply follow the manufacturer's instructions for applying the adhesive to the patch's underside and the roof's surface in the patch's location.
- Let the glue dry in the flash until it's no longer tacky.
- Once the patch has been applied to the roof, it should be rolled with a steel roller in a number of directions to remove any air bubbles and secure it in place.
- Close Up The Frayed Edges Of The PatchThe patch's seams should be sealed by applying a thick bead of EPDM lap sealant around their perimeter.
- Patch for Leaking Roofs That Responds to PressureIn order to apply a pressure-sensitive roofing repair compound, you must first remove the paper or film backing from the patch.
- Verify that the patch has been firmly pressed into place.
- It is advisable to use a steel roller to apply the patch to the roof's surface.
- For added defence against water intrusion, run a bead of EPDM lap sealant along the leading edge of the repair.
- To do this, simply roll the bead out on the surface of the patch.
- Insensitive Roof Patch RepairIf the patch material you're using doesn't come with a pressure-sensitive backing, you'll need to use single-ply EPDM adhesive to secure it to the roof's surface.
- Even if the patching material has a pressure-sensitive backing, this holds true.
- Instead, you should use an adhesive made for sealing EPDM to EPDM.To repair a hole in a membrane, you'll need to apply adhesive to both the back of the patch and the surface of the hole.
- To ensure proper adhesion of the patch to the preexisting EPDM roof membrane, roll over the entire area with the steel roller after installation.
- To do this, roll the bead of sealant out across the surface of the patch.
- What Should I Avoid Using On My Rubber Roof?When discussing the materials you should not use to fix the rubber roof on your EPDM roof system, it may be easiest to start with the materials you should not use.
- EPDM roofing membrane is a kind of roofing membrane that is made of synthetic rubber.
- Maintenance and repairs on an EPDM roof membrane system should therefore be performed using alternative materials.
- Use of Epdm: Pros and ConsBecause EPDM is one of the newer and more widely used roofing materials, it's important to understand how it works and what you can expect from it.
- This is true for roofing professionals as well as homeowners searching for a simple, do-it-yourself roofing solution.
- We'll list the main pros and cons of this option below, so you can make an informed decision about how to proceed with your project.
- If your roof is completely flat and of a particular size in square metres, installing solar panels will be a breeze.
- If your roof has obstructions like chimneys, vents, or lanterns, solar panels won't work as well.
- In most cases, professional assistance should be sought out for the installation process if the roof is not exactly flat.
- Plus: It's good for the environment.
- EPDM rubber roofing's eco-friendliness comes from the fact that it is manufactured from waste products, making it a more sustainable option than other roofing materials.
- Damage is possible.
- Keeping a close check on your roof will help you see any damage quickly so you can get it repaired and returned to an adequate degree of waterproofing.
- The best way to prevent your roof from showing signs of wear and tear over time is to use thicker membranes.
- Damage can be easily repaired if necessary.
- To ensure that the rubber bonds properly, it is important to thoroughly clean the damaged surface.
- First, make sure you're using the right primer and applying it properly to the surface.
- You may completely cover up the damage with your 9-inch flashing tape.
- Negative: Needing to Search for an Appropriate InstallerWhen compared to the long history of other roofing materials and procedures, the forty years that rubber roofing has been in use is quite brief.
- Because of this, it may be harder than you think to find a local roofing professional who is capable of completing your project.
- The best approach to track down a certified set-up specialist is to visit the manufacturer's website or get in touch with them straight.
- To make installation as easy as possible, we will custom-cut the EPDM membrane we provide to the dimensions of your roof, including any overhang.
- If you have the rubber roofing cut to size beforehand, you can finish a regular roof with a single membrane.
Frequently Asked Questions About Rubber EPDM Roof
Install the Repair Patch
Using a glue-down patch: Apply a single-ply EPDM adhesive to the back of the patch and the roof surface in the patch area, following the manufacturer's instructions. Allow the adhesive to flash off until it is no longer tacky to the touch.
Cyanoacrylate adhesive is practically the only choice if you are looking for a high-strength bond. Permabond recommends its 105-grade cyanoacrylate for this troublesome substrate.
EPDM, or rubber, is not compatible with asphalt-based products. This includes any type of roof cement flashing as well as any type of asphalt-based roof coating including aluminium roof coating. These products should not be used to maintain or repair an EPDM roof membrane system.
The three most common problems with Rubber Roofs are improper installation, shrinkage and seams. While rubber roofs are known to be durable, they also need maintenance.
Metal was the preferred RV roofing material until TPO and EPDM showed up on the scene. Flex Seal will adhere to almost any surface, including wood, metal, aluminium, plastic, fibreglass, rubber, vinyl, or just about any dry (or even wet) surface. You need to be sure to clean your RV roof before applying Flex Seal.