Once inside your home, the fungus known as dry rot can cause significant damage to the wood in your home. Early prevention and detection are much more effective and more simple than treatment after the problem has already developed, as is the case with the vast majority of issues that impact the structural integrity of your home. We explain how to spot dry rot, how to treat it, what causes it, and how to fix wood that has been infected, all with plenty of photos.
What Is Dry Rot?
Dry Rot is a form of wood-destroying fungus that receives its scientific name, Serpula lacrymans, from the fact that it grows and spreads by feeding on the cellulose found in lumber. As a result of this procedure, the lumber is dry and brittle, with visible fissures running through it. As a result, any impacted surface in your home is extremely vulnerable to harm.
When dealing with dry rot, immediate action from a specialist is necessary to prevent significant damage. While both varieties of rot require a source of moisture to germinate, dry rot can quickly spread far beyond the spot where it originally found water. Dry rot spores can even pass through thick walls and over things like steel or brick to reach another source of wood to eat on their hunt for more timber to consume. Dry rot is typically distinguished by the presence of a mushroom-like body known as a sporophore. Millions of spores in the form of red dust are released by these bodies.
The term "dry rot" was coined to differentiate decay caused by fungi in dry wood from decay caused by fungi in wet wood (such as recently cut lumber). The term "dry rot" is not totally accurate (i.e. timber ready to be used in building).
For dry rot to establish itself, the environment must be moister than it should be. In order for the fungal spores (which often take the shape of orange dust) to germinate and create hyphae, the moisture level of your timber should be between 28 and 30 percent. Mycelia are the threads that eventually evolve into the fungus's body.
It only takes a moisture level in your lumber of over 20% for the fungus to start growing again after it has already colonised. It will also produce hyphae (strands) capable of moving across stone and brick in search of more timber to colonise. The fungus causes the rot because it feeds on your lumber, cellulose hemicellulose, and removes water from the wood and leaves a brittle "skeleton" structure behind.
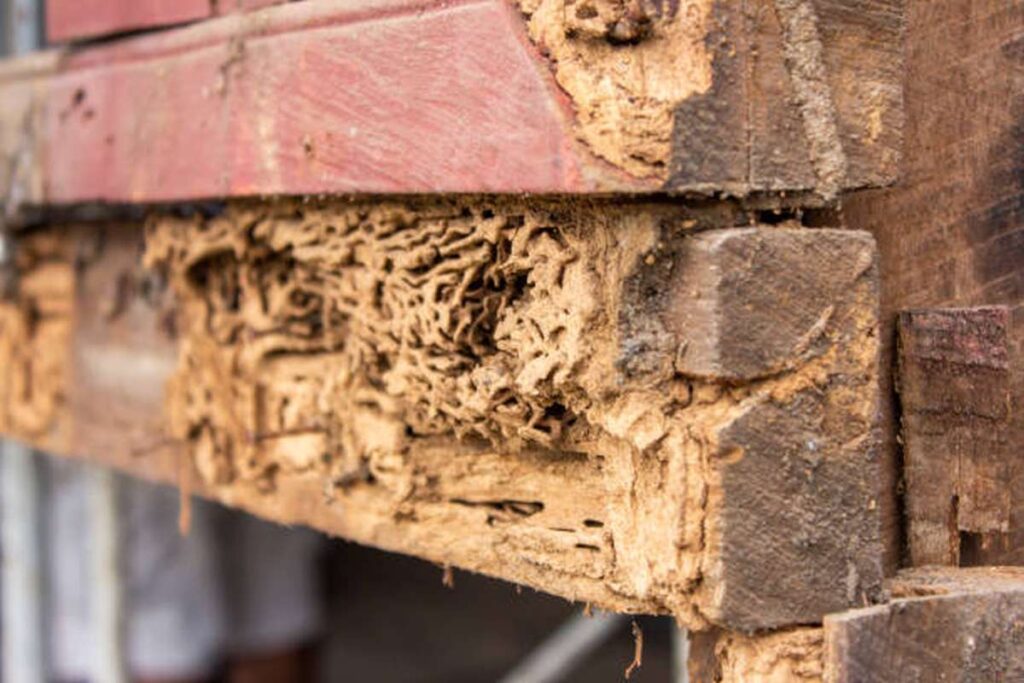
As a result of the degradation, the wood becomes crumbly and a darker or browner colour, and the board splits in a fine, square pattern. The wood will eventually dissolve into dust, which, of course, has the ability to bring down pieces of your house. The rot will not cause any damage to the brickwork because it does not feed on it; rather, it will just flow through it. Because dry rot can be present in your walls for years or months before the fungus appears on the surface, there may be rot in the wall itself even if there are no fungal bodies on the surface.
How To Know If Your Wood Has Rotted?
First and foremost, you must correctly identify the problem before attempting to solve it. There are several approaches to consider here:
Signals Of Fungus
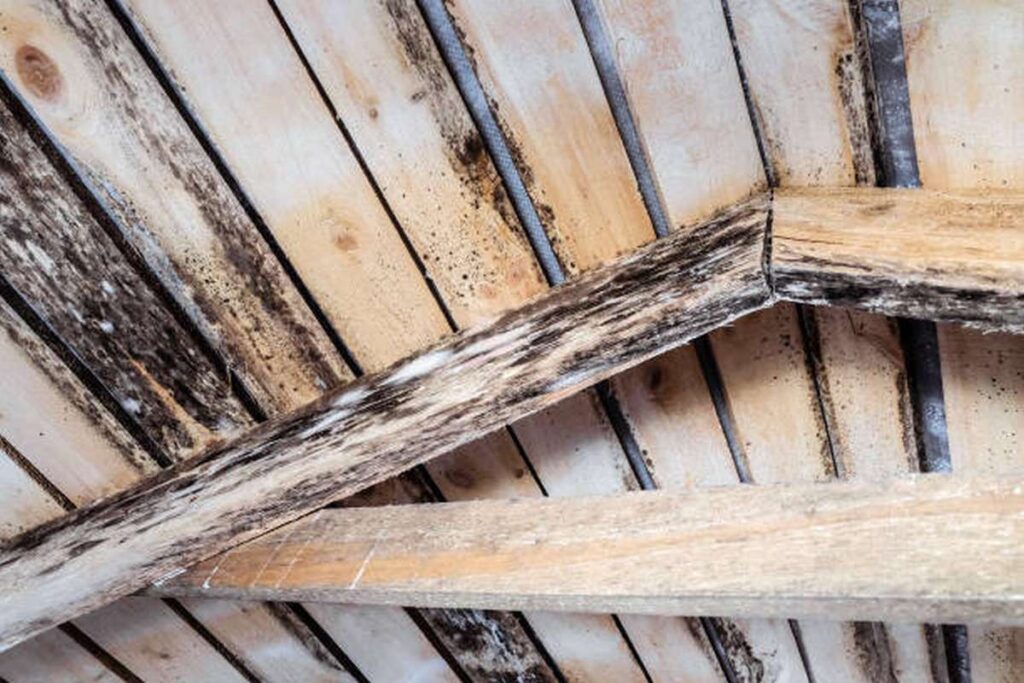
This occurs in regions that are dark and wet, with a persistent buildup of moisture, such as a leaking roof or when water penetrates chipped wooden siding. If moisture can infiltrate but not necessarily evaporate, the environment is likely to promote the formation of a nasty fungus. The fragrance isn't extremely strong, but the entire piece of wood is covered in white patches that resemble bitten-up mushrooms. The emergence of a snow-white film on specific areas of it indicates the presence of a fungus, which will eventually cause the wood to decay. It is not difficult to recognise.
Waterlogging
The process by which wood expands to the point where it can no longer hold any more water is referred to as "waterlogging." It refers to the state of being entirely submerged in water to the point where it can be seen. The colour and shape of the wood will be determined by the length of time the damage has been there.
If there are no traces of moisture or damp patches on the outside of your wooden beams, you can safely assume that they are not waterlogged. Waterlogging happens only when the entire component is completely saturated. There is a chance that there is still wetness on the inside, but the problem has not progressed to this point.
Malleable To The Touch
Before the wood can be used for anything, including cladding, roofing, or anything else, it must be cured for up to a year. As a result, the wood takes on a brown to beige colour rather than the colour it had when it was first collected. We're all familiar with the look, feel, and strength of lumber in its different forms. This is a really alarming indication if you can press your fingertips against the edge of the wood and feel a depression as a result of the pressure. You have damp rot, which is eroding the glue-like components that are naturally found in wood fibres. This is a situation you've created for yourself.
Odour
When wood begins to rot, it emits a pungent odour that is difficult to adequately explain. This odour is difficult to pinpoint exactly. It is almost as if a general mustiness and a mild body odour were combined into one, although in most cases, it can only be detected when one is quite close to the source. If you suspect that the wood has been damaged by wet rot, get up close and smell it. If it still smells like you just walked into a Home Depot, then you're in luck; it's certainly recoverable. If it doesn't, then it's probably not.
You could possibly solve the issue in a very short amount of time. On the other hand, if there is a strong odour coming from it, it is most certainly rotten, and you will need to determine how severe the damage has become.
Telltale Of Mycelium
Mycelium is a form of fungal growth that is particularly specific. It is not the same as the previously discussed white and moist fungus. This, on the other hand, has the appearance and behaviour of a white powder and can spread almost everywhere. If you detect this in a corner of your flooring or on your walls, it's usually too late to do anything about the dry rot that has established in rather than the previously present wet rot.
Once established, mycelium produces colonies and is extremely difficult to eliminate. Unfortunately, these spores spread swiftly, indicating that severe damage has already occurred. This can happen when the moisture content of the wood has reduced to an exceedingly low level (it should be around or slightly above 7%), allowing the mycelium to grow and spread throughout the wood.
There are many things that could go wrong, but even if they do, we will not abandon you in the lurch. Instead, you'll discover how to repair rotting wood and make it seem almost as good as it did when it was first created.
How to identify dry rot
Detecting dry rot in its early stages is critical for limiting the amount of damage it may do to your property and limiting the amount of money that will need to be spent on repairs. Dry rot is more likely to be found in sections of the property where people do not generally look, such as under floorboards, behind plasterboard, or up in attics. While our advice below will help you understand and identify dry rot, you should be aware that it is likely to be found in these areas.
A musty odour is one of the first signs of dry rot, which may be rather unpleasant. If you've heard anything like this before, you should probably investigate about your property for any of the warning signs listed below:
- Dry rot-damaged wood will often deepen in colour and become so dry and brittle that it can easily break or crumble. This happens because the fungus consumes the cellulose in the wood. In dry rot-affected lumber, cube-shaped cracking can be noticed.
- Concentrated Spore Dust - Dry rot spores can be found practically anyplace and pose little danger. If, on the other hand, fungal spores appear in concentrated patches of rust-colored dust, this is an unmistakable sign of active dry rot.
- When dry rot spores come into touch with damp and humid timber, they begin the process of forming hyphae. Hyphae are distinguished by their white or grey colouring, which resembles spider silk.
- Mycelium is a cotton-wool-like mass formed by dry rot when the fungus spreads from wood on which it can no longer feed. Mycelium is a grey or white substance. If you see mycelium that appears to be caused by dry rot, you must act promptly to correct the problem or it will almost surely worsen.
- Mushroom-Looking Fruiting Bodies The final stage of dry rot's lifecycle is the most visually appealing: the fruiting body that resembles a mushroom. When dry rot needs to pump new spores into the air in order to find more timber, it will produce these fleshy masses of fungus that resemble gigantic rust-colored mushrooms.
We have an entire webpage dedicated to exhibiting images of dry rot, which you are welcome to peruse if you need help identifying it. On the other hand, if you recognise any of the indications or symptoms stated above or on the images page, we strongly advise you to consult with our experienced team to determine whether or not you require dry rot therapy. These signs and symptoms can be found on any page.
What Causes Dry Rot?
Dry rot in your lumber suggests that it has been dampened in some way. There are two possibilities for why this has happened:
- Your old house had unkilned wood. Interior building requires kiln-dried lumber with a moisture content of 20% or less. Clay roof tiles on older homes may not be water-permeable. Older homes may have substances that don't meet Standards, allowing water to seep into the wood.
- Moisture has entered your lumber as a result of a wet situation.
It is probable that any dry rot that colonised on your lumber while it was moist will remain, despite the fact that your damp problem was rectified as previously stated. If your lumber is subjected to Rising Damp, Penetrating Damp, or any of the other types of wetness that can affect a home, it may be wrecked. Dampness can also be caused by chimney and roof flashing damage.
If you have never had a damp problem in your home but are concerned that you may have dry rot, this is an indication that you do, in fact, have a damp problem somewhere in your home. If your lumber becomes damp again, any treatments you employ will be rendered ineffective since they will be diluted by the water, allowing the fungus to colonise your wood once more. Before you begin treating your dry rot, you must first ensure that any damp issues you have are handled.
How To Save Rotting Wood
Steps:
- Using a screwdriver or a chisel, you can dig out the decaying material and uncover the solid timber that lies behind it. It is advised that you hire a specialist to repair structural (load-bearing) timber damage.
- A thick layer of wood hardener applied to the exposed wood will protect it. This will help to keep the wood from deteriorating more in the future. Because some wood hardeners are both toxic and flammable, it is critical that you work in a well-ventilated location.
- Multiple screws should be driven into the afflicted area to provide appropriate support for the patching compound. The distance between each pair of screws should be about one inch, and the screw heads should be about one-quarter inch below the surface of the board.
- After mixing, the patching compound should have the consistency of peanut butter. When it is ready to use, it will take between 5 and 15 minutes to dry.
- Apply some form of repair substance to the damaged area. Apply enough compound to completely fill the hole, and then smooth up the surrounding area to reduce the amount of sanding required later. In some cases, it may be required to build a mould to maintain the compound in its intended spot while it cures. Cover the compound with wax paper, then clamp a flat board over it. That's the end of it.
- After the mixture has dried, sand it until it is smooth. After that, the compound should be primed and painted, and any damaged trim should be replaced.
Tips On Saving Rotted Wood
Whatever the case may be, rot requires some level of oxygen to breathe and continue creating germs and microorganisms that degrade the quality of the wood; we intend to put an end to that, as well as much more.
Polyester Filler
To smother the source of the rot and so eradicate the problem, we can use polyester filler instead of wood. After the wood has dried, you will detect fractures or splits, which are openings that go directly to the source of the problem. Any remaining rot can be confined with a small amount of filler, which also ensures that there is no oxygen for the rot to feed on.
Polyester filler, in addition to being a fantastic choice, is excellent for restoring the stability of wood. It sands quickly and paint clings to it just as well as to sheetrock or wood. To speed up the drying process, make sure there is adequate air circulation.
Chip And Salvage
Although this is not the ideal way to approach the subject, it is incredibly efficient and will ensure that no trace of degradation remains. You'll need a wood chisel and a mallet for this project. Start with the largest chisel and work your way down to remove the decaying portions.
You won't be able to use the chippings for anything, but you will be able to determine how far the rot entered in the first place. Even though the news isn't ideal, the good news is that you won't have to rely on bad wood in a project as you had intended.
Belt Sand It Away
Belt sanders are very effective in reducing the thickness of multiple layers of wood in a very short amount of time. Reduce the size of any rotting areas by grinding them down with your belt sander while wearing a face mask, of course.
Similar to our second choice, it will reveal the extent to which the rot has spread and advise you as to whether or not it can be saved. It is important to keep in mind that using this procedure might quickly deplete your supply of belt sandpaper. If you want to recover a large quantity of potentially rotten wood at once, you should ensure that you have sufficient supplies before you begin.
Use An Epoxy Sealant
The remaining deteriorating wood should be removed, and the rest of the space should be coated with epoxy resin. When epoxy is coupled with a bonding agent, it hardens to a degree that is somewhat greater than that of wood and latches onto the remaining timber's wood fibres. In this way, it doesn't feel like a distinct segment clinging to life; rather, it appears to be a part of the wood itself.
To establish uniformity with the rest of the wood, allow it to dry for an extended period of time before chipping away any leftovers. If you want to get it to the right size, you can use a wood planer to cut it down.
Wood Patch
Wood may be extremely expensive, especially when looking for boards that are at least 1 inch thick. You don't have to chip away at it or throw it away entirely. A wood patch can be used in place of a cutting board, and the construction is nearly identical. First, with a circular saw, cut out an area slightly larger than the spot where you believe the rot is. The chosen region should be slightly greater than the site.
Using those measurements, obtain a replacement piece of wood for the damaged one. It is critical to use a significant amount of wood glue in this step.
It should be coated consistently, and it should be applied to the rest of the mainboard with a clamp. You shouldn't just splatter it on the surface. Chip away any excess adhesive when it has cured.
How Much Rot Is "Too Far Gone"?
If the item is mushy to the touch (a symptom of wet rot) and the wet wood muck can be removed with a single swipe of the hand, it is doubtful that it can be recovered. If more than about 20% of your wood has deteriorated, you'll have to make a difficult decision. You have two choices: remove the rotten section of the board and utilise what is left of it, despite the fact that it will be shorter, or replace it.
Because the rot spreads throughout the wood rather than manifesting itself in a particular corner or spot, identifying the damage is more difficult, and the damage is likely to be higher than was previously thought.

What's The Difference Between Dry Rot And Wet Rot?
Dry rot is caused by a different fungus than wet rot. It is typically easier to treat than other varieties of fungi since it cannot cross dry sections to reach other timber and is confined to the damp timber area where it first invaded.
Wet Rot can colonise wood with a higher moisture content than Dry Rot, so if your wood is damp and then dries out, Wet Rot will stop colonising it. Dry Rot, on the other hand, can colonise wood that is less damp (as it is too dry for it). Dry rot, on the other hand, will eventually colonise the area once it reaches the "dry" state required for it to do so.
What Is The Best Dry Rot Treatment And Repair Method?
There are a few different techniques to treating and restoring dry rot-damaged wood. It is critical to remember that if there is any sign of a damp problem in your home, you must first locate the source of the problem and remedy it before treating and repairing dry rot damage.
There's no point in adding more water if it's only going to dilute the chemicals you used to cure the problem in the first place. After all, each of these substances is water-soluble and capable of penetrating moist brickwork and wood.
If you are positive that the deterioration is limited to exposed timber, commonly known as exposed joists, you will need to treat not only the timber but also any masonry with which the joists come into contact.
Conclusion
Dry rot is a fungus that, if allowed inside, can severely weaken or destroy any wood structures. Preventative measures and early diagnosis are more efficient than treatment administered after the fact. Here, we detail the signs of dry rot, the treatment for it, and the repair of infected wood. Even if no visible fungal bodies are present, dry rot may still be present inside the wall. As wood decays, it releases an odour that is both unpleasant and intriguing.
In the case of dry rot, the mycelium is able to grow and spread throughout the wood because the moisture content has dropped to an extremely low level. Dry rot is more likely to manifest itself in unseen areas of a property. One of the earliest indicators of dry rot is a musty odour. Wood that has been damaged by dry rot darkens in colour and becomes so dry and brittle that it easily cracks or crumbles. Dry rot is a symptom of damp problems, so if you're worried about it and you've never had a damp issue before, that's a good sign.
Those who recognise any of the signs or symptoms described above or depicted on the pictures page are urged to get in touch with our expert staff to find out if dry rot therapy is necessary. To chip away at rotten wood, you'll need a wood chisel and a mallet. Suppress the moisture that promotes rot with polyester filler instead of wood to permanently fix the issue. Polyester filler is great for fixing drywall or drywall and restoring the stability of wood. Planks of wood at least an inch thick can be quite pricey.
You can just use what you need from it and not waste the rest. If you don't have a cutting board on hand, you can use a wooden patch instead. You'll have to make a tough call if more than 20% of your wood has deteriorated. You can either salvage what you can from the rotten board or buy a new one. Dry rot damage to wood can be repaired using one of several methods.
Content Summary
- Dry rot is a fungus that, if allowed inside, can severely weaken or destroy any wood structures.
- As is the case with most problems that threaten your home's structural integrity, prevention and early detection are much more effective and simpler than treatment after the problem has already developed.
- A type of wood-eating fungus known as Serpula lacrymans, or dry rot, develops and spreads by metabolising cellulose in wooden structures.
- Dry rot requires immediate attention from a specialist in order to avoid serious consequences.
- Both wet and dry rot require water to start growing, but the latter can quickly spread far beyond its point of germination.
- The sporophore, which resembles a mushroom cap, is a telltale sign of dry rot.
- Dry rot can only take hold in conditions where there is more moisture than is normal.
- The fungus is to blame for the decay because it consumes the cellulose and hemicellulose in your lumber, sucking the moisture out of the wood and leaving behind a dry, brittle "skeleton."
- Because it doesn't eat brick, rot won't harm the structure; it'll just seep through it.
- Wall decay may have already occurred if dry rot has already set in, even if no visible fungal bodies have yet to appear.
- Before attempting a solution, you must first ensure that you have correctly identified the problem.
- The presence of a fungus, indicated by the appearance of a snow-white film on certain areas, will lead to the decay of the wood.
- Age of the damage will determine the wood's colour and character.
- It is safe to assume that your wooden beams are not waterlogged if the exterior does not show any signs of moisture or damp spots.
- If you press your fingertips against the wood's edge and feel a depression as a result of the pressure, this is a very concerning sign.
- Smell Rotting wood gives off a strong, unpleasant odour.
- Smell the wood closely if you think it has been affected by wet rot.
- On the other hand, if it smells bad, you can be sure that it is rotten and will need to assess the level of decay.
- Signs That You're Dealing With Mycelium Unique among fungal growths is the mycelium.
- If you find this in a hidden area of your floor or wall, dry rot has probably already taken over from the wet rot that was there.
- This occurs when the wood's moisture level drops to an extremely low level (it should be around or slightly above 7%), giving the mycelium enough time to grow and spread throughout the wood.
- As an alternative, you'll learn how to restore decayed wood so that it looks nearly as good as when it was first made.
- Tips for Recognizing Dry Rot Dry rot can cause significant damage to a building, so finding it early is essential for mitigating losses and keeping repair costs low.
- Under floorboards, behind plasterboard, and in attics are some of the most common places for dry rot to be hidden.
- Our guidance in the following section will assist you in recognising and figuring out dry rot, but you should be aware that it is prevalent in these places.
- One of the earliest indicators of dry rot is a musty odour, which can be unpleasant.
- Dry rot spores form hyphae when they come into contact with wet or humid wood.
- Dry rot-looking mycelium necessitates prompt action, as the condition will only get worse if left untreated.
- Structures that bear fruit that resemble mushrooms The mushroom-like fruiting body that appears at the end of a dry rot infection is its most striking stage.
- However, if you notice any of the signs or symptoms described above or on the pictures page, you should talk to our knowledgeable staff about whether or not you need dry rot treatment.
- It's a good sign that you have a damp problem somewhere in your home if you're worried about dry rot even though you've never had one before.
- It's important to take care of any moisture problems before beginning dry rot treatment.
- When dealing with structural (load-bearing) timber damage, it is best to have a professional take care of it.
- The exposed wood can be protected by applying a thick coat of wood hardener.
- Screws should be spaced an inch apart, and their heads should protrude from the board by no more than a quarter of an inch.
- You should use enough compound to fill the hole entirely, and then buff the area to reduce the need for further sanding.
- After that, prime and paint the compound and replace any broken moulding.
- Inert Polyester We can use polyester filler in place of wood to suffocate the rot and thus fix the problem.
- Filler, in small amounts, can contain any remaining rot and prevent it from spreading by blocking off the oxygen it needs to thrive.
- For this task, you'll need a wood chisel and a mallet.
- Douse It With Belt Sand Belt sanders can quickly and efficiently reduce the thickness of several layers of wood.
- While protecting your face with a mask, grind down any rotting areas to reduce their size.
- Keep in mind that this method could quickly use up your belt sandpaper supply.
- To Seal With Epoxy If there is any rotting wood left, it must be taken out, and the area must be coated with epoxy resin.
- Use a wood planer to reduce the size to the desired specifications.
- If you don't have a cutting board on hand, you can use a wooden patch instead.
- Start by using a circular saw to remove an area that is slightly larger than the suspected rot.
- Get a new plank of wood cut to those specifications to replace the old one.
- This step requires a substantial amount of wood glue.
- If the object feels soft when touched (a sign of wet rot) and the wet wood muck can be wiped away with a single swipe of the hand, it is highly unlikely that the item can be salvaged.
- You'll have to make a tough call if more than 20% of your wood has deteriorated.
- You can either cut out the rotten section and use the rest of the board, which will be shorter, or you can buy a new one.
- Dry rot damage to wood can be repaired using one of several methods.
- The first step in treating and repairing dry rot damage is identifying its cause if there is any evidence of a damp problem in your home.
- If you know for sure that the rot is only in the exposed timber, also known as exposed joists, you should treat both the joists and any masonry they touch.
Frequently Asked Questions About Rotting Wood
Product Details. Bondo Rotted Wood Restorer will solidify soft and spongy wood by penetrating the wood surface to create a solid base and stop the rot quickly. Wood rot is a common issue for most homeowners, regardless of where they live. It can be easily repaired with this restoration product.
Wet rot needs a lot of moisture to grow, while dry rot can continue to spread regardless of whether the infected area is wet. Fortunately, this means that wet rot often confines itself to those select, damp areas.
Unlike many other wood-destroying fungi, dry rot can readily grow over and through porous masonry provided that there is a nutritional source (wood) from which it can spread; this ability allows the spread of the fungus from one area to another.
Wet rot treatment stops the source of moisture, causing the wet rot fungus and drying out the surrounding areas of the infestation. If this process is successful, future regrowth of wet rot will have been prevented.
Dry Rot Damage Repair Process: The dry rot repair process has six steps: Remove Dry Rot, Spray Fungicide, Apply Wood Hardener, Replace Damaged Wood with Epoxy, Sand Surface Smooth, Protect with Exterior Acrylic Primer and Paint.