
Finding where a leak in the ceiling is coming from is like solving a puzzle. The process of identifying the source of the water supply into the house may seem elementary at first, but it can be a bit of a trial and error affair. The best way to find out what's causing the leaking in your ceiling is to investigate the area carefully and rule out the most obvious possibilities.
Missing shingles, broken metal flashing on chimneys and exhaust fans, and pinholes in the roofing material can all lead to water damage in the home. Leaks can be difficult to locate because water may first seep through the roof deck and rafters before pouring onto ceiling below.
What Exactly Is Leak Detection?

As was mentioned before, the most challenging aspect of repairing a leaking roof may be locating the source of the leak. Because water enters the roof in one spot and travel to this other position before beginning to seep into in the walls or ceiling, pinpointing the precise location of the roof leak can be challenging.
Clearly Visible Indications Of A Roof Leak
Unless you routinely inspect the attic, you probably won't notice a roof leak till it has already done significant damage to your home's interior.
Seeing water damage in your ceiling or walls is the most telltale sign that you've got a roof leak.
Minor discoloration (usually black, brown or yellow) or warping of a materials on your ceilings or walls may indicate water damage (e.g. warped wallpaper).
The two factors may interact to produce the final result. It's usually water damage that's been building up over time if the damage manifests as more severe warping or discoloration.
Long-term water damage poses numerous concerns, both to the building's structure and to people's health.
If water damage has occurred to your ceiling or walls, the structural integrity of your home has been compromised. Ceilings and walls with serious water damage may eventually rot away or possibly collapse.
Health problems might arise from mould that grows in areas where water damage has occurred. Conditions including asthma, hay fever, allergies, chronic cough, skin rashes, sinus problems, frequent sneezing, and exhaustion are all on the list.
Whether you're concerned about the roof's structural integrity or the inhabitants' health, a leaky roof is an emergency that has to be fixed as soon as possible.
How To Find The Cause Of A Roof Leak
It's not as easy as spotting a wet spot on the ceiling to figure the source of the leak was coming from. Often, the wallboard and paint will be stained and damaged in a different place than the initial leak. If water gets into your roof place at a single end of the house, it can slowly make its way down through the insulation and eventually find a weak area in the ceiling.
Walk around outside and check the condition of your roof. Check the upper sections of the roof first, as these will be far from the source of any leaks or water damage inside. The source of the leak may be found in a damaged section of your roofing, tiles, corrugated steel shingles or sheets. Water marks on exterior walls could also be visible under the eaves. This may indicate that the flashing was damaged and will require maintenance or replacement.
After you've looked around the outside, it's time to take a closer look at your home's inside and roof. Look for flaking paint, water marks, and discoloured spots (yellow, gray or brown) on the ceiling. All of them indicate a roof leak. With a flashlight in hand, investigate the interior of your attic or roof. If you see mould, water stains, or moist rafters or beams, you may have a roof leak and can trace the water back to its source.
- To start, look for the source of the leak inside the house. Verify that the roof is leaking and that the water damage within the house is not the result of a problem with any other part of the house. Plumbing, roofing scuppers, roof drain, HVAC systems, and humidity are among potential leak causes.
- If a problem with the roof is suspected, the leak can be located by taking measurements from two known locations inside the home. These fastenings should be perpendicular to any exterior walls, chimneys, or other features that penetrate the finished ceiling and continue on to the attic or roof.
- Using the readings you took from the interior of your home, investigate the attic to pinpoint the area of roof deck where the leak is occuring. Examine the source and location of the current leak. Once you're up in the attic, you may need to widen your search area because the true entry point of a water into in the attic room may not be exactly where its leak is appearing on the inside of the home.
- Take readings from two known locations to pinpoint the exact spot where water is penetrating the attic. Try to find anything that won't move, including bathroom exhaust fans, chimneys, and vents. If you can't find any nearby roof openings, you can use the width and length of two outside walls that are parallel to each other as a substitute.
- Get up onto your roof in a secure manner and use the measurements you took up there to get the exact dimensions of the roof. If your measures were dependent on the position of exterior walls, you will need to make adjustments to account for the depth of exterior wall system and soffit overhangs.
- Determine the general area where water is getting into your attic. From the pinpointed source of the leak, expand your search in ever-widening circles. Remember that any hole in the roofing system is a potential entry point for water while you inspect the roof. A roof leak will occur is if roofing material have any gaps or cracks that allow water to enter the building envelope of your property.
The cause of some seepages may be readily apparent. For the rest, you'll need a keen eye, maybe a yard hose, and some detective work. If you're not confident in your roof-walking skills, you can have any service provider in your area inspect the roof for free. Finding the tiniest leak might be just as challenging! Consider the following advice for locating that annoying roof leak.
The Shingles Field
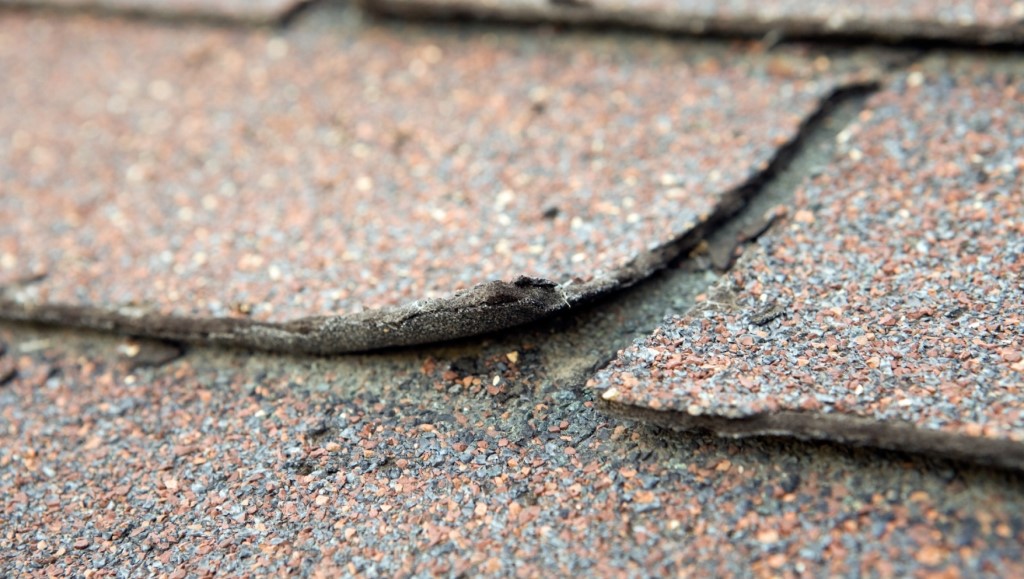
The roof field could be the source of the leak if the roof is quite old. The area covered by slate, shakes, or shingles. If your roof is made of asphalt, you can safely walk on it. Slate, concrete tile, and clay tile, on the other hand, may not have been so forgiving.
Walking on a roof might cause cracks, so tread lightly. In the case of conventional shingles, you should inspect the ridges of the vertical cutouts. Check for any granules of the wrong colour. Specifically, you should search for breaks. Maybe a nail worked its way out of the shingles. Don't rush things; rather, look around.
Valleys
A valley is the intersection of two roof planes. Metal flashing and rolled roofing are just two examples.
In other locations, the shingles are simply laced together. If the shingles are not trimmed properly around the valleys, it might lead to serious issues. A shingle with a chisel tip is the result of trimming it to fit a valley.
The water can run over the crest of the shingle and enter your home if a second cut is not performed to form this point like such an arrow point. This second cut is really easy to create and the instructions are on the shingle package.
Flashings On The Head Wall
In some cases, a roof abruptly ends at a solitary wall. Water running down the wall should be diverted away from where the shingles end, and this is accomplished with metal flashing. In some cases, the flashing may be concealed behind the siding, while in others it will be exposed in front of the brick.
If possible, the flashing should be at least two or three inches longer than the shingles. If the wall is made of brick or another type of masonry, then flashing must curve and extend one inches into the a mortar joint.
Nothing of the sort, including tar, caulk, or roof cement, should ever be utilised in conjunction with all these supplies. The presence of them indicates an attempt to repair a leak.
Flashing On A Wall Step
Sometimes the flashing around the steps of a roof will corrode and allow water in. These flashings are installed at the point where a roof slopes up next to a wall. Step flashing is put over the shingle adjacent to the wall after each row is laid.
One end of the flashing is exposed on the wall, while the other is hidden by the shingles above it. Check these flashings for signs of rust or holes. If all goes according to plan, you will only be able to make out a tiny fraction of these brief illuminations.
Chimneys
Lots of leaks can be traced back to these. There are four distinct kinds of flashing seen in chimneys. Unless everything is in proper working order, water will leak in. To add insult to injury, the counterflashing that is set into the mortar between bricks must remain undamaged.
Water can leak beneath flashings even if just a little fracture appears above them. Keep an eye out for holes in the flashing or damaged solder at the corners. It is not recommended that caulk be used to fix these flashings.
Flashings For Plumbing Vents
Many modern aluminium vent flashings also feature a rubber seal. In less than 10–15 years, the rubber may start to degrade. Examine the pipe's rubber enclosing for signs of cracking. From the centre of the plumbing vent, the flashing must swim up and underneath the shingles that run up the roof. The flashing's underside must be visible so that it can protect the shingles.
B-Vent Or Furnace Flashing
There is no discernible difference between these flashings and the ones used in the plumbing industry to cover vent openings. On occasion, however, they will have a steel storm collar. Simply wrap one of them around the pipe system protruding from the roof, and you're set. Leaks can be caused by loose storm collars.
Leaks From Ice Dams

The inhabitants of extremely cold regions are particularly vulnerable to the problems caused by ice dam breaks. Though if your roofing is in good condition, these leaks can still occur. When ice dams form, they prevent rainwater from freely draining off a roof. When this happens, water can get trapped below flashings, shingle, tar paper, and the like.
The water might trickle into the house for days after it has already started to flow. Membranes installed beneath the roof are the sole effective deterrent. A correctly built membrane will prevent water leaks but will not prevent ice buildup.
Leaks Caused By Wind
Strong winds can also cause rain to become a significant issue. Again, you might have a solid roof, but wind will still push water up and underneath the shingles or tiles. The ice dam membrane and tar paper are your sole defences.
Hem the edges if the metal is ridged. This implies that the valley's unobserved sides curve sharply by 180 degrees.
By doing so, a channel is formed that allows wind-driven rain to be redirected to the valley floor. Cementing under shingles on windward roof edges is recommended. A persistent wind gust of 70 miles per hour might do significant damage to your property.
Roof Leaks Occur!
Sometimes it appears as though you have a leaking roof, but closer inspection reveals that everything is alright. Condensation in the attic is a typical instance. Condensation and "rain" from high humidity can form in your attic. The underside of roof sheathing may also appear damp. If anything, you suspect a leak.
Splits in the summit of a chimney are not uncommon. The plaster inside the chimney begins to discolour or bubble. You have concluded that a roof leak is indeed the culprit. The siding may be missing from the uppermost part of a building. Water may seep in behind the flashings if this occurs. Seek out the cracks and look for the leaks!
Sources Of Leaks Other Than Your Roof
In the event of a roof leak, you have the option of repairing the damage yourself or contacting a roofing contractor.
A competent roofing contractor may still charge a diagnostic fee if you send them out to investigate a leak and they find that it is not related to the roof.
To protect themselves from this fee, homeowners should first investigate any alternative explanations for water seepage. Some of these are:
- The air conditioner is letting in outside air.
- Condensation
- Infestation by Pests
How To Check Your Roof For Water Leaks
Leaks in the roof can be checked in a number of methods, some more effective than others depending on the sort of roof you have, the tools at your disposal, and your level of comfort with house repairs.
Roof Leak Detection Using A Garden Hose
Using a garden hose to detect if and where water is leaking in from the roof is a common approach to check for leaks.
While you're inside, have a friend or family member run the hose across the roof near the spot(s) you think the leak is occuring.

To locate the source of the leak, begin by isolating the immediate surrounding region.
Soaking a single side of a skylight or chimney before moving on to the other top and the sides will give you the clearest picture where the leaks are.
You should be prepared to wait until you notice a drip, so set up camp for at minimum one hour and give each side a few minutes.
Discover a way to mark the place, move the hose upstream from leak to see if it remains, and do not be afraid to switch direction if you can't find the source of the leak right away when you or your helper notice a drop or leak inside.
You (or your assistant) should stay inside near where you think the leaks may well be occuring and check for drips or wetness to appear; then, you can guide the hose's stream to go in different directions upstream of the leak unless you discover the source.
If you or your helpers have access to the roof, remove shingles in the suspect region to find the cause of the leakage and the precise locations where repairs are needed.
Water damage, rot, or at worst discoloured felt paper will be visible next to the leaking rook.
Finding a leak in this way is very simple, but the specific methods you use will depend on your roof, your access to the roof, your knowledge of home repairs, and the availability of qualified workers.
Remember to identify the spot where the leak is and to measure the area with a measuring tape once you've discovered it and gathered the necessary materials to fix it (Using the plastic sheeting technique mentioned in one of the next sections, this is especially beneficial).
Whether you're covering the exterior of your roof with plastic sheeting, plywood, or shingles, you can use these measures to get an accurate idea of how much material you'll need.
Why Do I Require This?
Flooding, stains, collapsed ceilings and walls, and ruined possessions are just some of the problems that can arise from roof leaks that go unchecked.
In the event that a leak in the roof is discovered, it must be repaired immediately. This may need replacing a few tiles or a few metal sheets, or it may be a symptom of a more serious problem with your roof.
There has been a steady worsening of the leaks. As soon as you discover its position, you must act. Fortunately, a small roof repair is often all that's needed to stop the leak. Changing a roof's shingles is an illustration. However, if you feel unsafe doing so, or if the leak appears to be extensive, don't be afraid to call in the experts.
Conclusion
Because water can enter via the roof deck and rafters before falling to the ceiling below, pinpointing the source of a roof leak can be challenging. Water leaks can be caused by missing shingles, damaged metal flashing on chimneys, or pinholes in roofing material. Ceiling or wall materials that are bowed or buckled may be a sign of water damage. Look for water damage or leaks in the home's roof and interior. A roof leak might be indicated by the presence of mould, water stains, or discoloured patches on the ceiling.
Taking readings from both inside and outside the house allows you to locate the source of a leak. Leaks can be caused by plumbing, roof scuppers, HVAC systems, and even humidity. Get the precise dimensions of your roof by measuring it. You may confidently put your feet on an asphalt roof. Potentially less forgiving flooring materials include slate, concrete tile, and clay tile.
Chiseled ends arise from cutting shingles to fit in a valley. Metal flashing and rolled roofing are just two types of roof planes that can meet at an angle to form a valley. Issues may arise if the shingles are not trimmed appropriately around the troughs. Today, a rubber gasket is often included in the design of aluminium vent flashings. Rubber may begin to disintegrate in less than 10–15 years.
The only things you have to protect yourself from flooding are tar paper and ice dam membrane. It is advised to use cement under the shingles on the roof's windward edges. There are several methods you may use to look for water leaks in your roof, and the most reliable one will be determined by the type of roof you have. It is usual practise to use a garden hose to see if and where water is entering through the roof. Taking precise measurements of the affected area with a measuring tape is the most reliable method for locating a leak. Don't be shy about getting professional help if the leak seems serious.
Content Summary
- Locating the source of a ceiling leak is a lot like putting together a jigsaw.
- Finding the water main that supplies the house can seem like a simple task at first, but it often requires a lot of trial and error.
- Investigating the region thoroughly and eliminating the most likely causes is the best way to determine the source of the ceiling leak.
- The previous discussion suggested that finding the actual leak could be the most difficult part of fixing a leaky roof.
- The most obvious symptom of a roof leak is water staining on your ceiling or walls.
- In the event that water damage has occurred to your ceiling or walls, the stability of your home has been threatened.
- Finding the source of a leak isn't as simple as looking for a damp area of ceiling.
- It's a good idea to take a stroll outside and look at your roof from different angles.
- Because they are farthest from the source of any leaks or water damage inside, the top areas of the roof should be checked first.
- Check the ceiling for signs of peeling paint, water stains, and discoloration (yellow, grey, or brown).
- Those are all signs of a leaking roof.
- Explore the inside of your roof or attic with a flashlight.
- First, investigate the interior of the house for the leak's origin.
- First, be sure the roof is leaking and that the water damage within the house is not the result of a problem with another portion of the property.
- If you have taken readings from inside your home, you can use these to help you find the spot on the roof deck where the leak is coming from.
- Find out where and how the current is escaping.
- Because the source of a water leak in the attic may be different from where it is visible on the interior of the house, you may need to expand your search area once you reach the top of the house.
- Take measurements in two established spots to zero in on the source of the water in the attic.
- You may determine the actual size of your roof by climbing safely up there and taking measurements.
- Trace the water's path to the attic's entry point.
- Your search should radiate outward from the identified leak's origin.
- While checking the roof, keep in mind that any openings you find could allow water to seep inside.
- If you're not comfortable walking on the roof, any local service provider will do so for free.
- In order to find the source of that pesky roof leak, think about the following suggestions.
- If the roof is fairly ancient, the leak may originate in the roof field.
- Traditional shingle inspection focuses on the ridges of the cutouts in the roof's vertical planes.
- When two sloping roofs meet, the result is a valley.
- Rolled roofing and metal flashing are just two examples.
- Issues may arise if the shingles are not trimmed appropriately around the troughs.
- Chiseled ends arise from cutting shingles to fit in a valley.
- It is not uncommon for a roof to finish in a single wall.
- Metal flashing is used to direct water away from the eaves and away from the wall where the shingles terminate.
- The flashing should extend beyond the shingles by at least two or three inches.
- A leak has been attempted to be fixed if they are present.
- Corrosion of the flashing around a roof's stairways is a common cause of leaks.
- When a roof rises up to meet a wall, that's where you put these flashings in.
- The flashing has one end that is visible on the wall and the other that is covered by the shingles.
- Look for rust or holes in these flashings.
- The flashing around a chimney can be one of four different styles.
- Check the soldering and flashing for any damage, especially around the corners.
- Today, a rubber gasket is often included in the design of aluminium vent flashings.
- Check for cracks in the pipe's rubber encasing.
- The flashing has to work its way up the roof and under the shingles from the vent's centre.
- These flashings are indistinguishable from the ones used in the plumbing business to seal off vent apertures.
- On rare occasions, however, they will have a steel storm collar.
- Storm collars that are too loose can cause leaks.
- The people who live in extremely cold areas are especially at risk when ice dams break and flood the surrounding areas.
- These leaks might happen even if your roof is in good shape.
- Ice dams are obstructions to the free flow of rainfall off a roof.
- The only things standing between you and the ice are the ice dam membrane and the tar paper.
- Roof sheathing's underside could also look wet.
- What you're really thinking is that there's a leak somewhere.
- You've determined that a roof leak is the root of the problem.
- Find the holes and check for the water!
- Other Places Water Can Seep In To Your Home If your roof springs a leak, you can either fix it yourself or hire a professional roofer.
- Using a Garden Hose to Find a Roof Leak It is usual practise to use a garden hose to see if and where water is entering through the roof.
- First, seal up the immediate area to narrow down the potential leak's origin.
- You can determine the source of the leak and the exact spots where repairs are needed by removing shingles from the roof in the area of concern.
- Leak detection using this method is straightforward; however, the approach you take will differ depending on the type of roof you have, your level of comfort climbing onto the roof, your familiarity with house repairs, and the availability of skilled labour.
- After you've located the leak and gathered the tools and supplies you need to remedy it, make sure to mark the precise location of the problem by measuring the affected area with a measuring tape (Using the plastic sheeting technique mentioned in one of the next sections, this is especially beneficial).
- Whether you choose to use shingles, plywood, or plastic to cover your roof's exterior, these dimensions will give you a good sense of how much of each you'll need.
- If a roof leak is noticed, it must be fixed without delay.
- This could be a sign of a more serious problem with your roof, or it could simply require the replacement of a few tiles or metal sheets.
- The leaking has gotten steadily worse.
- A minor patch to the roof is usually all that's required to fix the leak.
Frequently Asked Questions About Leaks Roof
Detecting a leak on a tile roof with sarking usually means searching upstream of the leak that appears on the ceiling. When you lift the tiles out – there should be telltale signs (water streaking) on the sarking. Then it is just taking more tiles out until you find where the roof leak comes from.
All you need to do is take a putty knife and apply a liberal layer of roofing tar or bitumen paint to the leaking hole. Then, press a shingle to the tar or paint and spread more around the edges. This will help to keep it in place.
There are quick ways you can make an emergency roof repair:
- Use a tarp to stop the leak.
- Use roofing cement to patch the roof or flashing.
- Use silicone or caulk to stop the leak.
- Utilise a Rubber Sealant Coating to Stop the Leak.
- Use Roof Flashing to Cover the Leaking Area of the Roof Temporarily.
- Replace shingles.
Before you panic or get too concerned, know that repairing a minor roof leak can be quite simple and you may even be able to do it yourself – tracking down the leak is the hard part, but the repair itself can be pretty easy.
Roof leaks during heavy rains may indicate the end of the shingles' life. Metal corrosion. Cracks in metal and corrosion around fasteners can create enough space for water to leak. Over time, expansion and contraction can loosen the seams in a metal roof.