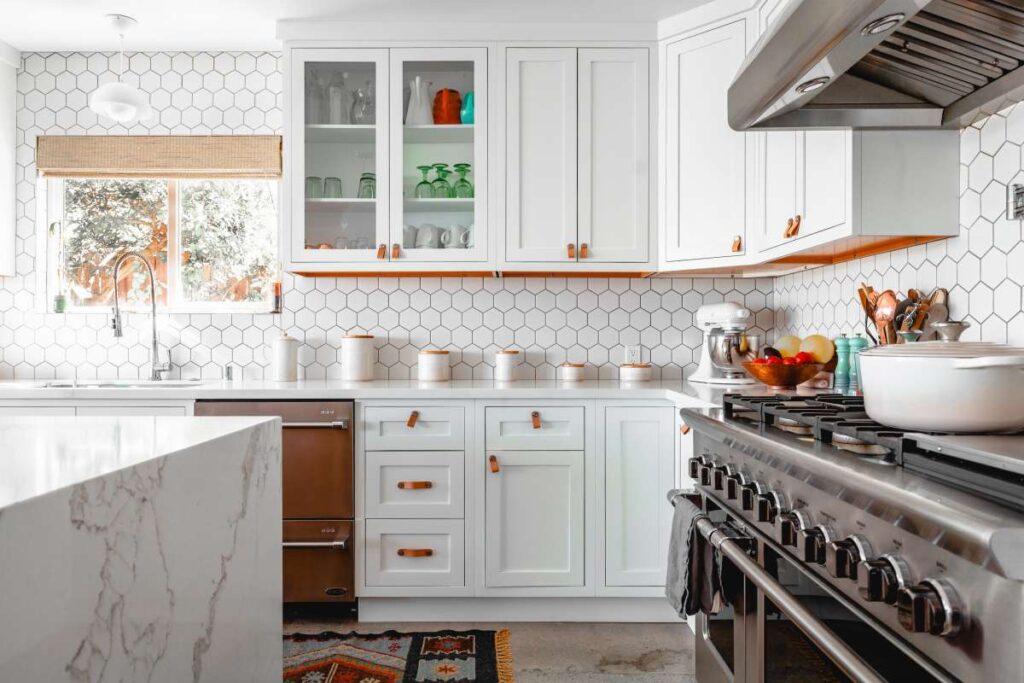
Old, worn out cabinets can be modernised to looks brand new. The doors and hardware on your old kitchen cabinets can be easily replaced, and this article will show you how.
Refinishing Kitchen Cabinets: What You Need To Know
Scrub All The Tables And Counters.
Clean your kitchen cabinets thoroughly before attempting to refinish them. You can achieve this by carefully removing the cabinets from the walls, wiping them down, and then giving the wood plenty of time to dry out.
For simple reassembly afterwards, they recommend labelling or numbering the cabinet doors. If you plan on painting or sanding, take special care not to remove the marks. Doors should fit snugly into their designated slots, and they should have matching hinge-hole patterns.
Keep The Kitchen And Yourself Safe.
Drop cloths should be used to protect the countertops, appliances, and flooring from spills. You should always wear gloves and eye protection when working with any kind of wood cleaner.
Submerge The Equipment.
Given the importance of this task, it is suggested that the hardware be soaked in a large basin of soapy water for at least half an hour before being cleaned. Quickly scrub them with a soft brush before rinsing them in water. After you're done washing the hardware, let it dry completely in the air. After that, shine them up and let them dry again.
Refinish And Strip Your Cabinets.
Cabinet stripping is the next step, and depending on how well you've prepared, it can be a challenging one. First things first, get yourself to a place where there is plenty of fresh air, preferably outside. First, you'll need to determine the type of finish currently on the wood to know which stripping agent will work best on your cabinets.
You can remove wax from wood by applying a few drops of turpentine to the surface, as in the case where you suspect the cabinetry has a wax finish. Assuming the solution can be dissolved, you've found the correct solution.
There are many different types of finishes available, such as shellac, lacquer, paint, vinyl, polyurethane, varnish, penetrating oil, and water-based finishes; each of these has its own protocol for removal and upkeep.
Prepare a plan for refinishing your cabinetry, and then carry it out by using the proper stripping agent on the wood. Verify the functionality of all components by trying them out in a hidden area, and always use the necessary safety gear when doing so.
Sand, Prime, And Paint The Wood.
After you're done with the stripping agent, use wood filler to fix any holes or scratches in the wood, and then sand the patch lightly to smooth it out. The remaining cabinetry will also require sanding, and as was mentioned before, this is a task that is best carried out in the fresh air. Finally, paint the cabinets, keeping in mind that the wood may expand and contract depending on the weather. Unfinished wood that has been exposed by the elements should be refinished.
Paste wax should be applied to cabinets that have already been treated with penetrating oils. The wax will not only increase the finish's durability but also improve its aesthetic appeal. Carefully replace the cabinetry in your kitchen, taking close attention to the hinges, when the paint has had enough time to dry. Completing this task without assistance is no easy feat, so if you manage to pull it off, you should use this chance to congratulate yourself on a job well done.
Consider This Before Investing In New Cabinets
Before
It may seem hopeless, but a brand new kitchen can be made by simply replacing the cabinet doors and having the boxes enamelled. This will prevent you from having to replace everything, which would have been a very costly undertaking.
To your amazement, updating your kitchen to look more current doesn't require tearing out your existing cabinets and performing a major remodel. Cabinets can be given a whole new look for far less than the cost of new ones by simply being repainted and having new doors put on.
The old cabinet doors were removed, and then the cabinet frames were painted with a black oil paint in a satin finish to give the room a more dramatic feel. Subsequently, we changed them out for new, slightly bigger cherry panel doors that included concealed hinges. The doors were placed closer together, and there was less clutter caused by the lack of hinges, all of which contributed to a more modern aesthetic.
Our kitchen's design is an eclectic mix of classic and modern features that complements a wide variety of architectural types, but these methods may be used to create any appearance you can imagine. Our kitchen design is an eclectic mashup of modern and traditional components, giving it a clean, modern aesthetic that complements a wide variety of architectural styles.
Consider ordering flush doors for a modern and streamlined look, or raised panel doors for a more traditional look. Learn how to paint your cabinets for a smooth, long-lasting finish, and get tips on finding and installing the right-sized hinges and doors.
Have You Been Waiting For This Project?
Despite the fact that refinishing kitchen cabinets is not as time-consuming or messy as a full kitchen remodel, it is still a sizable project that must be finished. As a result, you should set aside up to 4 weekends, put in a lot of physical work, and use your full brain power.
Even though there isn't a tonne of actual carpentry involved in making the cabinet doors fit, you'll still need a thorough plan and accurate measurements to ensure a good result. After that point, your perseverance will determine how the painting turns out.Spackling, sanding and cleaning will take up a large chunk of your time before you can even think about painting the kitchen cabinets again.
Aside from the paintbrushes, rollers, and other painting equipment listed below, you'll also need a handsaw, drill, a hot-melt glue gun, and a vacuum with a hose and an upholstery brush attachment.
We ended up buying eight drawer faces, sixteen cabinet doors, and a set of new hinges to reface the cabinets. We visited a store that specialised in stained glass materials in our area, and after looking at their exquisite selection, we decided on the "cross reeded" pattern. The renewal of the cabinets cost significantly less than purchasing brand-new ones would have. The price does not include the knobs and drawer pulls.
Tips For Simplifying An Otherwise Difficult Task When Purchasing Doors And Hinges
Measure New Doors And Drawer Fronts Carefully
Remove the doors by unscrewing their hinges. It's a good idea to label each drawer with a number before you take it out, as they'll be needed again. Changing the style of your cabinets by replacing just the doors is as simple as taking measurements and shopping for new ones that fit.
We are using concealed hinges that require 40 mm holes to be drilled in the back of the doors. Additional large doors to cover the cabinet front will need to be ordered to achieve the more contemporary look shown in the image.
However, ordering more doors of a larger size is not the only option. Due to the larger overlap between the door and frame than a standard hinge allows, a disguised "cup" hinge that fits into a 40mm hole in the rear of the door will need to be ordered. In order to accommodate the larger overlap between the doors and the frame, this special hinge will be necessary.
The hinge is attached to the cabinet's face frame with the help of a separate piece called a mounting plate. You can choose from a wide range of sizes for your mounting plate, from 1/4 to 1/2 to 5/8 to 3/4 to 1 to 1-1/8 to 1-3/8 to infinity. Each of these measurements is the desired overlap between the door and the face frame. Although there are a plethora of options, we settled on Blum Compact 34 hinges. Using the old cabinet's face frame as a template, you can easily determine the required measure and size of the new doors.
Masking tape half an inch wide can be used to show the space between doors and drawers. Careful measuring is required during tape installation because it will be used to determine final door and drawer dimensions. Utilize the masking tape to visualise the door openings and figure out the particulars before placing an order for the doors. It's up to you how far apart your doors are, but there are some things to think about before making that decision.
The hinges we used allowed for spacing as small as 3/8 in. between doors, but this level of precision was beyond the capabilities of the cabinets of yesteryear. The closer the doors are together, the more pronounced any differences in spacing between them will be. A half-inch was the choice we made. Spacing because it allowed us some room to "cheat" while still achieving the sleek, contemporary look we were going for.
It is a good time to replace your cabinets because you will soon be painting the frames and will have easy access to filling in seams and nail holes. To the left of the stove, we reduced the depth of the wall cabinets and built an open shelf just for cookbooks.
By taking out the cutting boards, we were able to add three-quarters of an inch to the height of the drawer fronts. To better align the doors of the cabinet above the range, add strips to the cabinet's face frame. After you're satisfied with the spacing and have double-checked the inner corners to make sure the drawers won't hit each other after the new pulls have been installed, it's time to take measurements and place an order for the doors and drawer fronts.
Find a cabinetmaker in your area or place an order with a business that specialises in building cabinet doors. Search for "kitchen cabinet doors" on the internet. The following step is to visit nearby cabinet showrooms and peruse literature about cabinet doors in order to select a door style that appeals to you.
If you want to use a specific brand of 40mm hinge on your cabinets, you should let the cabinet door manufacturer know. This service's high quality more than makes up for the small price hike. Buying a 40mm bit and using a drill press or jig to bore the holes will be very expensive options. The next step is to place an order for doors that can accommodate glass inserts.
Prizes for the door prizes will range in price from inexpensive to extravagant, depending on the materials used to make them. There may be a twofold price difference between oak and more exotic hardwoods like cherry.
Construction Methods For Doors
When compared to the older partial-overlay doors, which exposed the face frame, the full-overlay variety hides most of the building.
Helpful Hints For A Professional-Looking Paint Job
Prepare The Surface For Refinishing By Thoroughly Cleaning It.
Use a rag dampened in mineral spirits to wipe down the cupboards and remove any visible dirt. Then, give them a thorough washing using a solution of one part water and one part common ammonia.
Finally, rinse with fresh water and dry thoroughly. Using sandpaper with an 80-grit grit rating, smooth out any bumps and roughen the surface of the cabinets. You can start painting the room as soon as you place your order for new doors.
Add up to 6 ounces of Penetrol paint conditioner per quart of oil paint if it seems too thick or dries too slowly. A smooth paint job is guaranteed if you follow these steps. Two or three thin coats of paint are superior to one thick coat when it comes to durability and smoothness.
Work in well-ventilated areas at all times while handling organic solvent-containing products like shellac or alkyd paint, and always wear a respirator approved by NIOSH for organic vapours.
The primary requirement for a long-lasting paint job is for each coat to adhere to the one underneath it. If you take the time to score the wood with a knife to make an "X," and then adhere a strip of Scotch tape over the "X," you can rest assured that the original cabinet finish will remain firmly attached to the wood. After that, take the tape out and see if any of the coating comes off with it.
If that's the case, the surface must be stripped of its current finish before being painted. Clean and sand the cabinets to ensure a good bond with the existing finish. We settled on shellac as a primer due to its potential for tenacious adhesion to a wide range of finishes.
If you decide to use products other than those we recommend, be sure to read the manufacturer's guidelines and see if they are compatible. A professional-looking paint job begins with a smooth surface and continues to require a dust-free environment throughout the painting process.
It does not experience the same shrinkage that spackling does, sets in a shorter amount of time, and lasts longer. While you're at it, take your time sanding and use a bright light to check on your progress occasionally.
Start at the top and work your way down when painting the face frame of the cabinets once you've finished the inside. Put the paint on quickly, and then use long, gentle strokes to blend it out.
The rule of thumb is to begin in the unpainted areas and gradually advance into the painted ones. If you want to avoid brushing over paint that is only partially dry, work quickly and finish one area before moving on to the next.
Paint can be wiped off of surfaces that are out of reach (around a corner, for instance) with a rag that has been soaked in mineral spirits. Paint that develops a run or sag, or paint that has been contaminated by a hair or speck, should be allowed to dry completely before being sanded away and a new layer applied.
Quality Painting Requires High-End Equipment.
The tools necessary to complete a painting project to the highest standards are not something you can do without. They will also make the process less difficult and more enjoyable.
If you want to save time and money by finding the best painting tools and supplies in one convenient location, skip the home centre and lumberyard and instead visit a reputable paint store. Even though it will set you back a little bit more money, you will have access to the same tools that professionals use.
A 1-and-a-half-inch long flexible putty knife, as opposed to the type with a rigid scraper, will be needed to spread spackling on the thin cabinet frames and fill holes. The next step is to obtain a 3-and-a-half-inch long flexible knife. The end panels can be covered more quickly, and with fewer ridges to smooth out.
A rubber sanding block with a third of a sheet of sandpaper attached is the ideal tool for smoothing and levelling off spackle. Corners are much easier to sand with a fine-grain sanding sponge.
You couldn't use them as instruments, but they're about a gallon in size. A paint strainer is a must-have for a professional-looking paint job. You should stock up on a half dozen of these, as they serve only one purpose and can be discarded after being used once.
Pass the paint through the strainer into a new container before using it. This eliminates the possibility of colour lumps marrying an otherwise flawless paint job. You shouldn't use your best brush for shellac priming. While shellac does an excellent job of sealing, it is a huge nuisance to clean up after it has been applied. Choose a brush with a two-inch diameter, a mid-range price tag, and a good quality level if you want to accomplish this work properly.
Like any other fine tool, a high-quality paintbrush is a joy to use and, with proper care and maintenance, can last until the bristles are no longer usable. Mixed china and boar bristle brushes are reserved for the last stages of oil painting. This is the advice that the artists we consulted with gave us. These high-end brushes are equipped with paint-holding bristles that are both flexible and tapered to the ideal degree, allowing for the production of the light, feathery finishing strokes essential for flawless enamelling.
The face frames will require a 1-1/2-inch brush, while the flat panels will require a 2-1/2-inch brush. In order to avoid a collection of crusty, unusable brushes, make it a habit to clean them immediately after each use with mineral spirits (or with warm water and soap for paints that are water-based). Pick up a separate 2-and-a-half-inch-wide china bristle brush specifically for varnishing. If this isn't done, bits of dried paint could get into the varnish and ruin the look.
TIP
Mineral spirits can be disposed of by flushing them down the toilet or burying them. Paint can be reused multiple times if you let the solids settle to the bottom and then store the paint in an airtight container. Take the trash to the local facility for hazardous waste.
Concealed Door Hanging
To Complete The Doors
We recommend staining and sealing all cabinet and drawer fronts. Applying a pre-stain conditioner before staining pine, cherry, or birch may reduce uneven coloring. Use only products that are safe to be used together, and follow the label's drying time recommendations for each coat. We used polyurethane for the sealer, and in between coats we sanded the surface with a fine-grained sponge and sucked up the dust.
Use a brush with the finest quality china bristle when applying oil varnish or polyurethane. Remove any dirt or dust from the horizontal rails first, then the vertical stiles, and finally the flat panel.
It's a good thing you're good with a paintbrush now, because sealing the new doors is an essential step in the installation process. A possible solution would be to order prefabricated doors so that you wouldn't have to deal with finishing them yourself. We were ready to complete the doors after applying one coat of pre-stain conditioner, one coat of oil stain, and two coats of polyurethane varnish.
Pre-stain conditioners are useful for reducing the severity of blotchiness in cherry, pine, and birch, among other blotchy woods. Light sanding and vacuuming in between coats of varnish will ensure the smoothest possible finish. At this point, you'll finally find out if the doors you ordered are a good match. It's far more challenging to get through double doors that aren't joined in the middle than it is to get through a single door. It doesn't matter if they're too close together or too far apart.
If repositioning the hinges does not alleviate the problem, you may need to modify the mounting plates. As an illustration, if there is less than an inch and a half between the door frames, the doors will not open properly. On one leaf of the door, switch out the existing overlay plates with new, thicker ones measuring 1 inch.
Tip
If you want to have a lot of options when hanging the doors, it's a good idea to order a few extra pairs of mounting plates with the next larger and smaller overlay. To make up for a smaller gap, you could use a shim under the mounting plate, or you could chisel a slot into the face frame's edge for the plate to drop into. These two paths are open to you if you ever find yourself in a jam.
The door's height can be changed by repositioning the mounting plate, while the door's width can be modified by loosening the hinge's adjusting screw. The adjustment screws look like they have Phillips heads, but in reality, you'll need a special Pozi screwdriver to tighten or loosen them.
Pozi screwdrivers can be found in hardware stores with the hinges. The drawer fronts can't go in until after the doors are in place and adjusted. The fronts of all the doors and drawers must be adjusted before you can return to the hinge mounting plate, add a second screw, and tighten all the adjustment screws. All that remains to be done is to attach the drawer pulls and door handles. When everything is already in such great shape, it's hard to resist making a few minor tweaks.
Galvanized sheet metal was installed in the space that formerly served as a backsplash, and cherry boards were installed above the upper cabinet doors to make use of the available space. New counters are being installed, and they are made of plastic laminate that was prefabricated elsewhere (available through lumberyards, home centres or online).
Conclusion
Kitchen cabinets that have seen better days can be updated to look like new. Your old kitchen cabinet doors and hardware are easily interchangeable. The next step is to remove the cabinets, which can be difficult if you haven't planned ahead. Put the wood through a sanding and priming process before painting it. To create an entirely new look for your kitchen, have the boxes enamelled and switch out the doors on your cabinets.
Refinishing your existing cabinets with paint and new doors will give them a fresh new look at a fraction of the price of replacing them. Find out how to find and instal the appropriate sized hinges and doors, and how to paint your cabinets for a smooth, long-lasting finish. Although updating kitchen cabinets is not as labor-intensive or disruptive as a total kitchen overhaul, it is still a sizable project that must be completed. A concealed "cup" hinge, the installation of which requires a 40mm bore in the door's back, must be requested. The new door sizes and measurements can be easily determined by using the existing cabinet's face frame as a guide.
Any variations in door spacing will be more noticeable the closer the doors are together. Estimate the size you need and place an order for the cabinet and drawer fronts. Oak could be twice as expensive as some exotic hardwoods. If a quart of oil paint seems thick or dries too slowly, add up to 6 ounces of Penetrol paint conditioner. Starting with a clean, dust-free surface is essential for a finished paint job that looks like it was done by professionals.
Shellac is favoured over spackling because it does not shrink like spackling does, dries in less time, and lasts longer. The tools and supplies available at a do-it-yourself store are the same as those available at a professional paint store. The bristles on a high-quality brush are flexible and tapered, so they can hold more paint without bending. In the final stages of an oil painting, it is common practise to switch between brushes made of china and boar bristle. In order to reuse paint multiple times, it is best to first let the solids settle to the bottom of the can and then store the paint in an airtight container.
Cherry, pine, and birch all benefit from the use of pre-stain conditioners, as they lessen the severity of blotchiness. Once the doors and drawers are in place, the final step is to instal the knobs and handles. Mounting plates come in pairs, so you should order extra sets with the next larger and smaller overlay if you want a lot of flexibility when hanging the doors.
Content Summary
- Cabinets that have seen better days can be updated to look like new.
- This article will show you how to effortlessly replace the doors and hardware on your outdated kitchen cabinets.
- Make sure your kitchen cabinetry is spotless before you try to restore it.
- Be cautious and careful in the kitchen.
- Toss the machinery into a deep pool.
- After you've cleaned the hardware, hang it up to dry.
- Take down and refinish your cabinetry.
- To discover which stripping agent is appropriate for your cabinets, you must first identify the type of finish existing on the wood.
- Wood filler should be used to repair any holes or scratches in the wood once the stripping agent has been removed, and the patch should be sanded softly to remove any rough spots.
- At last, paint the cabinets, remembering that wood can expand and contract depending on the temperature and humidity outside.
- When the paint is complete, carefully reinstall your kitchen cabinets, paying special attention to the hinges.
- Even if it seems hopeless, a new kitchen can be created by having the boxes enamelled and changing the cabinet doors.
- You may be surprised to learn that you don't have to completely gut your kitchen in order to give it a more modern look and feel.
- Refinishing your existing cabinets with paint and new doors will give them a fresh new look at a fraction of the price of replacing them.
- After removing the previous cabinet doors, the cabinet frames were coated with black oil paint in a satin finish to add drama to the space.
- Our kitchen design incorporates both contemporary and classic elements to create a fresh, contemporary look that works with a wide range of decor schemes.
- Get out how to find the right-sized hinges and doors for your cabinets, and receive advice on painting them for a smooth, long-lasting finish.
- Refinishing kitchen cabinets is a big job that doesn't require as much elbow grease or dust as a full kitchen redesign, but it still needs to be done.
- You will need to spend a considerable amount of time spackling, sanding, and cleaning the kitchen cabinets before you can even consider painting them again.
- In order to reface the cabinets, we needed to purchase eight drawer fronts, sixteen cabinet doors, and a new set of hinges.
- The price of cabinet refurbishment was much lower than the price of new cabinets.
- Measuring the openings and purchasing new doors for your cabinets is all it takes to give them a whole new look.
- It is not, however, the only choice available to you.
- A concealed "cup" hinge, which fits into a 40mm hole in the back of the door, will have to be ordered because the overlap between the door and frame is greater than what a regular hinge permits.
- This unique hinge is required due to the increased overlap between the doors and the frame.
- A mounting plate secures the hinge to the face frame of the cabinet.
- In each case, these numbers represent the ideal gap that should be left between the door and the wall.
- We ultimately decided on Blum Compact 34 hinges despite the abundance of alternatives.
- The replacement door sizes and measurements can be simply determined by using the existing cabinet's face frame as a guide.
- To denote the gap width between cabinets, use masking tape that is half an inch wide.
- Applying masking tape to the door frames can help you visualise the openings and work out the specifics before you place an order.
- We were able to use 3/8 in. as our hinge spacing because of these.
- In order to make room for a dedicated cookbook shelf, we rearranged the wall cabinets to the left of the range to make them shallower.
- To increase the depth of the drawers by three-quarters of an inch, we removed the cutting boards.
- In order to get the doors of the cabinet above the stove to line up properly, you can attach strips to the face frame of the cabinet.
- It's time to take measurements and order the doors and drawer fronts once you've finished adjusting the spacing and double-checked the inner corners to ensure the drawers won't strike each other with the new pulls placed.
- Locate a local cabinetmaker or a company that specialises in making cabinet doors, and get in touch with them about your needs.
- You may find a lot of information online if you just type "kitchen cabinet doors" into a search engine.
- Let the maker of your cabinet doors know if you have a preference for a certain kind and model of 40mm hinge.
- When ready, order glass-ready doors.
- Remove any dents and roughen up the surface of the cabinets with sandpaper that has an 80-grit grit rating.
- As soon as you get the new doors installed, you may begin painting the space.
- If a quart of oil paint feels too thick or dries too slowly, add up to 6 ounces of Penetrol paint conditioner.
- When comparing one thick layer of paint to two or three thin coats, the latter is clearly the superior option due to its increased durability and silkiness.
- To ensure that your paint job lasts, it is essential that each layer adheres to the one below it.
- In that instance, the pre-painting surface preparation steps call for the removal of the existing finish.
- You should prep the cabinets by cleaning and sanding them so that the new finish will adhere well to the old.
- A professional-looking paint job necessitates a dust-free atmosphere from the time you prep the surface until you finish painting.
- After the interior of the cabinets is finished, begin painting the face frame by working from the top down.
- Apply the paint rapidly, and then smooth it out with long, delicate strokes.
- Professional-grade painting demands sophisticated tools.
- Painting equipment is essential for a job of any size to be completed properly.
- Skip the home centre and lumberyard and head straight to a reliable paint store if you want to save time and money by obtaining all the painting equipment you'll need in one place.
- To get a clean, even coat of paint every time, a paint strainer is an indispensable tool.
- Before using the paint, strain it into a clean container.
- When priming with shellac, don't use your best brush.
- If you want to get this done right, you should get a brush with a diameter of two inches, a reasonable price tag, and a high quality level.
- In the latter stages of an oil painting, you should use a brush made of a mixture of china and boar bristle.
- A 1-1/2-inch brush is needed for the face frames, while a 2-1/2-inch brush is needed for the flat panels.
- Clean your brushes with mineral spirits right after you're done using them so you don't end up with a bunch of crusty, unusable brushes (or with warm water and soap for paints that are water-based).
- To apply varnish, grab a special 2-and-a-half-inch-wide china bristle brush.
- All drawer and cabinet faces should be stained and sealed for optimal durability.
- If you're going to be applying oil varnish or polyurethane, make sure you use a brush with the highest quality china bristle.
- Sealing the new doors is an important part of the installation procedure, and you've recently developed a talent with a paintbrush, so that's great.
- To avoid the hassle of finishing the doors yourself, you could always get them readymade.
- In order to lessen the intensity of blotchiness in cherry, pine, and birch, among other blotchy woods, pre-stain conditioners are helpful.
- The doors you ordered will be tested here to see if they fit properly.
- Passing through a pair of doors that aren't linked in the middle is far more difficult than passing through a single door.
- If moving the hinges doesn't fix anything, you might have to fiddle with the mounting plates.
- For instance, if there is less than a half-inch of space between door frames, the doors will not open completely.
- Replace the existing overlay plates on one door leaf with new, thicker 1 inch plates.
- Tip Ordering extra mounting plates with the next larger and smaller overlay will provide you a lot more flexibility when hanging the doors.
- Use a shim under the mounting plate or cut a groove into the face frame's edge to accommodate a narrower gap.
- You can alter the door's height by moving the mounting plate, and its breadth by slackening the adjusting screw on the hinge.
- Pozi screwdrivers can be found in hardware stores with the hinges.
- The doors must be installed and adjusted before the drawer fronts are installed.
- After adjusting the fronts of all the doors and drawers, you can go back to the hinge mounting plate and tighten the two screws there.
- Putting on the knobs and handles is all that's left to do.
- A galvanised sheet metal backsplash was erected in its place, and cherry boards were mounted above the upper cabinet doors to make the most of the available height.
Frequently Asked Questions About Kitchen Cabinets
- STEP 1: Remove the cabinet doors.
- STEP 2: Strip the old finish from the cabinets.
- STEP 3: Fill damaged wood with wood filler, then proceed with sanding the cabinets.
- STEP 4: Apply a sealer.
- STEP 5: Apply the stain.
- STEP 6: Add a protective varnish to the cabinets.
You can refinish old stained cabinets to hide surface imperfections, restore colour and provide a protective finish. Cabinetry that's in good condition -- sturdy and free from major damage -- can be easily refreshed with new stain or paint.
If budget is your main consideration, refinishing is often the cheaper option. Estimates have shown that refinishing cabinets costs about 2/3 of the refacing costs about 70 to 80 per cent of the cost of installing replacement cabinets.
Applying polyurethane over the stained surface is the easiest part when refinishing kitchen cabinets without stripping them. Apply one coat, allow it time to dry, and apply another coat. Repeat this process until you are satisfied with the results. Two or three coats will give you a beautiful finish.
For painting your kitchen cabinets, the best paint is one that's consistently easy to apply. ProClassic Alkyd Interior Enamel is a traditional oil-based paint that, when fully cured (21 to 30 days), provides a harder, more durable finish than latex or acrylic paints.