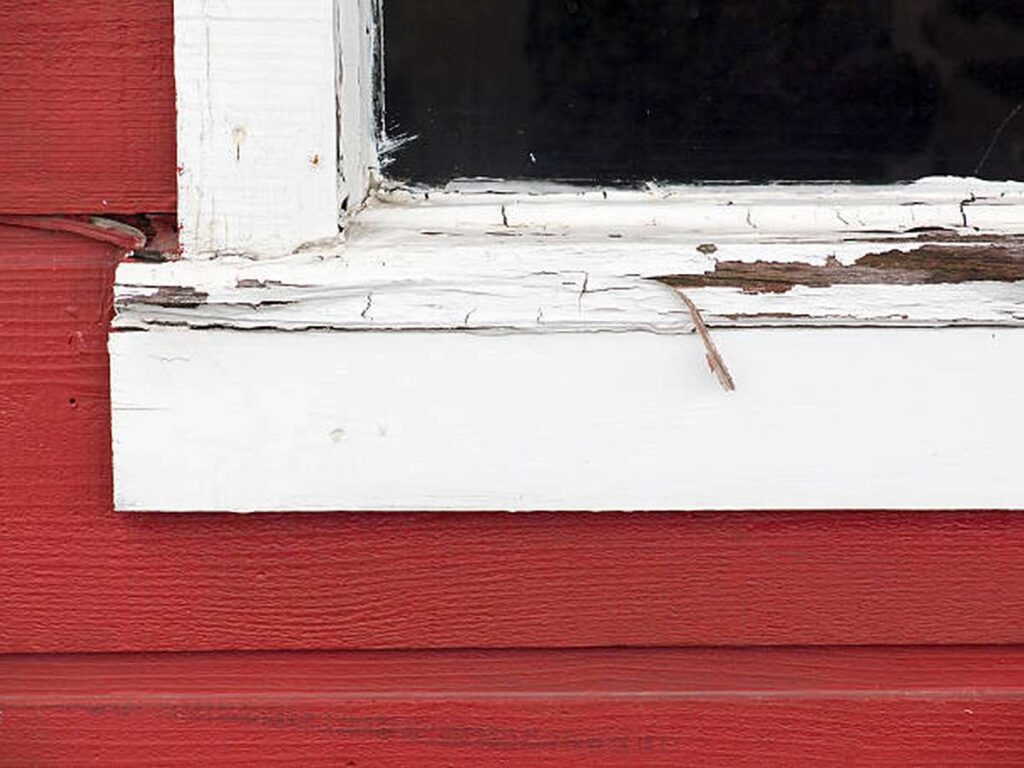
It is not unusual for older homes to suffer from rot, particularly in areas that are not properly sealed, such as around the windows. Ignoring a damaged window frame, however, can lead to further problems in the home, such as the loss of insulation, the growth of mould, and the eventual collapse of the framing members themselves.
The good news is that repairing the damage caused to the wood that surrounds a window does not necessarily need to be a difficult task or an expensive one. The vast majority of the minor blemishes may be scraped out and filled with epoxy. When dealing with significant rot around the trim and sill, it is necessary to remove the affected area in its entirety, then cut a replacement piece to fit in its place. If there is damage to the sash itself, your best option is to have it rebuilt by a specialist contractor to guarantee that the job is done correctly. This will not only save you money but also ensure that the job is done correctly.
Have you recently observed some signs of wood decay in the timber window you have? Is it now time to get a brand-new window installed, or is there still a chance that the problem can be fixed in a simple way? In the following blog article, we will discuss all of the many solutions to this problem and how to implement them.
Discovering the source of the rot in the item is your first order of business. The most effective method for achieving this goal is to have a conversation with a skilled builder who is able to examine the damage and determine whether or not they have any insight to provide regarding the possible causes of the problem. Checking for bug infestations is another important part of this inspection, as such infestations are frequently to blame for the drying out of wooden windows.
What Is Wood Rot?
It is a form of degradation that is induced by the growth of fungi in moist wood. When wood gets wet enough to have a moisture content of 20 percent or more, is unable to dry out fast, or is frequently moistened, it creates the ideal circumstances for wood-eating fungi to grow and thrive in the wood.
White rot, brown rot, and soft rot are the three most prevalent varieties of wood rot that may be found in homes. These types of wood rot can be differentiated from one another by the manner in which they decompose the wood fibres.
White Rot
Fungi that create the white version are harmful to something called lignin, which is a component of the material that makes up timber's structural framework. Because it degrades the lignin while preserving the lighter-colored cellulose, it gives decaying timber a white or yellowish look. This is because lignin is what it attacks first. In addition, it imparts a spongy or stringy feel to the final product.
Because they thrive in temperatures ranging from 65 to 90 degrees Fahrenheit, the fungi that cause white rot can be found growing in the interior of most homes. It is interesting to note that white fungi, such as shiitake mushrooms, are also regularly found on dinner plates. However, we do not recommend eating a fungus that is growing in your home. However, it is fascinating to notice that white fungi are commonly found on dinner plates.
Brown Rot
The brown variety is frequently referred to as dry rot because it gives the appearance that the surface of the rotten lumber is dry. However, do not be deceived by this appearance; in order to begin growing, it requires a moisture level of at least 20 percent. It degrades the cellulose in the wood, which results in the wood losing its volume, turning a dark brown colour, and shattering into roughly cube-shaped pieces. A cubical fracture is the term used to describe this phenomenon.
Brown mushrooms, like their white counterparts, thrive best in environments with temperatures ranging from 65 to 90 degrees Fahrenheit. Brown mushrooms, on the other hand, can travel through or over surfaces such as plaster and masonry, in contrast to their white counterparts. It is only harmful to lumber, but if it is left behind on other materials, it can easily move to and re-infect timber that has already been repaired. Because of this, the brown form is extremely challenging to eradicate completely.
Soft Rot
The third category of fungi is known as soft fungi, and these secrete an enzyme that degrades cellulose and produces microscopic cavities as a result. It is possible for it to induce cracking and discoloration that appear to be comparable to the symptoms of the brown variety. To reiterate, the lumber cannot support the growth of soft rot fungi unless it has a relatively high moisture content.
The soft variety comes with both positive and negative aspects to consider. The good news is that it is discovered in downed trees far more frequently than it is in houses. This is due to the fact that soft fungus grow more slowly than white or brown fungi, and are also less aggressive. The temperature range of 0 to 110 degrees Fahrenheit is within the optimal range for the growth of soft fungus. This is the unfortunate aspect of the situation. This indicates that it is possible for it to occur on your property and that it is more likely to grow on an exterior that is exposed to temperatures that are more harsh.
Repairing Minor Rot With Epoxy
Try Probing The Wood To See How Bad The Decay Is.
When wood rots, it develops what's known as a "punky" texture, which can be described as soft and sponge-like. Your fingertip or a tiny tool such as an awl or screwdriver can be used to apply pressure to the wood at intervals of 1-3 inches (5.2–7.8 cm) as you move around the entire window frame. This will allow you to determine how severe the issue is. If you feel any give in it, that is almost certainly an indication that there is rot in that particular portion.
- Paint that is flaking, wrinkled, or has changed colour frequently accompanies the rotting of wood.
- Be careful you do a touch test across the entirety of each piece's surface. If you don't pay attention, you might miss it.
Tip
When a repairable part retains between 80% and 85% of its original structure, or when installing new wood would be prohibitively expensive or difficult, epoxy is the material of choice.
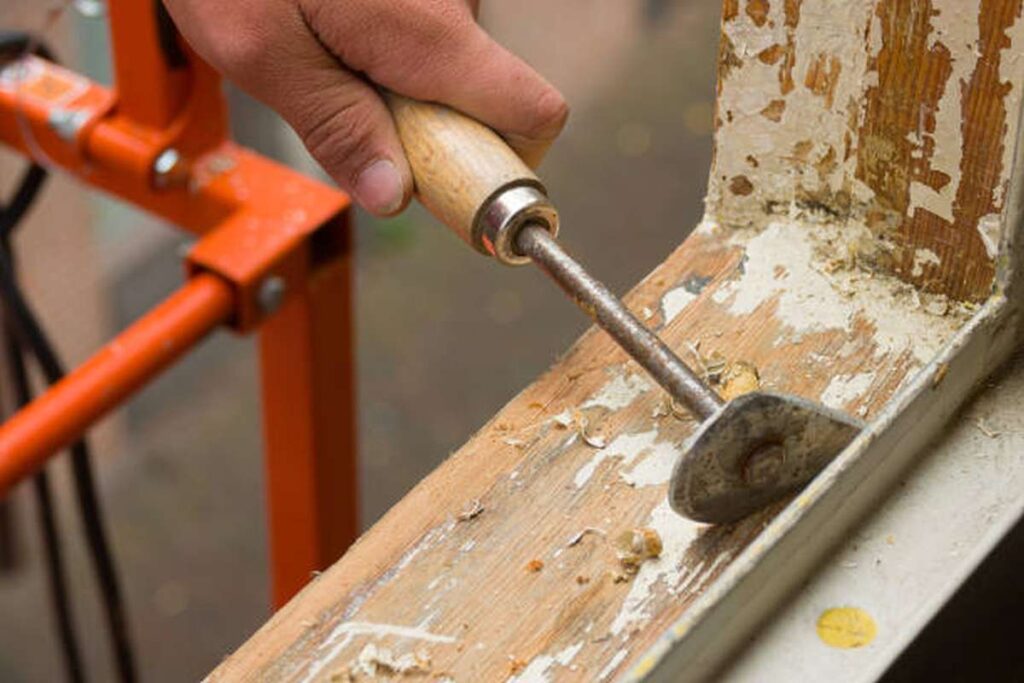
Using A Screwdriver Or Chisel, Carefully Remove Any Small Areas Of Rot.
Dig the point of your instrument into the rotted wood, and then use it to pry the wood away from the frame. Because the decay will have softened it, it would be helpful if you did not encounter an excessive amount of resistance. However, you will still need to work cautiously in order to avoid causing damage to the wood that is around you. Keep scraping and gouging the board until there is nothing left but hard, healthy wood.
- Focus all of your energy on cutting down the majority of the rotten wood as you can. If you don't remove any that you drop, it will likely spread to other parts of the frame.
- If the rot is more extensive than you thought, you may have to cut new pieces to replace the damaged areas.
Follow The Manufacturer's Epoxy Mixing Instructions.
Most epoxies consist of two separate bonding components, which must be mixed in equal parts for the glue to set. Prepare enough epoxy to patch each hole that you discovered while probing by following the instructions for mixing that are provided on the container of the epoxy.
- Prior to starting your project, make sure you select an epoxy wood filler that is designed specifically for use on wood.
- The epoxy should be mixed on a nonstick surface if at all possible, so use anything like a plastic tarp, piece of plexiglass, shiny side of a strip of packing tape, or a freezer bag. If you can, perform the blending in a large open space like a backyard.
Epoxy The Damaged Area With A Putty Knife.
Spread on enough so that the area is just slightly overfilled; you may sand away the excess water later. When you're done adding epoxy to each section, smooth it down with the flat side of your putty knife like you're frosting a cake. This will assist in the production of a smoother finish, which can then be readily concealed by applying a couple of coats of paint.
- It is possible to mix the filler and apply it all at once with some two-part epoxy kits thanks to the included applicator guns. Stores sell these sets. Even though you'll be using a gun to dispense the epoxy, you should still plan on using a putty knife to smooth it out afterwards.
- It is preferable to use an excessive amount of epoxy rather than an insufficient amount. After the area in question has been repainted, unattractive dents and depressions may appear if the holes and fissures in question were only partially covered.
- You only have between 45 minutes to 1 hour from the time you mix your epoxy until it starts to dry, therefore it is imperative that you work as swiftly and effectively as possible during this time. If you are going to be repairing numerous windows, you should make a new batch before moving on to the next one.
Let Epoxy Cure For 3-4 Hours.
As it remains in place, it will slowly increase in size in order to continue filling in the broken region. After it has had time to set, it will have the consistency of a solid, waterproof seal that will do a significantly better job of preventing undesired moisture from entering the structure than either fresh paint or wood would on their own.
- If the temperature or humidity is exceptionally low or high, you may need to let the newly applied epoxy sit for up to 1 day before proceeding.
- While the epoxy is curing, you should not touch it in any manner. It's possible that doing so will distort it, putting all of your labour to waste.
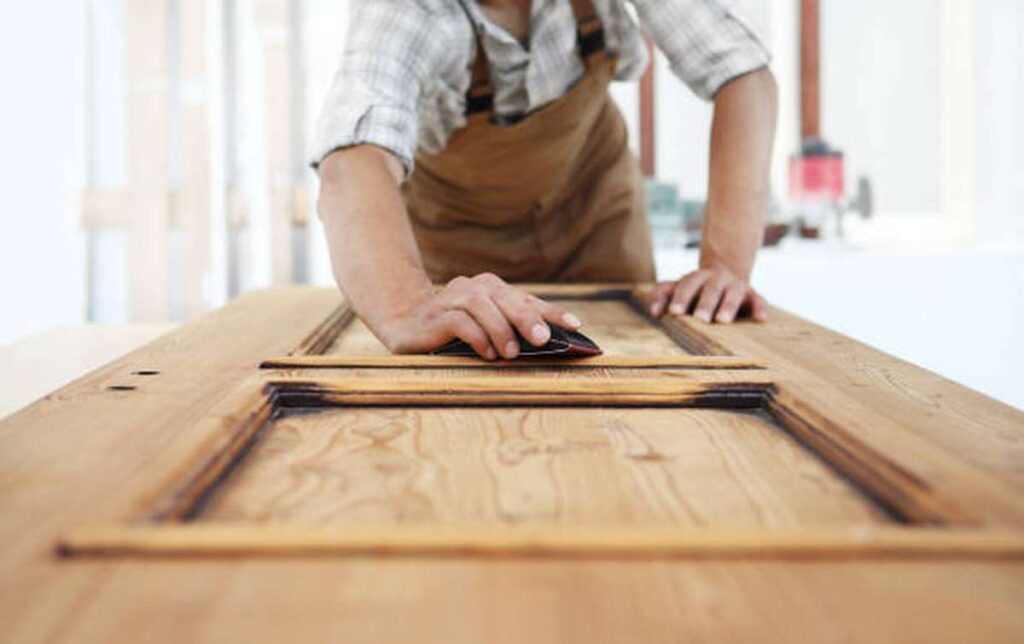
Sand Dry Epoxy Flush With Wood.
After removing the surplus filler with a sheet that has an 90-grit grit, switch to a sheet that has a 130-grit grit to take care of the fine finishing. To obtain a finish that is flawless and devoid of imperfections, pass the sandpaper over the epoxy in small, even circles. The goal is to mould it such that it follows the contours of the piece of the window that is being repaired.
- Wear a face mask and protective eyewear to keep dust at bay, and then clean up the area thoroughly with a vacuum.
- As a final step, you should be able to tell that the hole has been filled by looking at the colour contrast between the wood and the epoxy.
Paint The Patched Area.
To ensure that the surrounding wood surface and the epoxy are fully covered and that the colour is uniform, apply at least two coats of the stain using a paintbrush. Between coats, you must give the surface sufficient time to dry for the amount of time specified in the instructions. Wait at least twenty-four hours after painting a window before making any more alterations to its appearance once you have completed the task and are satisfied with how it looks.
- The best way to paint intricate moulding, thin trim, and other small, precise details is with an angled trim brush.
Placing New Boards In Areas Where Old Ones Have Rotted
Check The Whole Window For Rot.
Simply go around the outside of the frame and press your finger or a tiny hand tool into the wood at each corner. Pay close attention to any areas that are touchable and seem like they have a spongy or squishy consistency. These locations will frequently be accompanied by visible signs of deterioration, such as splintering, peeling or discoloured paint and chipping. Other symptoms of decay may include discoloration.
- Take careful note of the precise location where the typical, healthy wood gives way to rot in any regions where there are several boards or small fragments. The amount of labour necessary for your project, as well as the total cost, will decrease if you save as much of the original wood as you can.
Remove The Entire Rotten Section.
First, use a pry bar to loosen the afflicted casing and trim pieces, and then pull them away from the wall by hand. In the event that you come across a component that you are unable to move, you should reach for a cutting instrument that is flexible and easy to manoeuvre in confined spaces, such as a skill saw or a reciprocating saw. Make a number of cross cuts that are rather shallow into the rotting wood, stopping just short of the healthy timber that lies beneath. After scoring the wood, use your pry bar to drive the piece out of the hole.
- When scraping wood pulp out of joints and gaps, you may also find that putty knife, an awl, or another tool of a similar nature comes in handy.
- Take your time and be careful so that you don't cause any unnecessary damage to the adjoining sheathing or siding components.
- Once the sash has been taken out of the window, the balances can be taken out of the inside of the frame.
Tip
Before beginning the process of disassembling your window, it can be a good idea to take a picture of its intricate design, especially if its structure is particularly difficult to understand. That way, you'll have a dependable reference that can demonstrate how everything is supposed to go together, and it'll be much easier to do so.
Measure Each Removed Piece.
To determine the width, length and depth of each component that you remove from the window, you can make use of a ruler or a measuring tape. Put each measurement on its own separate piece of label and paper it correctly after you've recorded it. Your substitute materials will need to have dimensions that are as close as they can go to these specifications.
- Noting distinguishing characteristics, such as mitred corners or places for fastening, will help you reproduce such characteristics at a later time.
Seal Exposed Sheathing Cracks.
Before continuing with the installation of your new pieces, you will need to address any visible openings that are located around the window's edges. Caulk or sealant tape can be used on gaps that are small to medium in size, while canisters of expanding spray foam insulation can be used to cover breaches that are bigger. In the event that the sheathing that surrounds the damaged area exhibits evidence of water damage, you may additionally choose to apply adhesive flashing in order to stop any additional moisture from entering the area.
- Board sheathing, common in older structures, is prone to cracks and gaps. The sheathing on boards swells and contracts with temperature changes.
- For this reason, it is essential to plug up any and all openings that you come across; even the tiniest of crevices can quickly widen into a gaping hole.
Cut New Wood To Fit The Rotted Sections.
When cutting the replacement wood to the same dimensions as the original, use the measurements you took previously as a guide. Concentrate on making clean cuts that are as neat as possible so that you can easily slide the new piece into position without having to make any more changes. Remember to cut a 45-degree angle onto the ends of any decorative moulding you use. Mitre the corners.
- Do some shopping around for wood that has a grain pattern and thickness that is comparable to the original components of the window.
- If you are uncertain as to the kind of wood that was used in the construction of your house, you could go to the home improvement centre in your neighbourhood with a photo or a sample piece cut from a section of the window that is in good condition and have it evaluated by an expert.
- Using a mitre box or speed square can make it much simpler to line up repeated cuts at angles of 45 and 90 degrees with the highest possible degree of precision.
Galvanized Nails Should Be Used To Instal The New Pieces.
When securing window trim, professionals in the home improvement industry often advise using 8D finishing nails. First, hammer a nail into each of the upper and lower corners of each piece, and then repeat this step in the middle. It is necessary to repeat this process for each component that is being installed.
- To ensure that your new components stay in place, apply space nails every 18 inches (51 cm) along the length of the window, in pairs. This is especially important for really large windows.
- Putty should be used, if necessary, to fill in sunken nail holes in order to raise them up to the same level as the surface of the wood.
Paint Replacement Parts.
For the exterior, use two or three coats of paint in a colour that complements the natural surroundings. You should apply at least two coats of finish to raw wood to ensure full coverage, waiting the recommended amount of time between applications as specified by the manufacturer and giving the topcoat a full 24 hours to dry.
- If you are renovating an older home but cannot find any records of the original paint colour, you should do your best to find one that is as near as feasible. Using a paint chip set or a colour matching tool helps simplify the comparison process.
- Re-painting the window casings and trim is another option. Only a brand-new coat of paint will guarantee that the final product is uniform in colour. Furthermore, if the existing paint is deteriorating, it is probably time to paint over it.
Epoxy Window Frame Repair
In order to repair rotten window frames, an epoxy adhesive that is compatible with wood is applied in two separate processes. In order to accomplish this, you will need:
- Indenter or flathead screwdriver
- Consolidating wood with epoxy resin
- Putty knife
- Paintbrush
- A sanding sheet or block
- Epidermis-based wood filler
- Hammer or Drill
- Paint
Have A Look At The Devastation
Examine your window frame to determine its current state as a first step in the process. If you want to get a handle on the situation, you should see if the window frame can be fixed. When you live in an area that has high levels of humidity and moisture in the air, the quality of your wooden window frame may deteriorate to the point where it can no longer be repaired.
Damage to the wooden frame that is greater than ten percent is sufficient to warrant replacement of the entire frame. Vinyl windows, on the other hand, have a longer lifespan in moist environments and should be considered if you are thinking about replacing the wood window frame.
Take Out The Old And Rotten Stuff
You will require the following items to proceed with this step: armed with either a chisel or a screwdriver with a flat head and a brush, it is time to begin the process of removing the rotten material. To begin, you will need to scrape the rotting areas using the flathead screwdriver or chisel. You will need to scrape away the rotten stuff until you reach the healthy components of the substance. The next step is to use the brush in a light scrubbing motion against the surface in order to remove the debris.
Framing It Up With Holes
For this particular phase, you will require the following components and implements: ¼-inch bit driller/driver. It is now time to drill holes into the healthy wood using the bit measuring one quarter of an inch. Remember to leave about an inch of distance between each one of them. If the holes are evenly spaced out, then the fillers will adhere to the wood in a secure manner. After you have completed this task, the following step that you should take is to use a brush to remove any debris that may have been left behind.
Utilise A Wood Consolidating Epoxy
In order to cover the holes you drilled, you will need to use the epoxy wood consolidation. Make sure that you use epoxy to fill each of the holes. After that, you will need to wait anywhere from five to ten minutes for it to dry completely. Give the wood some time to soak up the epoxy. After the first coat of epoxy has had time to dry, you will proceed to apply the second layer of epoxy.
Fill The Frame And Then Paint It.
After the filler has been applied, the window frame should have its measurements returned to how they were before. When using it, place a significant amount of filler onto the region that has been scraped off and damaged. You'll need to mould it so that it conforms to the profile of the frame.
Putty knife pressure should be used to press the filler firmly into place, and then the filler should be allowed to dry for approximately twenty-four hours, or for the amount of time that is specified on the label.
The Frame Needs To Be Prepped And Painted
In order to get the window frame ready for painting, you will need to use sandpaper with a coarse grain to smooth out the cured epoxy and make it flush with the window frame. After that, you'll need to create a smoother surface by sanding it using sandpaper that has a finer grit.
In the following step, you will use a rag to remove the dirt and debris so that the paint will adhere properly without causing any problems. The last step is to cover the frame with a good quality exterior paint and let it dry completely. The wood and the filler can be protected from the elements of the outdoors by using exterior paint.
Choose a shade that harmonises well with the colour of the other window frames on the exterior. Before you begin painting, you should protect the glass by taping the frame with painter's tape. This should be done before you begin painting. You can begin painting the frame using an upward and downward motion from this point on. Take your time, and double check that the brushes you're using are clean.
Conclusion
Older homes frequently have rot in vulnerable places like around the windows. Consequences, such as decreased insulation and the development of mould, can result from ignoring a window frame that has been damaged. Numerous low-cost and low-effort approaches exist to fixing this issue, which will ultimately lead to better living conditions. When wood is exposed to moisture, fungi flourish, causing the wood to deteriorate. There are three main types of wood rot that can affect a house: white rot, brown rot, and soft rot. Insect infestations, which are responsible for the deterioration of wooden window frames, should also be checked as part of this inspection.
Content Summary
- Rot is a common problem in older homes, especially if they were never properly sealed, as is often the case around the windows.
- However, if you choose to disregard a damaged window frame, you may end up with a host of additional issues in your house, including a loss of insulation, the development of mould, and even the collapse of the framing members themselves.
- It's good news that fixing damage to the wood around a window doesn't have to be a major hassle or a major expense.
- Significant rot around the trim and sill requires removal of the affected area in its entirety, followed by the cutting of a replacement piece to fit in its place.
- If the sash itself has been damaged, it is recommended to have it rebuilt by a professional contractor.
- This problem has many potential solutions, all of which will be discussed in the subsequent blog post along with advice on how to put them into practise.
- The first thing you should do is identify what caused the item to deteriorate.
- The inspection should also include looking for signs of insect infestation, as this is a common cause of rot in wooden windows.
- Degradation caused by the proliferation of fungi in wet wood.
- There are three main types of wood rot that can affect a house: white rot, brown rot, and soft rot.
- The way in which the wood fibres are broken down by each of these rots is what sets them apart from one another.
- But if you find a fungus growing in your house, don't eat it!
Frequently Asked Questions About Wood Rot In A Timber Window
It kills the fungus and ensures that the wood is solid again. The second epoxy is then used as an epoxy filler. Epoxy fillers are excellent for keeping water out of wood and providing a solid surface ready for paint.
The good news is that replacing the wood around a window doesn't have to be expensive or complicated. Most small spots can be scraped out and filled with epoxy. To deal with extensive rot around the sill or trim, remove the entire section, then cut a new piece to go in its place.
If you catch rotted wood in time, you can successfully repair it with epoxy resin. Repairing rotted wood means you can stain or paint it again to blend in with the surrounding wood.
Boric acid (borate) is one of the most effective fungicides in treating wood rot. It can be applied to wood during construction to prevent future rot or as a treatment to stop an active decay fungus from growing.
It is common for rotten window frames to have fungus or mould, which can change the colour of the frames themselves. You can also look for issues like peeling paint around the window frame, likely indicative of a water leak. One of the first places your window will begin to rot is the window sill.