When wood is exposed to moisture, it begins to decay. It is not only unattractive, but if left unchecked, it can cause harm to your home. Fortunately, Rot is simple to remove and replace. So, whether you use epoxy, a wood filler, or another piece of wood to repair the rotting area, you can have your property looking like new in no time!
When Should You Repair Or Replace Rotten Wood?
If you have decaying wood on your porch, deck, siding, or within your home, you must decide whether to repair or replace it. Rotting wood is not only a nuisance, but it can also be a safety issue and a legal problem. The last thing you want is for your family, friends, and loved ones to be in danger at your house.
When it comes to restoring rotten wood, it's critical to understand when it's better to repair rather than replace it. If a piece of wood has rotted too much, attempting to repair it will be futile. Please continue reading to learn more about determining whether decaying timber should be repaired or replaced.
How To Tell Whether To Repair Or Replace Rotten Wood?
The strength and integrity of a beam will be damaged if a piece of wood has been exposed to too much Rot. A timber beam, on the other hand, can decay in places while remaining stable and powerful in support. It is critical to understand the distinction between these two scenarios in order to make informed judgments about whether to repair or replace the wooden beam.
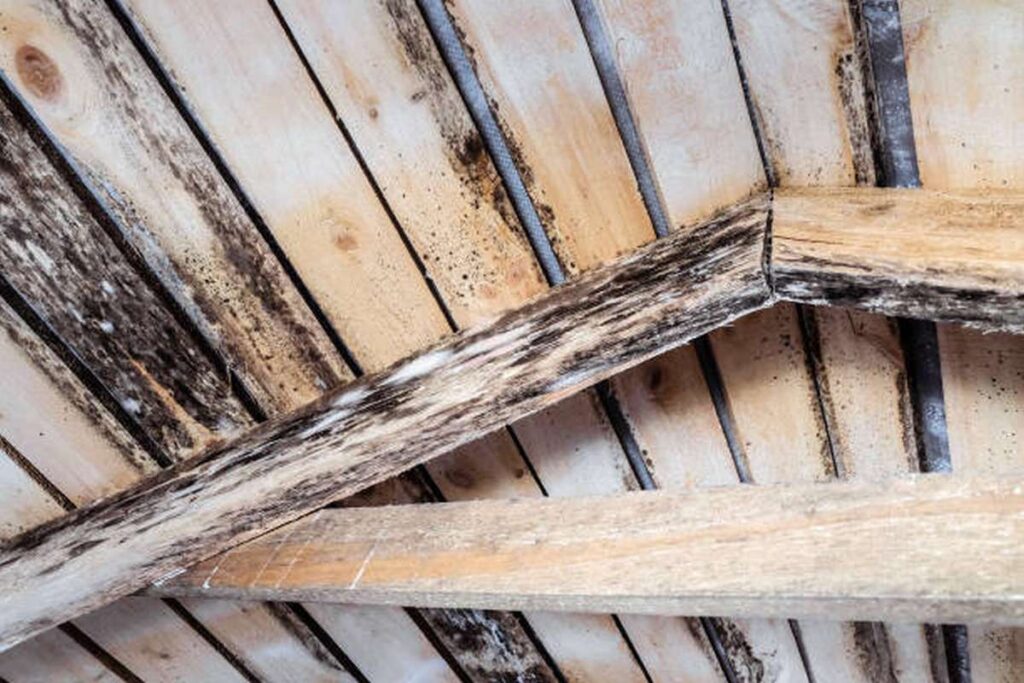
How To Recognise Dry Rot?
The first step in determining whether to repair or replace rotting wood is identifying dry Rot and weakening areas of the wood. Dry Rot, believe it or not, is a fungus that causes the majority of wood damage.
When wood is infected with dry Rot, it may appear to be decomposing. When you touch wood, it feels wet and soft. If you poke it with a screwdriver, you'll discover that the wood appears mushy. Using the screwdriver, you can easily break a piece of wood away.
Dry Rotted wood may also appear brittle, collapsing easily when pressure is applied. Furthermore, large fissures in the wood and visible fungus growth around the affected area are possible.
Removing Dry Rot
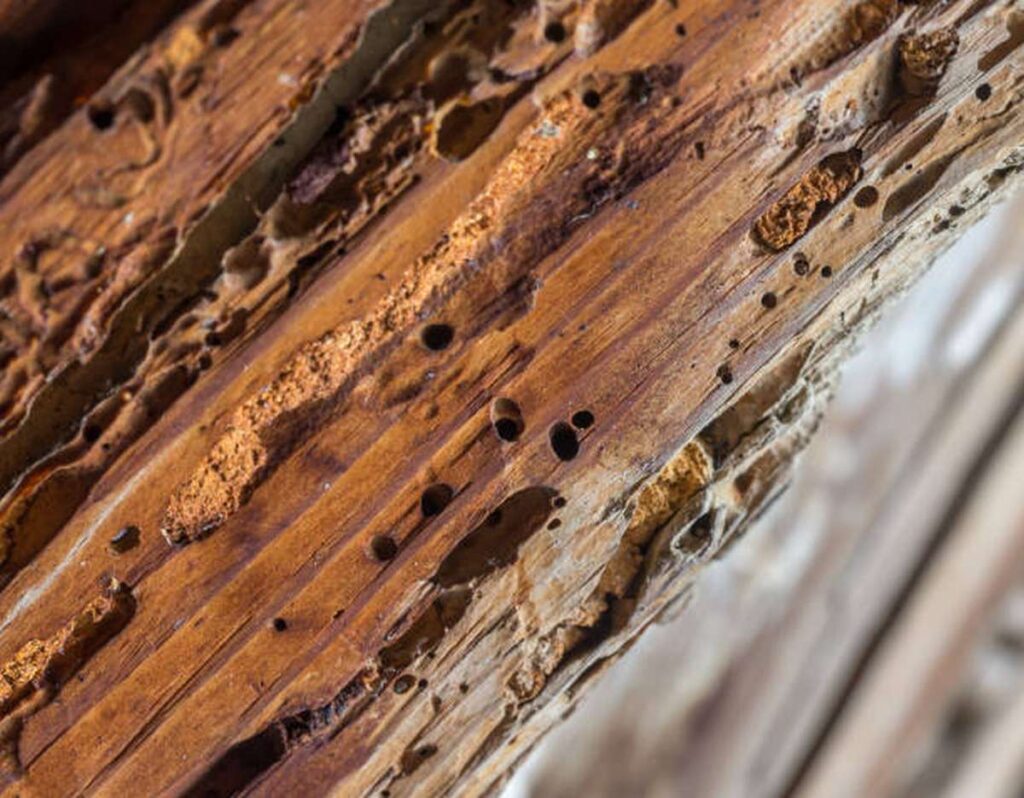
If a timber beam has dry rot to the point where it might easily be snapped in two, the board should be replaced. You can repair the beam if you see that you still have a sturdy piece of wood with only a few small sections affected by dry Rot. Before you begin repairing it, you should first remove all of the damaged wood and dried Rot from the beam.
You can remove impacted wood by scraping away any soft or weakened chunks of wood with a screwdriver. Dry Rot is a fungus, and fungi are extremely contagious. As a result, eliminating the dry Rot is critical to salvaging the rest of the timber beam.
How To Prevent Dry Rot?
Taking precautionary measures to protect any wooden structure is one of the most efficient ways of avoiding rotten wood on your property. This will ensure that the wood lasts a long period and is not affected by dry Rot.
To begin, remove any source of excessive moisture that may be harming the timber structure. Fungus flourishes in wet and humid conditions. Next, inspect your home for leaks and your gutter system. Finally, make sure that all drainage lines are clear and that you take the appropriate steps to irrigate and transfer water away from your home.
To protect wood from water damage, apply a polyurethane layer to the wood. This can go a long way towards safeguarding your home's timber structures and preventing dry Rot.
If you fix wood that has been afflicted by dry Rot, you can put a fungicide on the beam to eliminate any signs of dry Rot that may return and further harm the board. These precautions can stop you from having to deal with dry rot in the first place.
What You'll Need To Repair Rotted Wood?
It is critical to have the proper tools before attempting to repair damaged wood. Here is a list of the tools you'll need to efficiently repair a wood beam:
- Knife or screwdriver
- Wood-filler
- Putty blade
- sander for wood
- Primer for wood
- Paint
These tools are critical for successfully mending decaying wood!
Removing The Rotted Area
Use A Hammer To Pry Away Rotten Wood.
Dig out any loose Rot with a claw hammer. Place the hammer's claw at the Rot's base. As you drag the clawback towards you, apply pressure. Remove as much as you can while leaving the healthy timber alone.
- Please do not push the removal of the wood. Remove only the soft, decaying wood.
Remove Any Rotten Wood With A V-Bit Router.
Hold the router 20 inches (3.3 mm) away from the back border of the wood. Short, back-and-forth strokes with a grinder should remove any rot the hammer missed. Reduce the wood to a fine powder till it is strong and healthy. The router will have a harder time penetrating harder wood.
- The wood might deteriorate again if the rot was allowed inside.
Remove Rust And Peeling Paint By Sanding.
Many patching solutions will not adhere to existing paint and must therefore be removed. Remove any residue from the wood's surface with a coarse sandpaper or paint scraper of roughly 60 grit. Apply uniform pressure while working in a circular motion.
- Before proceeding, remove any priming, rust or dirt from the wood's surface.
You Should Give The Wood Five Or Six Coats Of Wood Restorer.
Paint the restorer over the entire area with the provided brush. Allow the restorer to sink into the wood for 3 minutes between layers. Then, wait 2 hours for the restorer to dry completely before working on it again.
- Put on some rubber gloves before touching the restorer so that you don't get it on your skin.
Using Epoxy To Make A Patch
Add A Bonding Agent To The Paint And Coat The Wood.
Apply a thin application of bonding agent to the wood with a wide paintbrush. Next, apply the agent to the entire region where you'll be constructing a patch. This improves the adhesion of the epoxy to the region.
- The epoxy bonding compound is available at hardware stores.
Mix 2-Part Epoxy Over Non-Porous Surfaces With A Putty Knife.
Epoxy should be used to fill the rotten space. Completely combine the two parts of the epoxy until they are the same colour throughout. Use a piece of flat, glass or clear plastic as a mixing palette; the epoxy will not stick to these surfaces. Most epoxies have a 1:1 mixing ratio, but follow the instructions on the package.
- Use a gun applicator to dispense the epoxy in the specified amounts.
- The epoxy will dry up if you don't use it within 30 minutes after mixing it.
Putty Knife The Epoxy Onto The Wood.
Put a thick layer of epoxy on the rotten spot. You need to make sure it touches the remaining wood. Pack the epoxy down using the blades of the putty knife.
- Use a straightedge made from a piece of scrap wood to get nice, even cuts.
Clean Putty Knife To Remove Excess Epoxy.
If you want the epoxy to look seamless and integrated into the existing wood, you can use the edge and corners of a knife to achieve this. Next, use a clean putty knife to blend the epoxy's edges.
- Using a robust pair of scissors, carefully cut out a plastic putty knife that you have traced over the wood profile.
Set Epoxy Overnight.
The epoxy needs to dry for a full day. In order to prepare the surface for painting, sanding, and priming must follow the epoxy's curing time.
- It is necessary to prepare and paint the epoxy before exposing it to the environment. If not, it will degrade in the sun.
Making A Wood Patch
Cut Wood Cleanly Using A Japanese Hand Saw.
Align the saw's teeth (those farthest from the handle) with the desired cut line. For a clean cut, press down on the saw at a 45-degree angle and apply pressure. The wood will need to be sliced repeatedly until it can be removed by hand.
- Cutting straight lines requires marking them with a pencil.
Cut Cedar To Fit The Hole.
Use the saw to trim the patch to the right dimensions. Make sure the wood fits snugly in the damaged area before proceeding. It won't sit flush with the surrounding wood if it's not tight enough.
- Cedar is frequently used as a patch due to its high resistance to decay.
Use A Wet Rag To Dampen The Bare Wood.
The glue you'll be using is activated by moisture. Moisten a cloth and rub it over the exposed wood where you plan to apply the repair. It ought to feel somewhat wet when touched.
Patch The Wood With Polyurethane Glue.
Apply the glue on the wood by simply squeezing it out of the jar. Apply it liberally to the affected region. Keep the patch firmly pressed against the wood until the glue has dried.
- Polyurethane glue, before solidifying, swells and foams to fill up any cracks or holes.
- Avoid touching the unset glue with your hands or any other tools. It will be very challenging to eliminate.
To Secure The Patch, Drill Two Screws Into Each Side.
The length of the screws should be sufficient to secure the baseboards. The patch can be held in place with two of them while the adhesive cures.
Sand The Patch After 6 Hours.
It takes polyurethane glue 6 hours to cure and solidify completely. Use fine-grit sandpaper to smooth off the tough glue until it's flush with the wood.
Filling Up Cracks With Wood Filler
On A Non-Porous Surface, Pour A 3" (7.6 Cm) Wood Filler Circle.
Wood filler might get stuck or twisted in plastic or glass, so place it on a flat surface first. In order to begin mixing, make the circular about 12 inches (13 millimetres) in thickness.
Squeeze The Cap-On Hardener Tube.
If you want to avoid the hardening agent from separating out of the tube, you should give it a good squeeze with your fingers before using it.
Mix A 3-Inch (7.6-Cm) Strip Of Hardener On The Filler.
Apply a putty knife and give the filler and hardener a good 2 minutes of mixing time. When all of the ingredients are mixed together, the colour should be a soft scarlet.
- Minimize waste by working with little amounts of wood filler at a time due to its short 10-minute working time.
- If you thin the mixture out, it will have more time to set.
Putty Knife The Filler Onto The Wood.
Extend the filler outward by two inches (6.1 cm), past the damaged wood. Apply constant pressure with the putty knife to achieve a good bond between the wood filler and the surface. The wood filler should be applied in layers until the desired thickness is achieved.
Give It Half An Hour For The Filler To Set.
The wood filler can be used in temperatures below 75 degrees Fahrenheit (24 degrees Celsius), and will be completely set within 30 minutes. If the temperature is high enough, it might set in as little as 10 minutes.
Fixing Wood By Sanding And Painting Broken Pieces
Use Sandpaper To Buff The Repair.
Please make sure that the margins of your repair are flat with the existing wood to achieve a consistent look. You may get a fully smooth surface by starting with coarse sandpaper (60 grit) and working your way down to finer and finer grits (200 grit) until you get the desired result.
If The Wood Is Stained, Match It.
If you're staining wood, wait for it to cure completely after application. Take care not to apply a new layer of stain over an old one, as this could make the colour appear darker.
- Cracks in wood that were filled with wood filler may take on a slightly different hue when stained. Try the stain on a tiny bit of the filler to see how well it sticks.
Prime Painted Wood Twice.
Use light strokes to cover the area with the primer. If you want to apply another layer, wait 10 minutes for the first one to dry.
- Use a spray primer for smoother application and less visible brush marks.
After The Primer Dries, Apply Paint.
Make sure the paint doesn't separate when you apply it by stirring it with a stir stick before each application. Apply paint with a paintbrush in thin coats to provide an even finish. Use whole board-length strokes to create a smooth result.
- Paint usually dries in about 10 minutes unless the air is extremely humid.
How To Take Care Of Wooden Fixtures?
Rot may be avoided by properly caring for wooden fittings throughout your home. Here are some maintenance suggestions for wooden decks, siding, and porches:
Seal The Wooden Fixture
Sealing wooden fixtures with paint, wood stain, or a clear sealant is one approach to safeguard them. This will aid in the protection of the wood against water, fungi, and other harm. Furthermore, it would be beneficial if you painted or refinished the wood every five years to keep it protected.
Clean Wooden Fixtures Annually
Cleaning wooden fixtures once a year can help to eradicate mildew, which can eventually lead to mould. Scrub dirt and other debris from the wood with warm soapy water and a scrub brush.
Dry Rot Vs. Wet Rot.
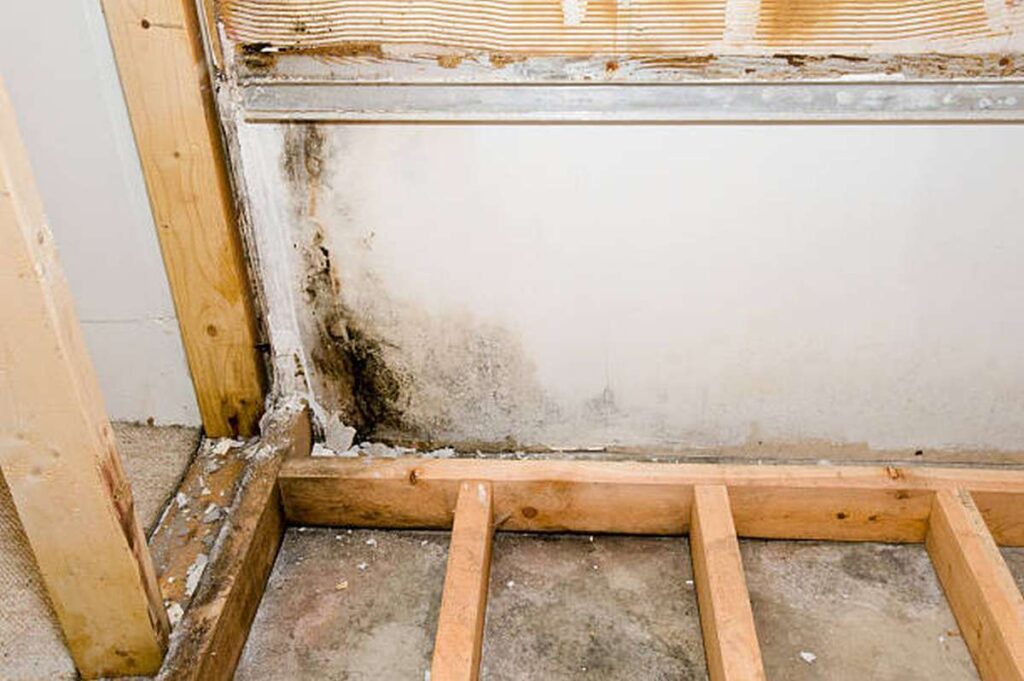
The wood-eating fungus wet rot is common in structures made entirely or primarily of untreated timber.Although there are many species of this fungus, Coniophora puteana is by far the most widespread. Wet rot is a wood-destroying fungus that can also weaken other building materials like wallpaper, wallpaper paste, and carpets. Wet Rot is a fungal disease that multiplies as it consumes wood and then releases spores into the air, where they hopefully fall on another piece of wet wood.
Since it is contained to the wet area only, wet rot is not as dangerous as dry rot, but it still needs to be handled because it might compromise the stability of a building.
Varieties Of Wet Rot
Several different types of fungi fall under the umbrella term "Wet Rot," the most prevalent of which being Coniophora Puteana, often known as basement fungus. There are two main types of wet rot that can be distinguished:
Discoloration Of Whiteness
Wet rot fungus can cause a white rot in certain woods. The term "white Rot" describes this condition. The fungus causes white rot by eating lignin, a component that keeps the wood cells together and gives it its intrinsic rigidity. The lighter colours are lost as lignin and cellulose are digested by the fungus, resulting in white rot. The wood feels incredibly spongy and smooth to the touch.
Infected Brown Mold
If you compare brown rot to white rot, you'll notice a significant difference in hue. This is because it can be made to look almost identical to the shade of the damaged wood. Wet rot fungus relies on sugars and cellulose as a food source when it can't degrade the lignin in a particular wood species. A brownish hue develops on the decayed wood as a result of this.
To What End Does Moisture Cause Rot?
When wood is subjected to prolonged exposure to high levels of moisture, a condition known as "wet rot" sets develop. These types of degradation damage wet wood by softening it. Water seeping into wood causes wet rot. It's possible that a number of different factors could contribute to moisture.
Wet Rot Causes
Wet rot occurs when wood is subjected to moisture from the environment or an indoor water source. In most cases, the timber components of a building are not visible because they are hidden from view. These factors can lead to wet rot:
- Difficulties with the roof
- Plumbing problems
- Damaged or obstructed gutters
- In and around bathtubs, as well as shower stalls
- Condensation leaking through the walls
- Condensation
Conclusion
Deterioration of wood occurs when it comes into contact with water. When wood has rotted too badly, restoration efforts are pointless. Believe it or not, dry rot is the most common wood-damaging fungus. Because it is caused by a fungus, dry rot spreads rapidly. So, getting rid of the dry rot is essential if you want to save the rest of the beam from being destroyed.
Take these measures to avoid dry rot in the first place. The proper equipment is essential for fixing rotting wood. Since many patching solutions do not work with preexisting paint, it is necessary to strip it off before applying a new coat. Hardware stores typically stock epoxy bonding compound. Employing a putty knife, blend 2-part epoxy onto nonporous surfaces.
Put your mixture on a flat, clear piece of glass or plastic. To get the epoxy ready for the outside world, you'll need to prime it and paint it. Before continuing, check that the wood fits securely in the damaged area. Polyurethane glue expands and foams to fill in crevices before it hardens. Avoid snagging or twisting the wood filler by setting it down first on a level surface.
To use the wood filler, the temperature must be lower than 75 degrees Fahrenheit (24 degrees Celsius) Depending on the temperature, it could take as little as 10 minutes to set. Take good care of the wood in your home, and you can keep it dry and safe from rot. Wet rot, a fungus that eats wood, is a common problem in buildings that use untreated wood for construction or structural support. Mildew, which can lead to mould growth, can be removed from wooden fixtures by cleaning them once a year. Wet rot develops in wood that has been exposed to water, either naturally or artificially, for an extended period of time. Deterioration from moisture causes softening and eventual colour loss in wood.
Content Summary
- Thankfully, Rot can be easily fixed or replaced.
- Decaying wood on your porch, deck, siding, or inside your home requires a decision: repair or replacement.
- The presence of rotting wood is not only an eyesore, but also a potential safety and legal issue.
- It is important to know when it is more cost-effective to repair rotten wood rather than replace it.
- To learn how to decide whether decaying wood needs to be repaired or replaced, please keep reading.
- The structural integrity and strength of a beam can be compromised by prolonged exposure to Rot.
- Identifying dry Rot and weakening areas of wood is the first step in deciding whether to repair or replace rotten wood.
- Wood infected with dry rot can give off an odour and look rotten.
- Wood that has been affected by dry rot may also appear brittle and give way easily to pressure.
- Get rid of the rotten wood and dried rot from the beam before you start fixing it.
- As a result, if you want to save the rest of the beam from destruction, you need to get rid of the dry Rot first.
- One of the most effective ways to avoid rotten wood on your property is to take preventative measures to protect any wooden structure.
- A layer of polyurethane can prevent wood from rotting when exposed to moisture.
- In a lot of cases, this is the first line of defence against dry rot in your home's wooden structures.
- What Is Needed To Fix Wood That Has Rotted In order to fix broken wood, you need the right equipment.
- To remove any stray Rot, a claw hammer will need to be used.
- If the hammer didn't get all of the rot, a few quick back-and-forth strokes with a grinder should do the trick.
- Pulverize the wood until it is as healthy and robust as powder.
- Harder wood will be more of a challenge for the router to cut through.
- Sanding off rust and flaking paint.
- Use a paint scraper or sandpaper with a grit of about 60 to get rid of any residue left on the wood's surface.
- First, make sure the wood's surface is clean and free of any rust or dirt.
- Use the provided brush to evenly apply the restorer to the damaged area.
- In between coats, give the restorer 3 minutes to soak into the wood.
- After two hours have passed, you can resume your restoration efforts.
- Epoxy as a repair material Coat the wood in paint that also contains a bonding agent.
- Use a wide paintbrush to apply a thin coat of bonding agent to the wood.
- After that, spread the agent across the entire area where the patch will be built.
- When you do this, the epoxy will stick better to the surface.
- You can find epoxy bonding compound at hardware stores.
- Apply the epoxy with the help of a gun applicator, and make sure to use the correct amounts.
- If you don't use the epoxy within 30 minutes of mixing it, it will dry up.
- The point and edge of a knife can be used to make the epoxy blend in with the wood's natural appearance.
- The edges of the epoxy should then be blended using a clean putty knife.
- Cut the patch to the appropriate size with the saw.
- Use polyurethane glue to fix the damaged wood.
- Squeeze the glue out of the jar and onto the wood.
- Spread it all over the area that needs it.
- Patching up a non-porous surface with wood filler, Put in a circle of wood filler measuring three inches (7.6 centimetres).
- Avoid snagging or twisting the wood filler by setting it down first on a level surface.
- Pull the plug on the tube of hardener.
- Blend a 2-inch (5.8-cm) band of hardener onto the filler.
- Use a putty knife and spend at least 2 minutes blending the filler and hardener together.
- Wood filler has a short working time of only 10 minutes, so use only as much as you need at a time to avoid wasting any of it.
- Ensure a strong bond between the wood filler and the surface by applying consistent pressure with the putty knife.
- The wood must be allowed to cure completely after being stained.
- Apply the primer with light strokes to avoid smearing.
- If you want a flawless application with no brush strokes showing through, try a spray primer.
- Spread paint on with a paintbrush in even coats.
- Take good care of the wood in your home, and you can keep it dry and safe from rot.
- Tips for caring for your wooden deck, siding, or porch, including: Seal The Assembled Wooden Part One way to protect wooden fixtures is to seal them with paint, wood stain, or a clear sealant.
- This will help keep the wood dry and free of rot and other hazards.
- Wooden furniture and fixtures should be cleaned once a year. Mildew, which can lead to mould growth, can be removed from wooden fixtures by cleaning them once a year.
- In order to remove grime and other particles from the wood, use a scrub brush and some warm soapy water.
- Wet rot, a fungus that eats wood, is a common problem in buildings that use untreated wood for construction or structural support.
- As the fungus consumes the lignin and cellulose, the lighter colours are washed out.
- Pathogenic Brown Mold Differentiating between brown rot and white rot is as easy as looking at their respective colours.
- This is due to the fact that it can be painted to closely match the colour of the original wood.
- When a wet rot fungus cannot degrade the lignin in a certain wood species, it will feed on the sugars and cellulose in the wood.
- Wet rot develops on wood that has been exposed to high humidity for an extended period of time.
- Moisture could be caused by a variety of factors.
- Caused by Wet Rot When wood is exposed to water, whether from the air or an indoor source, it rots.
Frequently Asked Questions About Rotted Timber
When old timber becomes worn or rots away, reach for the epoxy wood filler. Epoxy is made up of two components that harden when mixed. With a consistency like dough, it can be moulded by hand but will hold its shape as it hardens. It bonds well to timber and holds up against the weather.
Rotting wood can be repaired by first removing any rot from the original board or beam of wood. Once that has been done, you can fill the area with a wood patch or polyester filler. This material will fill the area and harden to provide strength and durability.
Use a polyester filler to rebuild rotted or damaged wood. You can mould and shape it to match the original wood profile. It takes paint well and won't rot.
Unlike many other wood-destroying fungi, dry rot can readily grow over and through porous masonry provided that there is a nutritional source (wood) from which it can spread; this ability allows the spread of the fungus from one area to another.
Rotten wood is highly porous and must be sealed before painting. Before rotten wood can be painted, it must be treated with a wood hardener. The hardener absorbs into the rotted wood to provide a firm base for the paint.