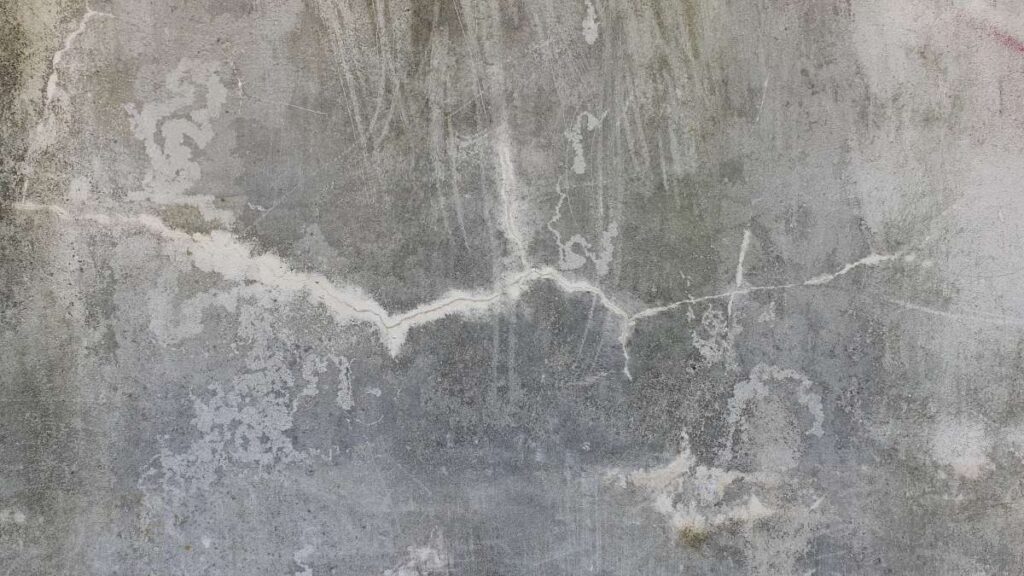
Long-term contact with water can cause significant structural damage to your home. Ground seepage and rainwater can cause extensive damage to a building's windows, masonry, doors, cement, foundation, siding, and roof. Another issue that can arise from too much humidity is the development of mould, which is especially common in damp environments like crawl spaces and basements. But if there are roof or gutter leaks, it can also happen above ground. Waterproofing your home and making sure it doesn't get wet inside is the single most important thing you can do to maintain it.
If the outer walls are exposed to precipitation or a high relative humidity, water and moisture may penetrate the masonry and affect the interior walls of your home. This means that it could take quite some time for your walls to dry out, which could lead to the growth of mould and irreparable damage. In humid regions like Florida, it's not a question of if wall damage from water penetration will occur, but when.
What can you do to prevent water and mould damage to your walls? The exterior of a building can be made watertight by carrying out the aforementioned seven steps. The exterior walls should be waterproofed if dampness has set in due to rain or other moisture sources. Examine the walls for any flaws. Before looking for waterproofing materials, it is important to eliminate any other causes of structural moisture. A broken water pipe, a leaking faucet, or even a crack in your brickwork could be the cause. All sorts of things could happen. After the problem has been fixed, prevent further damage by applying a waterproofing coating.
Maintain pristine gutters at all times. Clogged gutters not only cause water to spill over the side and down your walls, but they also collect water, which can be absorbed by the fascia boards or roof's wood over time, causing rot, leaks, and mould growth. Clear out the gutters. All of these problems can be avoided and your home's health maintained with just twice-yearly gutter cleaning.
When selecting a waterproofing agent, please use caution. Waterproofing products have come a long way since their inception, and today's homeowners have many options for defending their homes from moisture intrusion from the outdoors. Here's a rundown of items worth considering buying:
- You can protect water from reaching concrete by applying a concrete waterproofing coating, which is a cement-like compound that bonds permanently to masonry and concrete and can be applied to any surface, even painted walls.
- Silicate-based concrete sealer that creates a waterproof coating by reacting with masonry and concrete components; this sealer is only suitable for use on walls that have never been painted or sealed.
- Waterproofing paint is fundamentally different from acrylic wall paint in that it provides significantly higher water resistance. It is crucial to choose a formulation that allows walls to breathe and release moisture. You can use this product even on previously painted walls.
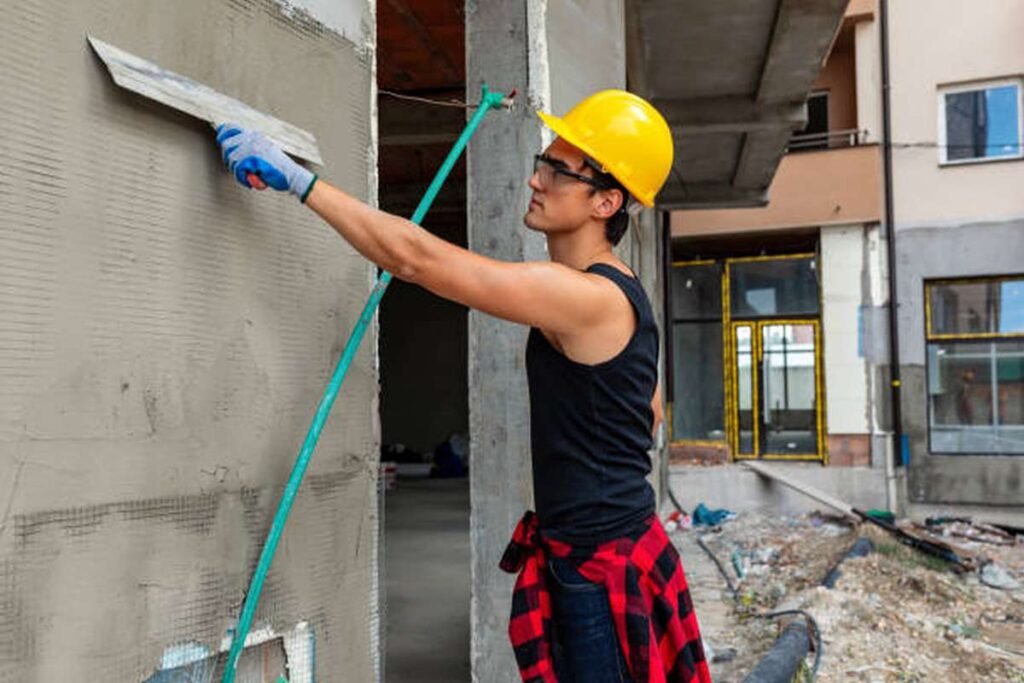
Use a waterproofing additive in the plaster: Plastering can boost aesthetics, strengthen walls, and prevent moisture damage. A waterproofing additive can be added to external plaster to fix water penetration problems and prevent them in the future, even though most external plasters already have these properties built in.
Before you try to waterproof your walls, make sure they're in good shape. No matter what product you use, you must first ensure that the exterior walls are in good condition before you can begin waterproofing them. This means that you need to use a high-quality filler when mending cracks and holes. Filler should be completely dry before being ground. The walls must be completely dry before the waterproofer is applied. After that, sand down any uneven spots or rough, wash the surface with water to remove any dust, and apply the waterproofer. Doing so will guarantee a solid connection between the waterproofer and the base.
Use a roller or a paintbrush to spread the waterproofing agent across the surface. If you feel like you need a second coat, let the first one dry before applying it. Use enough of the product to create an impenetrable barrier against infiltration.
A water-tightness test is a crucial step in determining the efficacy of the products used to waterproof exterior walls. This test requires spraying water onto the wall at a 30 ° angle for a few hours. If the results of a moisture metre show that your home is completely dry, then it will pass the inspection. Waterproofing the outside of your home will not only protect it from costly damage, but also raise its resale value.
How to Waterproof an Extant Outdoor Wall in 10 Easy Steps?
- Because the wall's outer face was now visible, the soil and fill that had been used to initially back-fill against it had to be removed. As with any old field tile or drainage pipe, it must be taken out to the footer.
- Do some cleaning to get rid of the grime and clutter on the wall. Before proceeding to the next few steps, the house's caked-on dirt must be removed. By doing so, we can guarantee that the procedures will work as planned. It is recommended to brush or sweep the wall first, and then use a power washer to get the last traces of dirt and grime off.
- Using hydraulic cement, fill in any cracks or holes you find in the wall after it has been cleaned thoroughly. Fill in any large holes or cracks in the wall with hydraulic cement. Make sure you've removed any loose cement or stone and followed the cement's instructions before using this product.
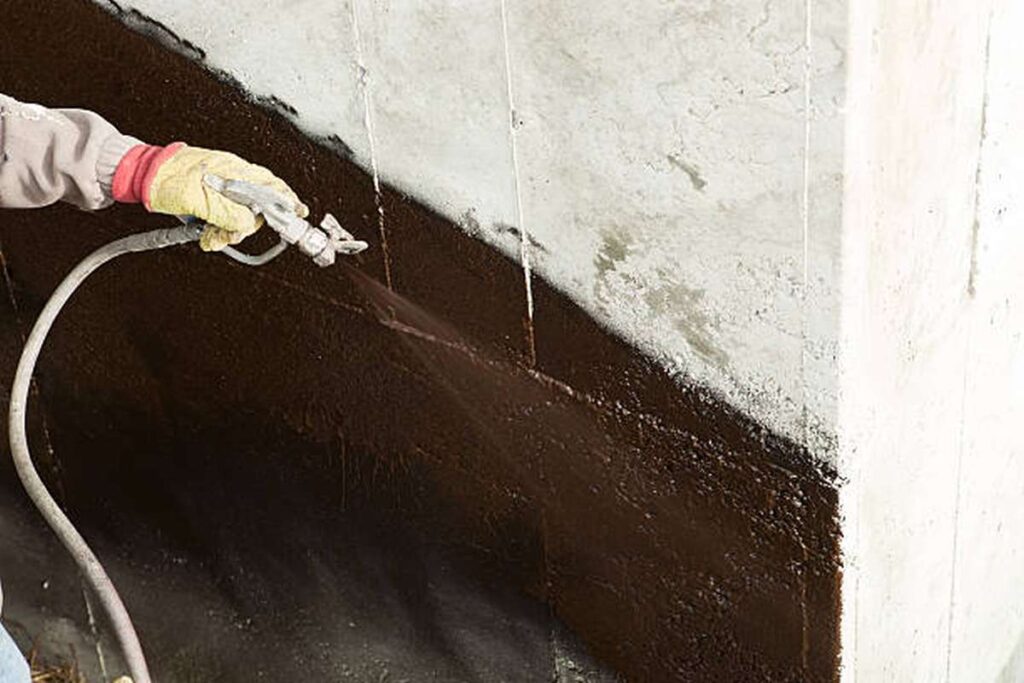
- Using a paintbrush, apply a cement-based waterproofing sealer to the exterior wall after it has dried. Exterior walls are the intended target for this particular paint sealer. Completely drying this out is required.
- Use tar-based material to seal the wall. Apply a pitch made from tar to the wall with a trowel. With some assistance, rubber membrane or roll out a heavy-duty plastic and lay it up on the wall, aproning the pitch away from the wall or covering the footer.
- Install a 1/2-inch-thick gravel base in the trench below the footer to give the drainage pipe a place to rest. A gravel base in the trench is necessary for the stability of the perforated plastic drain pipe.
- Make a gravel bed on top of the drainage pipe with the holes facing down. Adjust its height so that it's even with the footer. After that, you need to put about three to four inches of gravel on top of the pipe and then cover it with something.
- In order to protect the perforated plastic pipe, a fabric covering must be placed over it. This is an important safety measure to take to keep dirt and other particles out of the pipe and thus prevent a buildup of obstructions.
- Extending the Trench by Filling It With Soil
- The trench must be backfilled with dirt and the top surface must be raised to a height that permits settling. Aim to slant the ground away from the house to create a runoff area. Modify the rain gutters as needed to divert roof runoff away from the foundation.
Products for the Exterior Wall That Are Waterproof
Use of a trencher or a bobcat, for example, are two alternatives that could significantly alter the project's cost. The extra delivery fee and the potential daily cost of $100-$200 are just the beginning. Because of how close the trench is to the wall, operating mini-excavation or trenching equipment like a Bobcat or trencher would be difficult.
In our experience, the tried-and-true method works best, especially if you are not used to handling such sophisticated tools regularly. Go in there and start digging with your hands. We then rented a small Bobcat a month later, when the ground was more stable, and planted some shrubs and grass in the trench up against the wall.
Little remains to indicate that anything of note occurred there at all. This job would cost around $1,000 without the use of an Excavator or BobCat, with the precise sum depending on the length and width of the wall to be sealed. If you already have wheel barrels post hole diggers, digging using hand or shovels all you'll need are these tools and materials:
- Waterproofing paint sealer, like Thoro-seal, is a cement-based paint that has been on the market for years and costs $50.00 for 6 gallons. In today's market, a bucket that can hold 5 gallons can cost $250. Krystol T2, a product of modern technology, is a water block that, when placed on a flat surface, resists the force of water pushing down from below. By doing so, tiny crystals form, which eventually fill all the crevices and gaps in the concrete. When applied to damaged membranes, it can heal the damage and add a protective layer that will last for years. This amount should be enough to cover up to 350 square feet of wall space. You can use a spray can or paint it on.
- Less than fifty dollars will get you a 10-by-50-foot roll of plastic heavy duty membrane, which is roughly 550 square feet in coverage. Both of those options would improve security.
- The amount of tar pitch is 4.75 gallons. The company's products can be applied to exterior walls above or below ground, and a single application covers about 120 square feet for $50. This item can be used on brick, stone, or concrete block walls.
- Brushes and trowels needed for application of these items are estimated to cost between $50 and $75. They are essential for applying the products to these kinds of surfaces.
- When applied to block, concrete, and other masonry surfaces, hydraulic cement seals cracks to keep water out. At 5500 psi, hydraulic cement sets in 3 to 5 minutes, making it suitable for applications above or below ground. Possess the ability to patch a wall with holes the size of golf balls. It can harden and set submerged, so you can use it to patch up any damage to the surface before painting.
- A bulk delivery of 3/4-inch gravel costs around $100 plus $30-$40 per tonne. I'd like to place an order for truck delivery during the week. It will cost less than the weekend rate. It would take too much of your time, and it could cause delays for other people if you tried to pick it up by yourself.
- A length of 4 inch polypropylene drain pipe can be purchased for around $25.00, and an additional sock eliminates the need to instal a fabric barrier. Common applications for pipes of this size include drainage and sewer lines. Avoid hurting yourself if you must use an impediment.
- You can either buy a pressure washer outright for a few hundred dollars or rent one from a store like Home Depot for around $100 per day. A pressure washer can be used for a wide variety of purposes. There are a hundred other places it could be used besides the wall. We bought a pool even though we had one already, and it was a great decision. Buying your own is a better financial decision than renting when you consider the total cost over time.
Can You Waterproof a Basement From the Outside?
We hoped for clear, dry weather and scheduled the project for a fall weekend, and that's exactly what we got. Furthermore, we agreed that the whole thing ought to be done in festive spirit. We found that when people are well-fed and hydrated, their best friends are more willing to help out.
We were both cognisant of the fact that trench digging would necessitate considerable physical exertion, particularly from the backs of the workers. We picked a weekend or two and decided to invite as many friends as we could fit into our house. To ensure that no one would be hungry first thing in the morning, we made a huge breakfast. To put it mildly, we got an early start.
The wall was about 40 feet long, so we had to get below the footer, which was about 8 feet deep. Our ability to dig the trench so rapidly, even with only two people working at a time in each shift, surprised us. With so much food and music, it was almost bearable. By the time we sat down to dinner, we had already begun cleaning the wall.
After the work was done, the grill and keg of beer were brought out for the meal. Even as night fell, a small crew of workers was finishing up the final touches on the newly painted and patched section of the previously uncovered wall.
The wall appeared to be in good shape after we were finally able to get close enough to examine it the following morning. We threw the pitch—which, as we had suspected, was quite filthy—into the wall, making a coat over the sealer paint that had just dried. A few of us folded a plastic sheet in half and propped it against the freshly tarred wall to keep the elements at bay.
Next came the gravel that would support the perforated drain pipe. Since the trench sloped from deep to shallow and the wall had a natural incline, laying the pipe for the drainage system was a breeze. After the pipe was backfilled, a few inches of gravel were added to conceal it.
Make sure the roof's rain gutters are not clogged and have adequate space for the water that will be running off the roof. We put in wider and deeper gutters to prepare for the possibility. It'd be helpful to have. It was definitely worth the extra work and money. It's possible that the roof leaks were contributing to the problems in that area of the house, in addition to the groundwater that we knew was getting in.
Pay close attention to any situations that may require this. To be safe, treat all water as if it were an enemy. Upgrade to the more expensive and long-lasting vinyl interlocking gutters if you can. To direct water away from the house, take the downspouts out of the wall and reposition them. This decreases the likelihood that water will pool against an exterior wall, which in turn increases the likelihood that water will find another entry point.
Twenty Years Later, No More Rain Inside
Due to our findings, we are confident that waterproofing the exterior of the building's existing wall was not only the optimal strategy, but also the most cost-effective one (assuming no shortcuts were taken) and the one that will ultimately prove successful. Unless absolutely necessary, you should not plan on starting this project again in ten years.
After 20 years, we know without a doubt that none of the areas around our house that were treated with waterproofing are letting any water in. If you're looking for ways to cut costs and are considering doing this yourself, we have some suggestions.
- Make it a party and invite all the tough people you know.
- Each and every one of us had a fantastic time. It was hard to believe that we had managed to save so much cash.
- Include the forecast in your preplanning.
- Consult a professional contractor who is well-versed in the project at hand and the tools that will be needed for it. You'll both learn more and feel better about yourself if you have a conversation with your companion.
Rainwater seeping in through unprotected exterior walls is a breeding ground for mould and mildew unless the walls are waterproofed. Walls deteriorate and inhabitants experience health problems as a result of this. When a basement's interior is already finished, the best option for waterproofing is to instal a drain tile system on the exterior. This will seal the basement and keep water out. Building a perimeter wall is the initial step. This is followed by coating it in a watertight Silicone Polymers coating.
Waterproofing Services for the Interior
Increasing dampness from the gaps through which rainwater seeps inside, high groundwater level, and seepage from neighbouring leaking walls in the bathroom and kitchen are all contributing factors. Because of these factors, a significant amount of moisture is building up, and the conventional waterproofing techniques currently in use aren't enough to combat it. It would be fantastic if you could get your hands on a specialised treatment that would permanently fix this dampness.
Conclusion
The most crucial aspect of home maintenance is preventing water damage by sealing off the building's interior from the elements. Windows, masonry, doors, cement, the foundation, siding, and roofing can all be severely harmed by water seepage and rainfall. When compared to regular acrylic wall paint, waterproofing paint offers far superior water resistance. Plaster applied to the outside of a building can be made waterproof by incorporating a waterproofing additive. When you waterproof the exterior of your home, you not only prevent expensive repairs, but you also increase its value.
It needs to be removed to the footer, just like any other unused field tile or drainage pipe. The durability of the perforated plastic drain pipe depends on the gravel base in the trench. You can use a trowel to spread tar pitch on the wall. The expense of a project may rise or fall depending on whether a trencher or bobcat is used. A roll of plastic heavy duty membrane 10 feet long by 50 feet long costs less than $50.
Adjust the downspouts so that water from the roof flows away from the house. About $100 is added to the price per tonne, for a grand total of $30 to $40, for the delivery of three-quarters of a tonne of gravel. For $50, you can cover about 120 square feet with a single coat of hydraulic cement. A 25-foot length of polypropylene drain pipe costs about $25. We enlisted the assistance of as many of our friends as we could muster by holding an open house for the trench-digging operation.
It could have been bearable if there hadn't been so much food and entertainment. We had already started cleaning the wall by the time we sat down to eat. After 20 years, we can say with confidence that the best investment we made was to waterproof the exterior of the preexisting wall of our home. The downspouts should be removed from the wall and repositioned so that the water flows away from the house. If you can afford it, spring for the vinyl interlocking gutters.
Plan ahead using forecast information. You should talk to a licenced contractor who has experience with similar projects. The first step is to construct a wall around the entire area. After that, a Silicone Polymers coating is applied to ensure that it is completely waterproof. Waterproofing is best achieved through the installation of a drain tile system.
Content Summary
- The structural integrity of your home can be severely compromised by prolonged exposure to water. Leaks above ground are less common, but they can occur if the roof or gutters are faulty.
- Water and moisture can seep through the masonry and affect your interior walls if the exterior is subjected to precipitation or high relative humidity.
- Find any imperfections in the wall and fix them. It is crucial to rule out other potential sources of structural moisture before searching for waterproofing materials. The gutters should be kept spotless at all times.
- A concrete waterproofing coating is a cement-like compound that bonds permanently to masonry and concrete and can be applied to any surface, including painted walls, to prevent water from penetrating the material.
- Concrete sealer based on silicates, which, when exposed to water, forms a waterproof coating by reacting with masonry and concrete elements.
- Waterproof the plaster by mixing in an additive: Plastering has many benefits, including improving the look of a room, making walls stronger, and protecting them from water damage.
- The exterior walls must first be in good shape before any attempt at waterproofing can be made, regardless of the product used.
- Waterproofing agent can be applied with a roller or a paintbrush. To evaluate the effectiveness of the materials used to waterproof exterior walls, a water-tightness test must be performed.
- When you waterproof the exterior of your home, you not only prevent expensive repairs, but you also increase its value. It needs to be removed to the footer, just like any other unused field tile or drainage pipe.
- Get rid of the dirt and dust that have accumulated on the wall by cleaning it. Hydraulic cement should be used to fill any large cracks or holes in the wall. After the exterior wall has dried, seal it against water infiltration with a cement-based sealer using a paintbrush.
- In order to properly waterproof the wall, a tar-based product should be used. Use a trowel to spread tar pitch on the wall. Place a layer of gravel (at least 1/2 inch thick) in the trench below the footer to act as a platform for the drainage pipe.
- The durability of the perforated plastic drain pipe depends on the gravel base in the trench. Cover the drainage pipe with gravel, holes facing down.
- Once the trench has been excavated, the top surface must be raised to a height that allows settling to occur. It is recommended to slant the ground away from the house to create a runoff area.
- Adjust the downspouts so that water from the roof flows away from the house.
- Different choices, such as whether or not to use a trencher or a bobcat, can drastically change the total cost of the project.
- Mini-excavation and trenching equipment, such as a Bobcat or trencher, would be difficult to operate due to the proximity of the trench to the wall.
- Without an Excavator or BobCat, the cost to seal a wall would be close to $1,000. The exact cost would depend on the length and width of the wall.
- Hydraulic cement is used to seal cracks in brick, concrete, and other masonry surfaces, preventing water seepage.
- There is no need to instal a fabric barrier if you use a length of 4 inch polypropylene drain pipe that you can buy for less than $20.00.
- Depending on your needs, you can either invest several hundred dollars to buy a pressure washer or pay around $100 per day to rent one from a store like Home Depot.
- The footer was about 8 feet deep, and the wall was about 40 feet long.
- We were surprised at how quickly we dug the trench with only two people working at a time in each shift.
- A crew of workers, despite the late hour, was still painting and patching the previously exposed section of wall.
- It was easy to lay the pipe for the drainage system because the trench went from deep to shallow and the wall had a natural incline.
- Verify that there is sufficient room in the rain gutters and that they are free of debris to accommodate the water that will be draining off the roof.
- We knew that groundwater was getting into that part of the house, but roof leaks could have also been a factor.
- The downspouts should be removed from the wall and repositioned so that the water flows away from the house.
- As a result, water is less likely to pool against an exterior wall and more likely to find another entry point.
- After 20 Years, There Is No More Interior Rain
- Our research leads us to believe that waterproofing the building's exterior using the existing wall was not only the best plan of action, but also the cheapest (if no shortcuts were taken) and most likely to succeed.
- No good will come from resuming work on this after ten years unless absolutely necessary.
- After 20 years, we can say with absolute certainty that no water has penetrated the areas around our house that were waterproofed.
- We have some ideas if you're looking to save money and want to take matters into your own hands.
- Talk to an experienced contractor who knows how to tackle the task at hand and what equipment is necessary.
- Talking to your friend improves both of your knowledge and self-esteem.
- Mildew and mould can flourish in unprotected exterior walls that have been soaked by rainwater that has not been removed.
- Installing a drain tile system on the exterior of a basement is the best method of waterproofing once the interior has been finished.
- Rising humidity from rainwater seeping through cracks, a high water table, and water dripping from nearby leaking walls in the kitchen and bathroom all play a role.
- Ideally, you would have access to a specialised treatment that would eliminate this moisture for good.
Frequently Asked Questions About Exterior Concrete Wall
When sealing basement floors and foundation walls, the best concrete sealers are the Lithi-Tek 4500 primer, followed by the Siloxa-Tek 8510 waterproofing sealer. If you are installing flooring in the basement, it is best to use a moisture vapour barrier coating like the Vapor-Tek 440.
For the best method for sealing concrete block walls and the best cinder block water barrier, read on.
- Apply a Coating Directly On the Bare Wall.
- Use a Breathable / Permeable Barrier.
- Use a Weather-Resistant Elastomeric Layer.
- Use “The Pink Stuff”
- Repair Cracks and Fill Voids First.
- Install an Air and Moisture Barrier.
Yes, DRYLOK® can be applied to interior and exterior masonry surfaces – above or below grade.
Install a waterproofing membrane. A heavy membrane coat, an asphalt-modified polyurethane material, can be troweled or sprayed on to seal the foundation wall against water from the outside. Elastomeric membranes are made of modified asphalt and exhibit great waterproofing characteristics.
Although a concrete wall does get wet, water doesn't pool on it as it does on flat work, so it doesn't need sealing as much. After the concrete has been poured and cured, adding a sealer helps protect it from future damage, corrosion, and stains. Because concrete is porous, it tends to absorb water and other substances.