
Waterproofing and damp-proofing are two terms that are often used interchangeably; nevertheless, the primary distinction between the two terms is that waterproofing prevents water from entering an area totally while damp-proofing prevents moisture from accumulating. You can damp-proof a wall if you live in a dry environment that does not receive a lot of precipitation. Waterproofing is a safer option for the option for maintaining the structural integrity of your walls, but damp-proofing can be done.
Applying a damping glue, epoxy, or spray on the surface of a wall is the most popular method for preventing dampness from penetrating the wall. Plastic sheeting can also be used to cover outside wood walls, and silicone can be used to fill in holes in brickwork in order to prevent moisture from getting in.
Damp Proofing Walls
The presence of damp in one's home is something that many people have encountered at some point, and the results are never favourable.
Dampness can cause damage to the inside décor of your home, such as paint those peels, plaster those crumbles, wallpaper that curls, and rotting skirting boards. The most significant effect is that it transforms the ambience of your home from somewhere that is warm and inviting to a location that is uninviting and unpleasant.
In the event that your damp problem is not addressed, it has the potential to develop into more serious complications in the future. In this tutorial, we examine different strategies for protecting inner walls against dampness.
Problems With Damp Walls
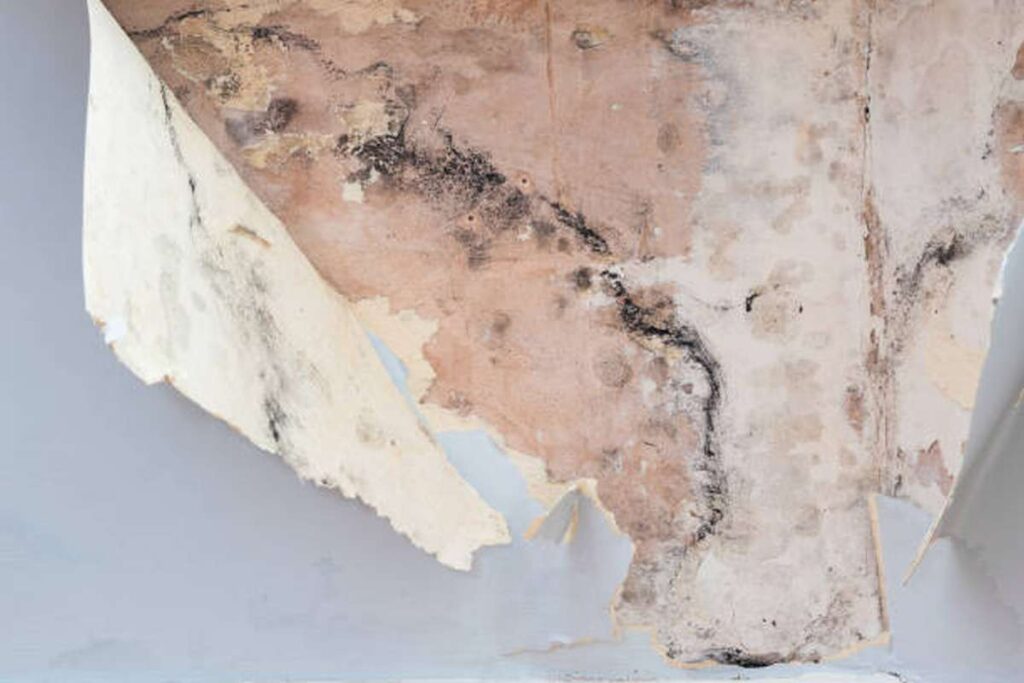
Internal walls that are always wet can cause a number of issues for a building. To begin, the presence of wetness in your home makes it feel less comfortable. It is unpleasant to smell musty and wet, and it causes harm to the décor and furnishings inside your home.
If the walls of your home are damp, it also means that your property is less energy efficient, which will cause your utility bills to be higher. The elderly, the young, and those who suffer from asthma, or any number of other respiratory illnesses are particularly at risk for developing health problems if they are forced to live in a home that has excessive humidity.
What Causes Damp Walls?
Finding out where the moisture is coming from is the first step in getting rid of damp walls. In order to accomplish this, you will need to conduct inspections of your home on the inside as well as the outside.
There are a number of potential underlying causes for damp patches on walls, including the following:
- Condensation
- The infiltration of rainwater
- Roofing that is not up to par
- Leaking gutters
- Poorly functioning downpipes
- Vegetation harming masonry and render
- The destruction of foundations or damp-proof courses by roots
- Rising damp
- faulty weather stripping on the windows and doors
- Insulation for Wall Cavities
How To Prevent Damp Walls?
The following are three speedy and simple methods for preventing moist walls:
Check For Any Cracks In The Walls And Seal Them
Cracks can appear in the walls of your home over time. These cracks often begin in the vicinity of the door frames and window frames. Because of these flaws, moisture is able to enter the structure of your building, which ultimately results in wet patches and wall seepage. Putty designed specifically for filling cracks needs to be used on each of these spaces. After the holes and cracks have been repaired, any loose plaster must be scraped off the wall before it can be painted again. It is imperative that you get this done before the monsoon season begins.
Waterproof The External Walls And Roof
Many of the paints used on the exterior of buildings are porous and allow water to penetrate into the inside walls of the building. It is necessary to apply waterproofing coats to the exterior of the walls in order to prevent water from leaking inside the walls. A coat that is waterproof will act as a barrier against rainwater and other forms of moisture, so preventing damp walls in your home.
The roof's ability to repel water is of equal importance. Because the terrace is open to the elements, it is easy for water to gather on its surface, which can lead to leaking and wet spots inside the building. As a result, waterproof roof coatings that also function as sealants and stop water from leaking through roofs should be used wherever possible.
Install A Damp-Proof Course
You may find that there are moist spots along the lower area of your walls, close to the skirting, on occasion.
A damp-proof course is a preventative step that can be taken to protect groundwater from seeping into your home via the walls as a result of wall seepage. About 150 millimetres above the ground level, a preventive barrier is built into the brick wall as part of a damp-proof course. This barrier is formed out of a material that is waterproof and does not permit water to pass through it. This stops any ground moisture from rising through the walls and causing harm to the structure.
A damp-proof course is typically installed during construction on the majority of structures. On the other hand, if you've found damp spots on the lower part of your walls, it's possible that the course needs to be replaced. This is a labor-intensive task that must be completed successfully. As a result, getting a qualified individual to inspect the damage and, if necessary, replace the damp-proof course is the best line of action to take.
During this time of year, it is important to make sure that your home has adequate ventilation. Because their presence might create breathing problems, mould and fungus that have formed on walls as a result of rain need to be removed as quickly as possible. In order to avoid having damp walls in the future, you should contact a professional as soon as you discover excessive moisture or extensive fractures in your walls.
Sealing Interior Walls With Damp Coating
Depending On The Material Of Your Walls, Buy A Damp-Proof Coating.
There are a variety of damp-proof coatings on the market nowadays. Most commonly, they are applied to a wall as epoxy, resin, cement, or spray to wick away moisture and prevent water penetration. Coatings can be applied in a number of ways. Get a coating that will last and is designed to withstand the elements of your wall construction. Coatings for different materials, such as stucco, wood, concrete, and cement, are needed. A coating can be purchased from a home improvement or hardware store, or it can be ordered online.
- Many people believe that damp proofing is not as effective as waterproofing. Damp-proofing will not help if there is apparent water damage or if you regularly have to deal with water in your room.
- Damp-proofing material sheets would ideally be put into a home's structure at the time of construction. Having builders install polyurethane sheets designed for damp proofing inside the walls of an unfinished project is one way to achieve this goal. Considering that this work involves penetrating the structure's foundation, only a licenced professional should take on this task.
- Hydraulic cement is a great option for repairing cracks in a cement or concrete wall and preventing water seepage. Though its primary function is waterproofing, another advantage is that it keeps moisture out of the walls.
Put On Protective Gloves, Eye Protection, And A Respirator.
No matter the kind of damp-proof coating, it is always necessary to take the necessary safety measures. Get a good pair of gloves on your hands first to protect them. Finally, always use safety glasses when working with any kind of coating, but especially when dealing with sprays. Finally, a respirator should be worn to protect the lungs from any toxic or hazardous airborne particles.
- Some damp-proof coatings are harmful, although the vast majority are not. When working with drugs you are not familiar with, it is especially important to err on the side of caution rather than regret.
Place A Drop Cloth Besides The First Wall You'll Be Working On.
This is an extremely important factor to think about before damp-proofing masonry, as cleaning the walls will result in the removal of a substantial amount of dust. It's also important to make sure the coating doesn't spill onto the ground. Spread out your drop cloth and lay it flat to protect the floor.
- Open the windows to get some fresh air into the room you're working in.
Any Damp Areas Should Be Wiped Down With A Lint-Free Cloth.
Find a clean, lint-free, strong cloth and use that. Holding it firmly in your palm, you can then use it to brush the wet sections of the wall. It's impossible to completely prevent moisture from entering your home, but the more moisture you can soak up, the better your damp-proof coating will be. Use a gentle, circular motion to wipe away any dust or dirt that has settled on the wall's dry parts.
- The best way to prevent condensation while damp-proofing a room is to turn up the thermostat and use a dehumidifier. In doing so, you increase the likelihood that the walls you are working on will remain dry. By doing so, you'll eliminate the source of the humidity in the room and be able to wipe the wall dry.
- It is best practice to shift the drop cloth from one wall to the next as you work your way around the space.
If the wall is crumbling, you can get rid of the pieces that are sticking out by scrubbing them with an angle grinder or scouring pad. However, if you notice that your wall is cracking, you should have an expert inspect the foundation to rule out a more significant water problem.
Apply Liquid Coatings With A Paintbrush And Roller.
Liquid coating application entails the following steps:
- To prevent dampness from spreading, pour some of the damp proofing solution into a paint tray.
- Painting the trim requires dipping a brush made of natural hair or nylon into the coating.
- Use precise back-and-forth strokes to paint the 6–8-inch region along the floor and ceiling as well as the places where the walls meet the corners.
- Using a roller with a thick nap will allow you to cover greater sections of your walls more quickly and easily.
- Some wet coatings require mixing before application, particularly those that are liquids or pastes.
- Most rising dampness in buildings is caused by water entering through the floor. Focus all of your energy on applying the coating to the wall's bottom if you want a polished look.
- There's a suggested drying period you should give it before returning to your bedroom. Drying time for a damp-proof coating is typically between 24 and 48 hours.
Apply Aerosol Coating To The Walls.
If you're using a paint sprayer or spray bottle, make sure it's clean before you start applying the coating, and then remove the cap. The lid can be locked in place by turning the knob inward. In order to apply it, hold the bottle or sprayer about 10 to 12 inches (25 to 30 centimetres) away from the wall and squeeze the trigger. The spray should be applied by moving your arm on a horizontal plane along each section of your walls.
- After spraying the walls, give them a minimum of 24 hours to absorb the liquid.
- You must use a respirator when carrying this out.
- It is possible to spray a damp-proof coating while holding sheets of corrugated plastic or poster board against the ceiling. That way, the coating won't accidentally end up on the ceiling. Use the drop cloth so that debris doesn't fall to the ground.
Use A Putty Knife To Apply Cement Coating.
Stopping moisture from creeping up the outside of a concrete or cement wall requires:
- Put a cement coating over it, and it will keep the moisture out.
- You can scrape the mouldy spots off the wall using a grinder or a wire brush.
- Open the container's lid and remove enough cement with a spoon to fill your putty knife.
- It may be required to repeat this step several times to ensure that all of the damp areas are well protected.
- You can use this method to keep brickwork dry, but only in small areas.
- Cement needs at least three to four days to fully settle.
Making Exterior Walls Damp-Proof With Plastic Sheeting
Determine The Moisture Problem Area And The Source.
Walk around the exterior of the building and inspect the wall you plan to treat for moisture. Before doing anything further, you should check for wetness in the wall by touching it. If there is no dampness whatsoever, or if any dampness is contained to the foot of the wall or lower, then the structure can be deemed damp proof. Water seeping in from the middle or the top indicates the need to hire an expert to waterproof the wall and fix any leaks.
- The presence of moisture at a wall's base suggests that it is being drawn up from the basement. A procedure called damp-proofing can mitigate this type of moisture buildup.
- If you want to make sure you aren't mistaking rain for dampness, you should check the wall when it has been wet for three or four days.
Prep Your Wall By Cleaning It.
When damp-proofing an exterior wall, it is important to first give it a thorough cleaning and get rid of any dirt or debris that may be on it. Assemble a garden hose and a cleaning spray that does not include chlorine. You should spray the liquid onto the wall you intend to damp proof. Applying cleaner to a hose and spraying it down and into the wall is an effective way to clean it. Allow the wall to air dry for 12-24 hours before wiping it off with a rough, lint-free cloth.
- To avoid ricochets, avoid spraying upwards. Instead, you should use a ladder to get the hose up higher and at a more advantageous angle.
To Keep Wood Walls Dry, Cover Them With Polythene Sheeting.
Adhesive polythene sheeting at least 6 mm thick is recommended for use on wooden walls (0.24 in). If the wall is damp on the side facing the exterior of the building, move the sheeting there. The wall should be dried with a clean cloth before you peel the backing off the self-adhesive side of your sheeting and stick it to the wall. Then, push the sheeting into the wall's surface to secure it in place.
- Construction workers use the same sheeting when they put in drywall on the inside of a building. This is a fantastic strategy for sealing off moisture. They have no manner of being fastened to masonry, however.
To Spread The Sheeting, Use A Credit Card Or A Squeegee.
Using a credit card or a squeegee, smooth up the sheeting once you've connected it to the wall. Use the flat, extended edge of the item to force bubbles out towards the sheeting's edge. To get rid of the surplus, you can use a utility knife or scissors.
Remember that you can always reduce the size of the sheets before you apply them if that's what you like. However, this might be a bit of a challenge to accomplish because you will have exposed edges if your dimensions are even slightly wrong.
To Fill In Any Gaps In Masonry That Has Cracks, Use Silicone Caulk.
Besides a caulking gun, you should also get a few extra tubes of silicone caulk. Caulk guns require tubes to be shortened by one to two centimetres (ten to twenty millimeters) at the top before they can be loaded. Next, examine your walls for holes, cracks, and other such imperfections. If you find a gap, you can fill it with caulk by inserting the tube's opening into the gap and pulling the trigger.
- Though technically not damp proofing, this will help keep moisture out of your walls.
- Walls that have had caulk put to them should be left alone for at least 48 hours before being painted over.
- This is not a practical option for repairing cracks in wood. Wood putty or trimmed panels can be used to fill the voids left by the absence of brickwork in the sheets.
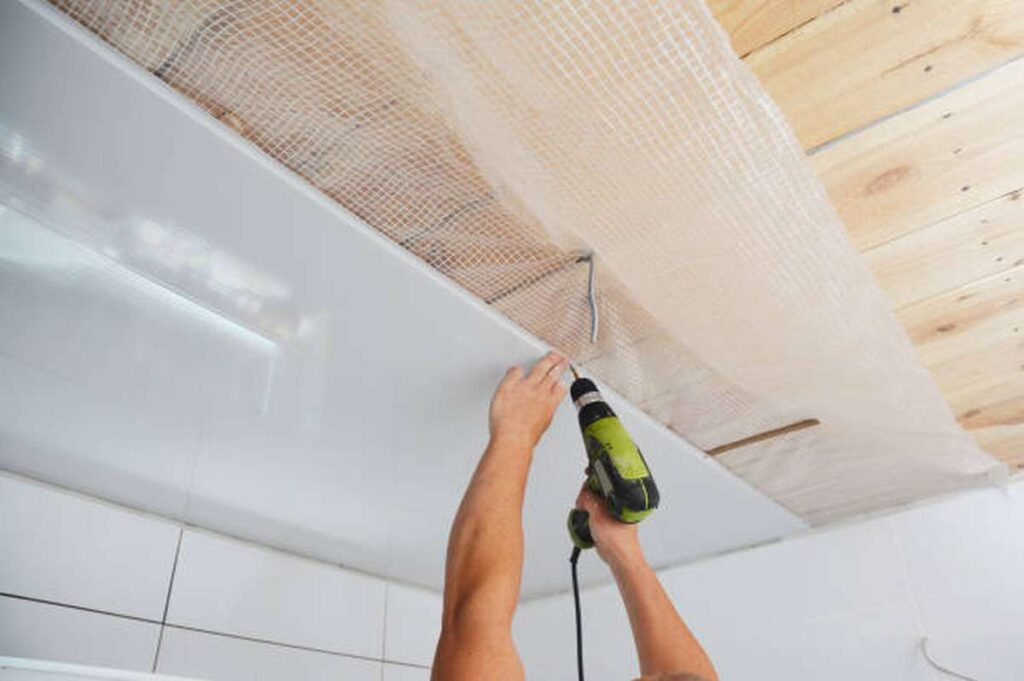
To Have Plastic Sheeting Installed In Dry Wall, Hire A Professional.
If you've tried sealing the wall with paint, outside sheeting, and caulk without success, you may want to hire a contractor to cut through the wall and install plastic sheeting. It's possible this is required. Search online for a waterproofing company though before you do anything else. You can't do this on your own, as it requires drilling into the building's foundation and working on its support beams.
- This is a great option to consider if you only want to keep dampness from building up on one specific wall. To cover your entire house in sheeting, though, would cost you tens of thousands of dollars.
- Costs could range from $ 500 - $10,000, depending on the complexity and scope of your project.
Hire A Contractor To Install Masonry Walls That Are Chemically Damp-Proof.
Existing concrete walls that are impacted by moisture cannot have plastic sheeting installed over them. Rather, you should hire a waterproofing service to inject a chemical into your wall that will keep it dry. They'll drill holes at specific heights and depths in your wall and fill them with a special foam or rod that will soak up any moisture there and keep it from harming your drywall.
- You cannot accomplish this on your own because doing so usually necessitates drilling through the joists in your wall.
- It's cheaper than knocking a hole in the wall, but it won't work on plaster or drywall very often.
Maintaining Dry In Your Room
Improve Your Room's Ventilation With Fans And Windows.
Sometimes the lack of ventilation is to blame for the dampness. Ventilate your room better by doing the following:
- As long as it's safe to do so, keep your blinds or curtains open two or three inches (5.1 or 7.6 cm) whenever the weather permits.
- Get energy-efficient fans and keep them running if you can't keep the windows open.
- Put them up against a dry wall, turn the power down, and set the oscillation settings so that they sway back and forth.
- If this is the case, consider having a ventilation, heating, and air conditioning (HVAC) expert install new vents near the damp spot in the room.
- You shouldn't leave your windows open all the time if you don't have screens. It's also not a smart idea if the window is located on the bottom floor, as water could easily enter the room in the event of a downpour.
- Keeping your windows open in a room where the relative humidity is high is not a good idea. This will just complicate matters further.
- The power setting of your room's fans is not necessary for them to be effective.
To Keep The Room Dry, Keep The Heat On Or Use A Radiator.
Another option is to raise the room's temperature, as this will have the same effect of removing moisture from the air. That way, any moisture in the air will swiftly evaporate instead of condensing on the surface of your walls. Consider buying a small radiator for your basement and leaving it on whenever you are there if you don't want to (or can't afford to) heat the entire house.
However, if you insist on using a radiator, take precautions to ensure that it won't cause a fire while you're away from the room by purchasing a low-heat ceramic model. Unplug the radiator when you leave the house or go to sleep. Space heaters should always be turned off before leaving the room they are in.
Keep The Room Humidity-Free By Using A Dehumidifier.
Getting a dehumidifier and placing it in the condensation-prone region is the best course of action if you don't want to mess with the temperature stability of your home. Plug it into a wall socket and turn it on. Make sure the dampness disappears after turning the dehumidifier to its driest setting.
- This precautionary measure is excellent for blocking the entry of damp air into your basement.
Regularly clean your gutters to prevent water spills.
A leaky roof is likely to be the cause of interior dampness that reappears days after a rainstorm. Get a ladder and have a friend help you up it. Move over to the external wall where you spotted the moisture and investigate. Don some gloves before you mount the ladder, and be prepared to get your hands dirty. Get a scoop and remove any leaves, dirt, or other foreign objects from your gutter to see if that helps.
- In the event of a heavy downpour, water may spill over the gutter's edges if it is obstructed by debris. This means it could seep through the base of your wall and pool there if it rains heavily. Damp areas on the wall are actually condensation on the interior of the wall.
Conclusion
Damp walls might cause structural difficulties. In addition, moisture can damage your home. Young, elderly, and asthmatics should avoid residences with humidity levels above 50%. A damp-proof course prevents wall seepage, which can let groundwater into your home. Permeable exterior coatings allow water to seep through walls.
Consumers can choose from many damp-proof paints and stains. Epoxy, resin, cement, and spray are used to wick moisture away and prevent water penetration. Building materials need coatings. Applying a liquid coating involves these steps. Damp-proofing a paint container.
Raise the temperature and use a dehumidifier to keep walls dry. Natural hair or nylon brushes must be wetted. Damp-proof coatings dry in 24 to 48 hours. Alternatives to a standard spray booth include corrugated plastic or poster board. This approach maintains dryness in brickwork.
Damp-proofing external walls prevent moisture from entering a building. Adhesive polythene is great for covering wooden walls (0.24 in). If moisture forms on the wall, move the sheets.
Content Summary
- Waterproofing is a safer option for maintaining the structural integrity of your walls, but damp-proofing can be done.
- Applying a damping glue, epoxy, or spray on the surface of a wall is the most popular method for preventing dampness from penetrating the wall.
- This tutorial examines different strategies for protecting inner walls against dampness.
- Internal walls that are always wet can cause some issues for a building.
- To begin, wetness in your home makes it feel less comfortable.
- If the walls of your home are damp, it also means that your property is less energy efficient, which will cause your utility bills to be higher.
- Finding where the moisture is coming from is the first step in removing damp walls.
- There are some potential underlying causes for damp patches on walls, including the following: The following are three speedy and simple methods for preventing moist walls: Cracks can appear in the walls of your home over time.
- It is necessary to apply waterproofing coats to the exterior of the walls to prevent water from leaking inside them.
- A damp-proof course is a preventative step that can be taken to protect groundwater from seeping into your home via the walls as a result of wall seepage.
- About 150 millimetres above the ground level, a preventive barrier is built into the brick wall as part of a damp-proof course.
- A damp-proof course is typically installed during construction on the majority of structures.
- On the other hand, if you've found damp spots on the lower part of your walls, it's possible that the course needs to be replaced.
- As a result, getting a qualified individual to inspect the damage and, if necessary, replace the damp-proof course is the best action to take.
- During this time of year, ensuring that your home has adequate ventilation is important.
- To avoid having damp walls in the future, you should contact a professional as soon as you discover excessive moisture or extensive fractures in your walls.
- Get a coating that will last and is designed to withstand the elements of your wall construction.
- No matter the kind of damp-proof coating, it is always necessary to take the necessary safety measures.
- Some damp-proof coatings are harmful, although the vast majority are not.
- Spread out your drop cloth and lay it flat to protect the floor.
- It's impossible to completely prevent moisture from entering your home, but the more moisture you can soak up, the better your damp-proof coating will be.
- Use a gentle, circular motion to wipe away any dust or dirt that has settled on the wall's dry parts.
- Doing so increases the likelihood that the walls you are working on will remain dry.
- By doing so, you'll eliminate the source of the humidity in the room and be able to wipe the wall dry.
- Liquid coating involves the following steps: Pour some of the damp-proofing solutions into a paint tray to prevent dampness from spreading.
- Use precise back-and-forth strokes to paint the 6-8 inch region along the floor and ceiling and the places where the walls meet the corners.
- Focus on applying the coating to the wall's bottom if you want a polished look.
- There's a suggested drying period you should give it before returning to your bedroom.
- Drying time for a damp-proof coating is typically between 24 and 48 hours.
- After spraying the walls, please give them a minimum of 24 hours to absorb the liquid.
- It is possible to spray a damp-proof coating while holding sheets of corrugated plastic or poster board against the ceiling.
- Stopping moisture from creeping up the outside of a concrete or cement wall requires: Putting a cement coating over it; it will keep the moisture out.
- Using a grinder or a wire brush, you can scrape the mouldy spots off the wall.
- Walk around the exterior of the building and inspect the wall you plan to treat for moisture.
- Before doing anything further, you should check for wetness in the wall by touching it.
- A procedure called damp-proofing can mitigate this type of moisture buildup.
- If you want to ensure you aren't mistaking rain for dampness, check the wall when it has been wet for three or four days.
- When damp-proofing an exterior wall, it is important to clean it and thoroughly eliminate any dirt or debris.
- It would help if you sprayed the liquid onto the wall you intend to damp-proof.
- If the wall is damp on the side facing the exterior of the building, move the sheeting there.
Frequently Asked Questions About Damp Proof A Wall
An easy solution to cure dampness on internal walls is to paint walls and ceilings with Dryzone Mould-Resistant Emulsion Paint. The paint is damp-proof internal walls against condensation and protects them from unwanted mould growth for at least five years.
Even installing a damp proof membrane (DPM) of the plastic sheet mesh variety can be considered a DIY damp proofing solution. Once again, there is a good range of damp proof membrane kits available that can do the job.
Rising dampness can be treated by creating a new damp-proof course by stripping the damaged old plaster and drilling holes into each brick. A damp-proofing chemical is injected into these holes under high pressure to create a water-repellent barrier. The wall is then re-plastered, followed by the application of wall paint.
Over time, if left untreated, it can damage our health as it can cause (or worsen) respiratory conditions. In addition, homes feel colder as dampness affects heat insulation. On top of this, it's unsightly and can lead to structural damage. So, damp proofing internal walls are something that needs to be done.
Open windows and doors to help speed up the drying process. Use fans to move air around the damp walls. Also, use dehumidifiers, which can help remove moisture from the air and walls. Professionals use tools like moisture meters, infrared imaging devices, dehumidifiers and heavy-duty fans.