It is crucial to learn the proper installation method if you plan to tile over your flooring at home. Step-by-step instructions for tiling over flooring, including information on materials needed and how to use them, may be found on this page. The included manual is packed with useful tips that will make the process go more quickly and easily. Read on if you're curious about tiling over flooring.
When it comes time to replace the flooring in their homes, many homeowners are confronted with the alternative of tiling directly over the floorboards. Changing the flooring in your home can be done for a variety of reasons, including updating your decor or making your home more functional.
The idea that tiles and floors can't live together is widespread yet false. They don't get along great, but with a little DIY magic, you can make them buddies again. In this article, we will discuss the steps necessary to lay tiles over flooring and get a flawless, long-lasting, and crack-free result.
Why Can't Floor Tiles and Boards Get Along?
Hardwood flooring can be a pain if you want to switch to tiles, and that's true whether you live in an older home with the original wooden floorboards or a modern construction with chipboard flooring buried beneath the carpets.
As time passes, tiles may crack or lift due to the wood's pliability and inconsistency. This is especially true in heavily used areas where floorboards bend underfoot, making it impossible to lay tiles directly over floorboards.
Despite the fact that robust and waterproof tile surfaces would be preferable in kitchens and bathrooms, it is not uncommon to see oak flooring in these rooms. It is for this reason that tiling over flooring is a common practice in bathrooms; nevertheless, if not done properly, it can lead to broken tiles and grout lines. If you want to transition to concrete, you won't have to tear up your flooring to do so. Instead, with a little DIY prep work, you can create a level, solid surface that's great for floor tiling.
Floor Tiling: A Do-It-Yourself Guide
Pick the Floor Tiles You Like Best
To begin your DIY project successfully, measure the area of floor you want to cover and choose floor tiles that are the right size for the job. Check out our wide variety of floor tiles available online; if you spend over $500, we'll even pay for delivery!
Put a Stop to the Creaks!
After you have taken all of the furnishings out of the room you intend to tile, you should give the floor a good stamping while listening for any squeaks, loose planks, creaks. Mark any floorboards that are sagging or creaking because of excess weight with a pencil. Once you've isolated the problem areas, you can try to strengthen the surface by adding more screws.
If there are pipes or wires running beneath the floor, use shorter screws to avoid injuring them. The joists are the structural supports beneath the floor, and they run perpendicular to the boards. You can reduce the squeaking by using countersunk screws to fasten any floors that are causing movement, and by using extra screws.
Pick Your Tile Backer Board
If you want to tile your floors, the next step is to cover them with something solid and smooth. Plywood has been widely used for floors, although a thicker ply of 12 mm is recommended to achieve the requisite rigidity.
Putting down tiles raises the floor by around 1.5 centimetres, so the room may look like it has a'step' leading into it. Specifically designed tile backer boards have been an option in recent years and are rising in favour. It will be easier to maintain a uniform floor height from room to room because to the reduced thickness of this material.
Organise Your Tiling Board
Regardless of the backing board you decide to use, you'll need to measure the area you're trying to cover with a measuring tape and a pair of scissors to get it to the right dimensions. It's best to start in a corner of the room and work your way across the space, slicing off the trickier pieces of board last to make them fit the opposite wall. Before you start laying the boards, you should clean the floor well.
Get some quick grip glue into a caulking gun and squirt it along the back of the first board you'll be laying, right up to the board's edge. Another adhesive perimeter, this one reaching further into the board's centre, can be made from this vantage point.
Check that the boards are aligned correctly with the edge of the floor after placing them with the adhesive side down. Next, you'll want to use your foot to tap the board down and make sure it's firmly attached to the floorboards underneath it. Then, immediately afterwards, fasten the boarding to the underlying floorboards with a few short countersunk screws.
Plywood can be screwed directly through, while tile backer board requires the drilling of pilot holes. Plywood can be screwed straight through. Use a cordless electric screwdriver to ensure they are firmly fastened in a gridlike arrangement throughout the entire surface. If you want to keep the board from popping up at the edges, you should also screw down its four corners.
Repeat these procedures with your tiling board until you have covered the entire floor. Applying adhesive to the joint between two boards is essential for avoiding the appearance of protruding lips or edges.
Preparation
After the last board is secured, you'll have a flat, smooth, and solid surface on which to do your work. Applying a thin coat of diluted SBR primer and letting it dry is the next step in getting a surface ready for tiling. If you do this, you'll have a surface that holds tiles securely and is ready for tiling adhesive.
It is strongly advised that flexible tile adhesive and grout be used when tiling over a wooden floor to reduce the possibility of cracking. Choose a silicone sealer in place of a solid filler for the area around the room's edges. As you walk on the tiles, they won't be pushed away from the wall or the skirting board and crack. As an alternative, they will bend under your weight.
Is Tiling Possible on Wooden Floors?
Which Items Do I Need?
Putting down overboard before tiling a floor is essential for ensuring the floor doesn't buckle. Wooden panels or a specific backer board could be used for this purpose. You'll also need a flexible glue and grout.
Make sure the surface is stable and level before installing tiles to provide a long-lasting finish. There are a handful of simple steps that must be taken in order to properly prepare the space for tiling over existing flooring.
Repairing Unstable Floorboards
You should begin by stomping around the entire room. Check any creaking floorboards and lock them down before you start levelling the floor in preparation for tiling. You'll have a solid foundation on which to build.
It's important to be cautious when nailing down loose floorboards to avoid severing any pipes or wires that may be beneath the surface. One way to reduce danger is to use shorter screws, while another is to pay close attention to the placement of already-installed fasteners. Keep in mind that the direction in which the joists run will be perpendicular to that of the floorboards. Having access to this knowledge is crucial.
The first thing you should do is examine the entire floor for any boards that are loose or making noise. These need to be securely screwed into place at the appropriate points to ensure they don't move. Be careful since there could be pipes or cables buried in the ground that could cause damage if you dig too deeply. Keep your movements to a minimum.
Picking the Perfect Overboard
Backer board and plywood are common building materials and can be found at most hardware and home improvement stores, giving you a wide range of options for your overboard's construction. If you want to use plywood for your tile project, make sure it has a thickness of 12 mm or more to ensure a stable base.
Think about how much the tiles you want to use, plus this, will elevate the level of your flooring before you begin the project. One possible alternate is the backer board. Keeping the floor level throughout the house consistent, this was made with tiling in mind and provides an alternative to the standard overboard that is thinner.
Setting Your Overboard
Using a combination of adhesive and screws, you can make sure your tile is good and stable before you start tiling. If you want to minimise cracks and breaks in the future, it is in your best advantage to take your time with this phase and limit the amount of movement that occurs.
Starting at one of the room's unobstructed corners, work your way across the open area, trimming and reassembling your pieces as you go. The trickier puzzle components should be saved for last. You can begin sticking things down once you have everything arranged how you want it.
Using the caulking gun, apply adhesive to one side of the board and replace it in its original location. The boards should be attached to the subfloor with countersunk screws and an electric drill for a flush appearance. After each section of the floor has been tiled, repeat the preceding processes.
Priming Tiles
The time to begin tiling is quickly approaching, so get set! However, you should prime the newly formed flat surface with a coat of diluted SBR primer before you begin putting your floor tiles on the wood. Before you can start laying tile on the floor, this must be done.
This will result in improved flexibility, waterproofing, and adhesion in addition to an overall improvement to the experience of laying tile. In the absence of a tile primer, there is a possibility that your overboard will become soggy and difficult to manipulate.
You have reached the end of the process of tiling over flooring and have an even surface that has been completely prepared for installation.
Tiling Your Floors
Our suggestion is to use a flexible adhesive in conjunction with grout when laying floor tiles over wood. When placing tiles on wood, which can be unpredictable no matter how well your floorboards are fixed, it is very important to work with flexible adhesive, which will offer your tiles a little extra give from any movement.
Wood Tiles vs. Wooden Floor
What you're thinking is not lost on us. We should not tile over the flooring because it would be unnecessary work. Wood-effect tiles are a great alternative to traditional hardwood flooring if you love the look of wood but hate the maintenance.
Tiling floors with tiles that give the impression of wood has many advantages over using real wood, including higher durability, less maintenance needs, and enhanced hygienic conditions.
Wood flooring, while durable, often has to be sanded and resealed once a year in addition to regular upkeep. Similarly, ceramic and porcelain tiles need to be cleaned regularly in most installations.
Plus, a well tiled floor can provide stability that is maintained over a longer length of time, and you won't have to worry about creaky floors. When compared to other flooring options, tile floors stand the test of time better, making them a great choice for high-traffic areas and wet locations like kitchens and bathrooms.
Patterns for Wood-Looking Tiles
The selection of designs available to choose from is an additional significant advantage of tiling over floorboards with wood effect tiles. Because there is such a wide variety of alternatives to pick from, including colours, textures, styles, and even forms, the possibilities for your floor are virtually unlimited.
How To Lay Ceramic Tiles On Floorboards
You would be mistaken if you thought that installing tile over floorboards was a difficult task because it is not. The truth is that tiling any surface, including over floors, is not any more difficult than tiling any other surface, provided that the fundamentals are followed. In addition, concrete is not likely to give a surface that is as flat as the one provided by floorboards.
To make it easier for you to instal ceramic tiles over wooden floorboards, We’re going to walk you through the process of doing so step-by-step today. If you tile over your flooring in this manner and follow these guidelines, you won't have any problems.
Check For Loose Floorboards
Checking for loose floors should be the very first and most important thing you do before getting started. It is almost unavoidable for wooden floorboards to acquire noises like squeaks and creaks over time. Before you can even consider installing tiles, you will need to tighten any floors that are loose first.
First remove all of the furniture from the room, and then walk around the floor in every direction. This will help you locate any loose floorboards.
The floors that are loose should be marked with a pencil, and additional screws should be used to secure them. If you want to avoid any lumps or unevenness on the surface, make sure you use short screws with countersunk heads. After you have finished tightening any loose floorboards, you should sweep and mop the floor.
Prepare Your Floorboard Surface For Tiling
Covering the surface of your floorboard with a backing board that is both smooth and strong is necessary in order to get it ready for tiling. When it comes to establishing a sturdy and smooth floorboard surface, 12 mm plywood or 6 mm tile backer boards are typically the best options to use.
Be aware that installing a backing board made of plywood on top of your floorboards can dramatically increase the height of your floors. Because of this, the use of thin backer boards is the option that is most frequently selected when preparing floorboard surfaces. In order to cover your floorboard, you should begin by measuring your plywood or backer board and then using a jigsaw cutting tool to cut it into the desired form.
You can attach your backer board or plywood to your floorboards by drilling a few holes in the material, and then using a silicone gun loaded with instant grip glue. Be careful to begin at one of the room's corners and work your way to the other sides as you clean.
Prime The Surface
After you are through preparing the surface of your floorboards, you will need to prime the surface so that tiles may be laid on it. When you are working with plywood, you have the option of priming the surface using either an SBR or an acrylic primer. Alternately, you should stick to utilising an SBR primer if you are working with a backer board. Be very careful not to use any special PVA primers on any of the backing boards; doing so will cause the surface to become damaged.
If you prime your backing board first, you will end up with a surface that is sticky and just right for laying tiles on. After you have finished priming, you can apply tile adhesive to the surface of your timber floor and then lay ceramic tiles on top of it.
Choose Your Ceramic Floor Tiles
After you have primed and prepared the surface of your floorboards, you can then instal floor tiles on top of them. You are now free to select the ceramic tiles in Perth that best suit your needs and preferences.
How To Tile On A Wooden Floor?
On top of the hardwood or wood subfloor, instal cement backer board with a thickness of half an inch. Using a scoring tool with a carbide-tipped blade, cut the backer board to meet the dimensions of the room's perimeter.
Make a score on the surface of the board at the location where you want the cut to be, and then break the board along the scoreline. Next, using screws that won't corrode, secure the backer board to the wood at regular intervals of six inches.
In order to conceal the seams in the backer board, apply fibreglass tape to each one. After that, strengthen the fibreglass by trowelling a thin layer of thin-set mortar over it, and then allowing the mortar to dry completely overnight.
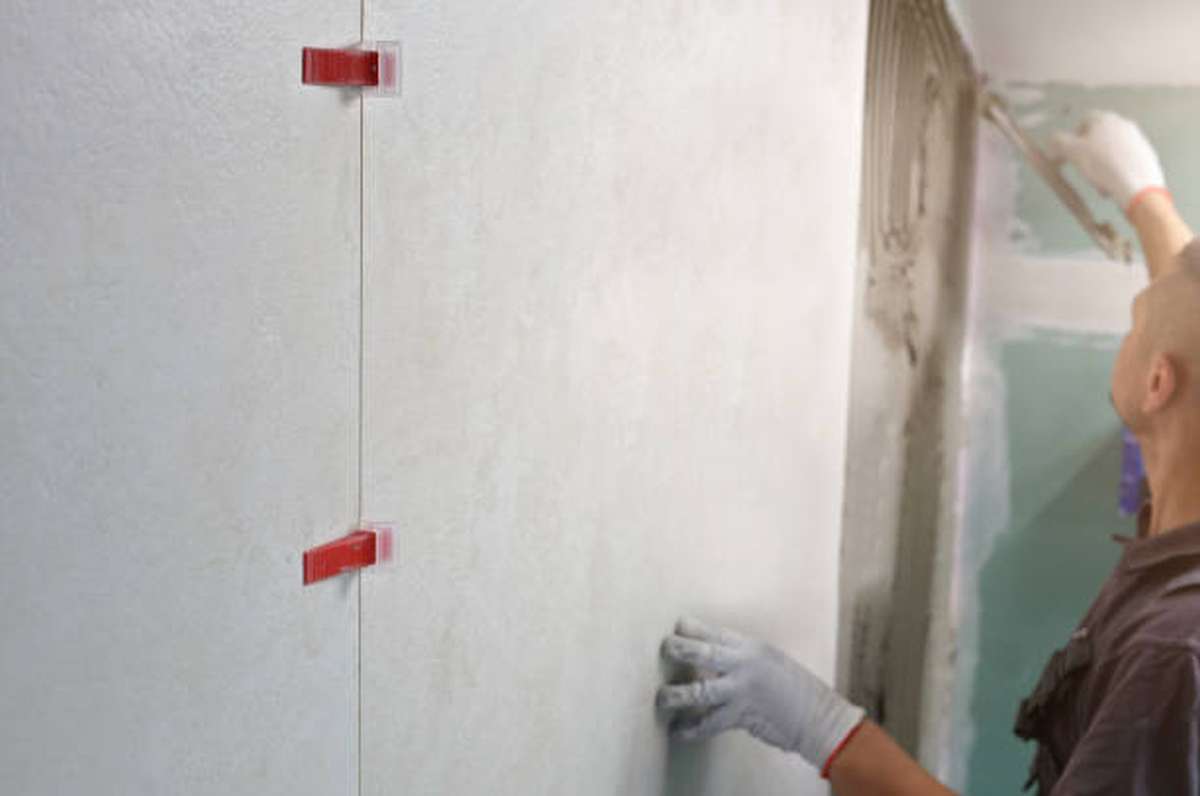
Find the centre of the wall that is the farthest away from the door you enter the room by using the measuring tape. Draw a line with the chalk that stretches from this point across the entire room.
To identify the most effective configuration for the space, dry fit your tiles into the floor without using any mortar. Placing the first tile against the wall that is furthest from the door and drawing a chalk line along the middle of it is the first step. Place the following tiles so that they are evenly spaced to each side.
By doing so, you will have an installation that is balanced, with the chopped tiles lining the boundaries of the space, which is the place in the room where they are least likely to be visible when you enter the room. If you need to, you can use tile spacers to ensure that your lines are straight.
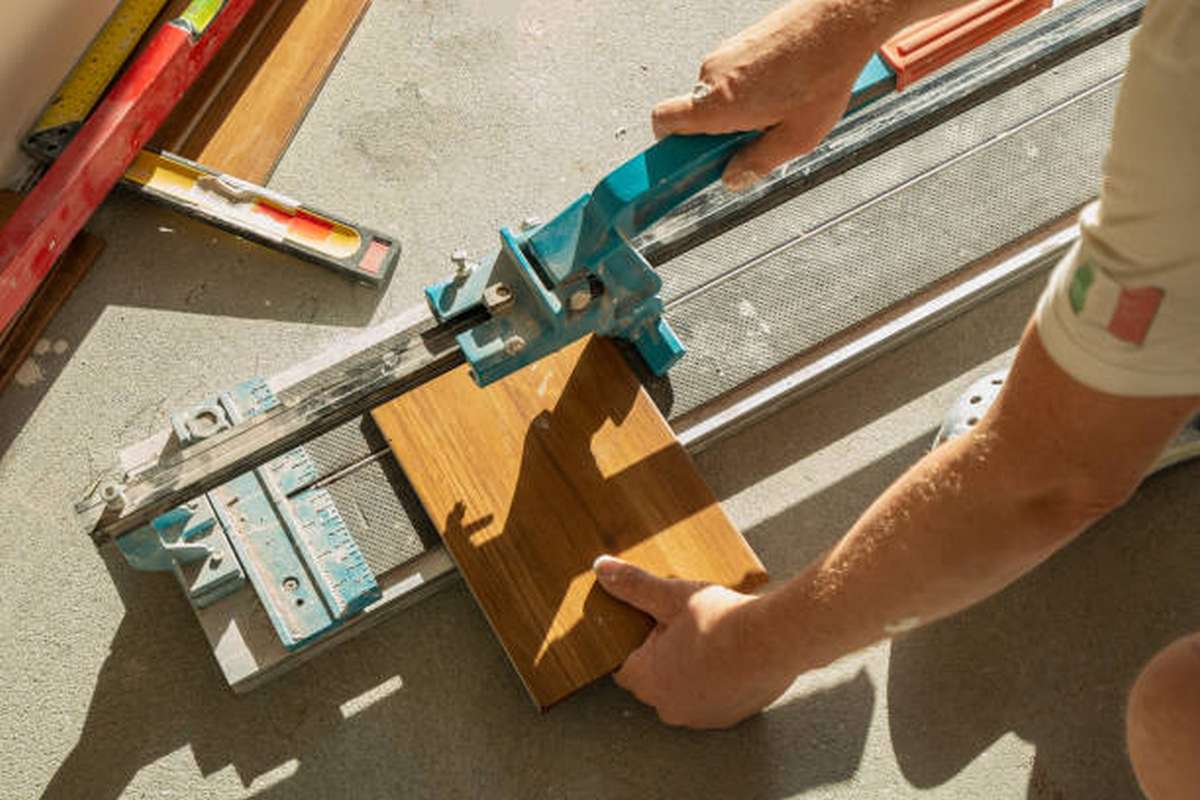
Tiles can be trimmed on a wet tile saw to fit the area, after which their placement in the dry layout should be double-checked. The tiles should be removed from the floor and rearranged in the opposite order in which they were initially laid out before being placed nearby.
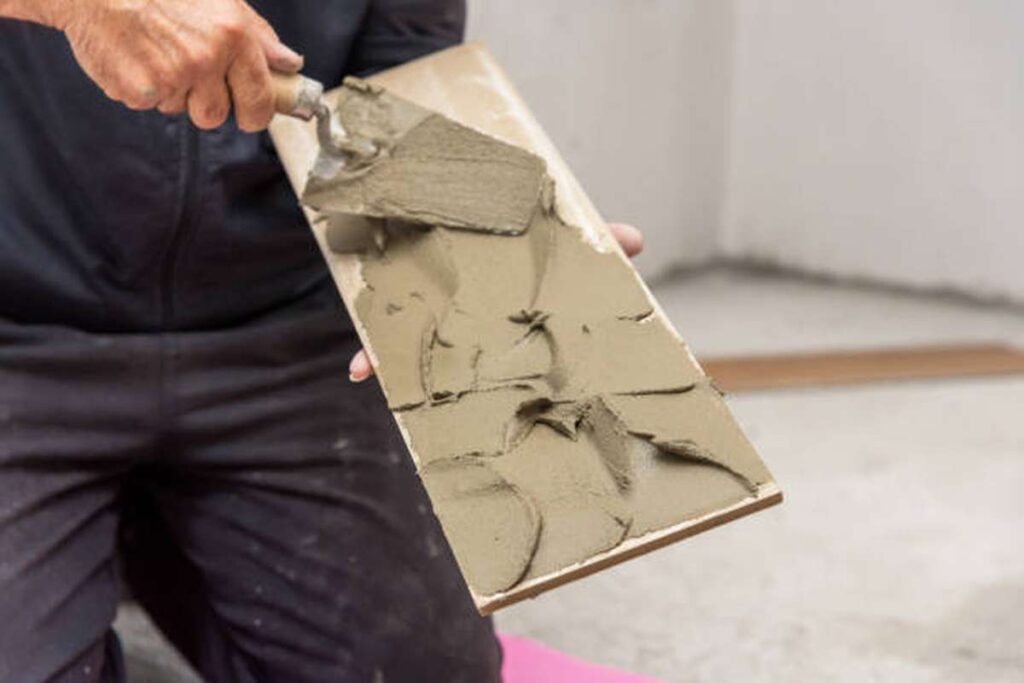
Using a trowel, spread thin-set mortar onto the floor of the room. The thin-set should be spread using the trowel's flat edge, and then the trowel should be turned to its teeth edge to comb the mortar until it is of a consistent thickness.
Apply even pressure to the tiles as you press them into the mortar, maintaining the same pattern as you did in the dry fit. After that, use a rubber mallet to gently tap the tiles into the mortar in order to achieve a strong binding between the tiles and the mortar.
Continue to put the tiles until you have worked your way out of the chamber in the opposite direction. The tiles should be allowed to air dry for a full day before anyone walks on them.
Finish the installation by using a grout float to disperse grout over the tiles and then grouting the space. Holding the float at a 45-degree angle, move the grout across the tiles in the desired direction.
First, press the grout into the joints using a variety of different angles, and then, using the side of the float, scrape away any extra grout. Ten minutes should be allowed for the grout to dry.
Use a grout sponge that has been dampened to clean the surface of the tiles. Rinse the sponge often while moving it in circular motions over the tiles until the tiles are completely clean. Wait a full day for the grout to become dry.
Conclusion
In this article, you'll find detailed guidance on tiling over existing flooring. There are a number of factors to consider when deciding to replace your flooring. DIY floor tiling is possible with a firm, flat surface prepared properly. The installation of tiles raises the floor by around 1.5 centimetres, creating the optical illusion of a step leading into the room. In recent years, tile backer boards that were made with their needs in mind have become more widely used.
Tiles can be easily installed over existing timber floors with minimal prep work. The floor must be level and stable before tiling, and this can be achieved with just a few basic preparation measures. Once a surface has been cleaned and prepared with water, the following step is to apply SBR primer and allow it to dry before proceeding with tile adhesive. Plywood with a thickness of 12 mm or more will serve as a solid foundation for your tiling project. The joists will run at right angles to the boards on the floor.
These days, you can find plywood and backer board at any hardware store. If you want the look of wood flooring but don't want to deal with the upkeep, wood-effect tiles are a terrific option. Wood-look tile flooring has many advantages over actual wood flooring, including increased longevity and decreased care requirements. Wooden flooring can be tiled over with the same ease as any other surface if the basics are understood and applied. Your floorboards must be prepared for tiling by covering them with a smooth, sturdy backing board.
Plywood can be primed with either an SBR or an acrylic primer, depending on your preference. Once the priming is complete, you can apply tile glue to the wood floor and then set the ceramic tiles on top.
Content Summary
- If you want to tile over your flooring at home, you must first learn the right installation process.
- This page provides detailed directions for tiling over flooring, including what supplies are required and how to apply the tiles.
- Many homeowners are faced with the option of tiling straight over the floorboards when it is time to repair the flooring in their houses.
- There are many good reasons to switch up your flooring, such as modernising your design or adding extra usable space.
- The misconception that tiles and floors can't coexist is pervasive yet untrue.
- This article will explain how to put tiles over existing flooring for a finished product that is beautiful, resilient, and free of cracks.
- When floorboards bend under foot, as they often do in high-traffic areas, tiling cannot be installed immediately on top of them.
- You may avoid tearing up your floor by making the switch to concrete.
- Instead, with some do-it-yourself effort, you'll have a stable, level surface that's ideal for floor tiling.
- The floor should be thoroughly stamped while listening for squeaks, loose planks, and creaks after you have removed all of the furniture from the room you wish to tile.
- Make a notation with a pencil on any planks of flooring that are bowing or creaking as a result of extra weight.
- Joists are the under-flooring structural supports that are perpendicular to the boards.
- You Should Select a Backer Board for Your Tiles The next step in floor tiling is covering the subfloor with a sturdy, flat material.
- Prepare Your Board For Tiling With a measuring tape and some scissors, you can cut the backing board to the exact size you need for the space you're trying to cover.
- You should clean the floor well before laying the boards.
- After setting the boards adhesive-side down, make sure they are flush with the floor's perimeter.
- Immediately after, use a few short countersunk screws to attach the boarding to the joists below.
- To tile an entire room or area, simply repeat the above steps using a new tiling board.
- The next stage in preparing a surface for tiling is applying a thin coat of diluted SBR primer and waiting for it to dry.
- If you accomplish this, you'll have a surface that's ready for tiling glue and can hold tiles firmly.
- In order to minimise the likelihood of cracking, it is highly recommended that flexible tile adhesive and grout be used when tiling over a wooden floor.
- Instead of using a regular filler around the room's perimeter, you should use a silicone sealant.
- Overboard must be laid prior to tiling a floor to prevent the floor from bowing.
- You'll also require grout and a flexible adhesive.
- You can ensure a long-lasting tile job by first making sure the surface is sturdy and level.
- Before you start levelling the floor in preparation for tiling, you should check for any creaking floors and secure them.
- It's important to remember that the joists won't run in the same direction as the flooring.
- The first step is to check the entire floor for any boards that are moving around or producing noise.
- Restrict your movement as much as possible.
- For your tiling job, plywood with a thickness of 12 mm or more is recommended.
- Before beginning the process, consider how much the tiles you want to use, plus this, will raise the level of your flooring.
- The backer board is an alternative that could be used.
- This was designed with tiling in mind to maintain a uniform floor height throughout the house and serves as an alternative to the conventional, thicker flooring.
- Place Your Overboard When tiling, it's important to secure the tiles in place with glue and screws to prevent them from shifting.
- Taking your time and reducing the amount of movement during this stage will help reduce the likelihood of fractures and breaks later on.
- For a seamless look, use countersunk screws and an electric drill to fasten the boards to the subfloor.
- To begin laying floor tiles on the wood, however, you must first prime the newly generated flat surface with a coat of diluted SBR primer.
- This step must be completed before the tile can be laid on the floor.
- It's possible that your overboard will get wet and unwieldy if you don't use a tile primer.
- Covering Your Floors with Tile For the best results when installing floor tiles on wood, we recommend using a flexible adhesive in conjunction with grout.
- Even though your floorboards are securely fastened, the wood beneath them can still shift around, therefore it's crucial to use a flexible adhesive when installing tiles on wood.
- Tiling over the flooring is an unneeded expense and hassle.
- If you want the look of wood flooring but don't want to deal with the upkeep, wood-effect tiles are a terrific option.
- Design Ideas for Wood-Imitating Tiles An additional major benefit of tiling over flooring with wood appearance tiles is the variety of styles available to pick from.
- Today, we're going to break down the process of laying ceramic tiles over wooden floorboards so that it's easier for you to do it yourself.
- Be On The Lookout For Wavy Planks Of Flooring The first and foremost thing you should do before beginning any work is to check for loose floorboards.
- Tightening up the floors is a prerequisite to tiling them.
- You can use this to pinpoint the location of any squeaky planks.
- It's important to clean and wipe the floor once you've finished tightening any sagging floorboards.
- The tiling surface on your floorboards needs to be prepared. Your floorboards must be prepared for tiling by covering them with a smooth, sturdy backing board.
- Placing a plywood backer board over your existing floorboards will significantly raise the floor level.
- Backer board or plywood can be affixed to the floors by drilling holes in the material and applying quick grip adhesive with a silicone gun.
- Initialize the Outer Shell After you've finished sanding and otherwise preparing your flooring for tile, you'll need to prime the surface.
- Plywood can be primed with either an SBR or an acrylic primer, depending on your preference.
- But if you're using backer board, keep to using SBR primer.
- Priming the backing board first will provide a sticky surface that is ideal for tiling.
- Once the priming is complete, you can apply tile glue to the wood floor and then set the ceramic tiles on top.
- Pick the Ceramic Tiles for Your Floor Installing floor tiles requires priming and preparing the floors underneath.
- Cement backer board, half an inch thick, should be installed over the hardwood or wood subfloor.
- Cut the backer board to size using a scoring tool with a carbide-tipped blade to match the room's outer dimensions.
Frequently Asked Questions About Floorboards
Before you lay your boards, give the floor a good clean. Measure plywood or backer boards and cut them to size to ensure the entire area to be tiled is covered. Start in an open corner and work your way across the room, cutting the more awkward pieces to fit the opposite wall as you go.
Good news, yes, you can! Tiling over floorboards is possible with the use of plywood or backer boards. In short, a layer of 'board' over your floorboards will keep the surface you're tiling strong and sturdy and help you minimise any movement from your old floorboards.
In short, yes! You can tile over floorboards, and many people do choose to do so, even with wood effect tiles. You might wonder why. While original floorboards can look interesting, they are often damaged beyond repair.
We don't recommend tiling directly onto floorboards due to excessive movement. Lay plywood or Hardibacker Boards onto the floorboards first, using a bed of tile adhesive to ensure a sound, flat surface, which you can then tile onto.
Ensure the floorboards are clean afterwards to be usable. Then the mortar bed can be set by a thin set mortar (follow the manufacturer's advice of use where possible). After this, you can begin laying cement boards. You should use a cement board ideally between 6mm to 12mm, depending on your needs and judgement.