Do you want to learn, through practise, how to fix up wooden pieces? If that's the case, you're in the right place. The accumulation of dirt and grime on old, uncared-for wooden furniture can cause it to lose its natural lustre and colour, giving the item a drab appearance. Considered in this light, antique furniture owners frequently wonder how to return a set of cherished pieces of old wood furniture to its former lustre.
Finally, the time required to restore wooden furniture is short. We have put together this easy-to-understand manual to make sure you have all the information you need to bring your old furniture back to life.
Restoration furniture is always on the cutting edge of design, whether it's in a period home or a modern condo, so if you're looking for a beautiful way to save money without sacrificing style, consider making your own. Because restoration furniture is consistently at the cutting edge of interior design, you have this option available to you.
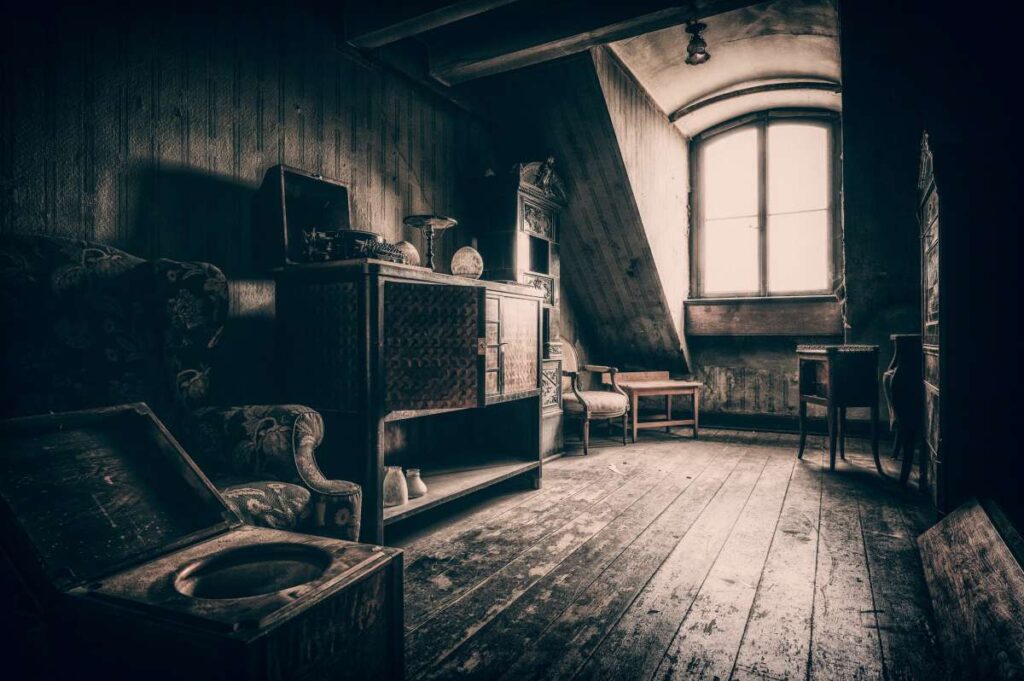
Unsightly watermarks, that also necessitated care, ruined the top of the mahogany writing desk showcased in this project below. Although refinishing old wooden furniture is a simple DIY project, it's important to use the right products to ensure a professional result. The following guidelines will assist you in restoring your furniture, and expert cleaners will handle all necessary cleaning.
Restoring Old Wooden Furniture: Step-by-Step?
Restoring Vintage Wooden Pieces
Clean the furniture with wood-cleaning soap.
Find a wood-cleaning soap, such as Murphy's oil soap, and dilute it with water as directed. A piece of furniture can be cleaned thoroughly by soaking a clean cloth in the cleaning solution, squeezing out any excess water, and then wiping the piece down.
Cleaning your furniture in this way is the safest and most effective way to give it new life while protecting its original condition. Alternative chemical solutions may damage the coating.
Wood soap can be found in hardware stores, hardware stores that specialise in furniture, and home improvement stores. If you can't, make a safe alternative by combining 1 US tablespoon (15 ml) of mild dish soap with 1 gallon (3.78 L) of water. Dry the furniture with a clean towel after wiping it down with a damp cloth that has been dipped in the solution to remove the dust and grime.
Petroleum Jelly Removes White Liquid Rings from Finishes.
Petroleum jelly can be rubbed into watermarks and white rings left behind over the years by glasses and spilt drinks. If you let it sit overnight, the watermarks will seep into the finish and be easier to wipe away in the morning.
If the petroleum jelly does not remove the ring, you might try other products that are intended specifically for the purpose of removing rings. However, because they have the potential to alter the colour of the finish, you should make sure to test them first on a small location.
Repair Any Small Chips Or Cracks With Epoxy Putty Or Wax.
The wood finish should be matched as closely as possible with the colour of the epoxy putty or furniture wax repair stick you choose. Use your fingers to shape a small amount of the putty or wax so that it may fill in the cracks and holes. When applying putty or wax, try to make the patch as flush as possible with the furniture's surface.
Epoxy putty and furniture repair wax sticks can be found in home improvement stores and speciality furniture shops. While epoxy can fill wider gaps, wax is better suited for correcting smaller imperfections. You'll need to mix two separate components to make the epoxy putty. It's vital to read and follow the putty's packaging directions before attempting to use it. Don't worry if the colour isn't an exact match for the coating. Wipe-on stains and finishes can be applied afterwards to conceal the repairs even further.
Gel stain the old finish to restore colour.
Gel stain can be rubbed into furniture with a soft cloth if the previous paint has worn off or faded. Use a clean towel to wipe away the excess stain and let the area air dry for an entire day if the paint is chipped or faded.
Gel stains can be applied over previously applied finishes without sanding or stripping the wood. Another benefit of gel stain is that it does not dry out rapidly after application. If you don't like the way it appears, you can remove it with mineral spirits and try a another colour.
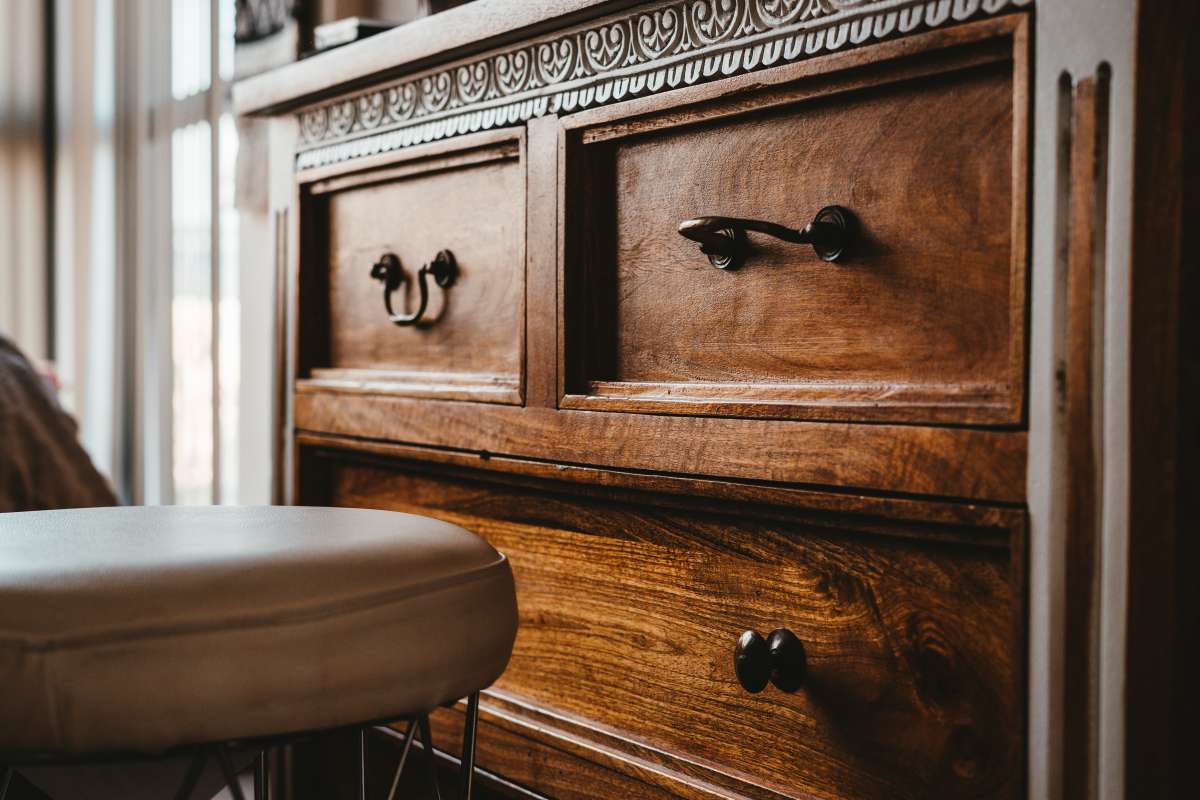
Apply a wood finish to shine and protect.
When applying a wipe-on wood finish, use a clean cloth and work it into the wood in circular motions, just like you would when waxing a car. After allowing the rejuvenation project to dry overnight, you can remove the excess finish by wiping it along the wood grain (in the direction the grain goes) with a clean cloth. Wipe-on finishes are the most convenient, but any of them will do. One option is to look for a polyurethane finish that is oil based.
Refinishing and Sanding Wood Furniture
Clean with a rag and all-purpose cleaner.
Before you start sanding, you must give the piece of furniture you plan to restore a thorough cleaning to remove any dirt and grime that may be embedded in the wood. Wood may be cleaned in the same way as a countertop by wiping it down with an all-purpose cleaner and a moist rag.
- A damp rag and some elbow grease should be all that's needed to clean the furniture if it's not particularly grimy.
- Recognizing that you will be creating a mess when refinishing the furniture, it is recommended that you do so in an easily cleaned location or use drop cloths to collect debris as it is created.
Use Coarse Sandpaper to Remove the Coating
Sanding blocks or electric sanders are best utilised with coarse grit sandpaper, such as 40 or 60 grit. Remove all of the old paint, varnish, or whatever else was used as a coating by sanding the surface in the same direction as the grain. Remove the finish with sandpaper and reveal the raw wood below.
- Every so often, you should examine the sandpaper to see how it is holding up. You should get a new sheet when the old one shows too much wear.
- Wearing a face mask and goggles will prevent dust from entering your respiratory system and damaging your eyes.
After Sanding the Finish, Clean Up the Dust.
You can use a cleaning brush or a tack cloth to get rid of all the sawdust that accumulates after sanding. If you discover any spots that needed sanding while you were focusing on something else, you will need to go back and do it.
- In woodworking, a tack cloth is a unique type of fabric used to trap debris and dust. You can find them in any hardware store, woodworking supply shop, or on the internet.
Fine-grit Sandpaper Smooths Wood.
If you're using an electric sander or sanding block, try adjusting the grain to a finer setting, such as 120 or 240 grit sandpaper. To have a uniform and smooth finish, sand the whole thing again in the same direction as the grain.
- When you think you're done sanding, run your palm across the entire surface to feel for any rough spots. If you find any, sand those areas again until they're smooth.
Use Mineral Turps to Clean Furniture.
If you use a tack cloth or brush to get rid of the bulk of the dust, you can then clean the entire piece of furniture with a rag dampened with mineral turps. Make sure you always wear a face mask when working with turpentine to prevent inhaling the vapors.
- Mineral turpentine will penetrate the wood and give it the appearance of having a natural finish while it is still wet. This can be helpful in determining whether you want to keep the natural colour of the wood or alter it.
Furniture oil gives wood a natural finish.
You can oil your furniture using teak oil or tung oil and apply it with a clean rag. After rubbing it in with the grain of the wood, leave the furniture to dry in the air overnight.
- The furniture oil is absorbed into the wood, providing protection while also bringing out the wood's natural colours. A new coat of finish can be applied whenever it looks best to you.
- Put down a plastic sheet or tarp, or choose a spot where spills won't be a problem, to use as your workspace.
If you don't like natural wood, varnish or stain the furniture.
Applying the first coat of stain or varnish to a surface requires the use of a paintbrush. Use long, even strokes that go in the same direction as the wood's grain. Use fine-grain sandpaper to smooth it out when it's dried completely. Putting on a second coat of stain or varnish and waiting for it to cure are necessary steps in completing a refinishing process.
- If you like a lighter finish, you can stop after the first coat, and if you prefer a deeper finish, you can apply a third coat.
You Should Get Ready To Pare Down
Due to the mess that is made when stripping furniture, it is highly recommended to complete wood restoration operations outside if at all possible. Take precautions to shield the floor and neighbouring furnishings and ensure there is plenty of fresh air if you must operate inside. In order to protect the finish on the table's body, you should cover it with a plastic sheet, revealing only the top. After that, spread the stripper around with an old brush.
Dissolve the Layers
The finish, which is a combination of old varnish and polish, must be left on the wood for five to thirty minutes for the stripper to do its job. Results from doing so will be satisfactory. The coating's composition and thickness will dictate the total processing time. If the stripper didn't get it all, you can just reapply the paste and it'll be good as new.
Turn Off The Chemical Stripper
Steel wool dampened with white spirit or a proprietary wax and polish remover should be rubbed into the surface in the direction of the wood's grain to neutralise it. Read the label of any chemical you buy before using it; different strippers require different neutralizers. Uneven neutralisation of the stripper could result in the chemical's reactivation, preventing you from proceeding with the wood restoration as planned.
Please wipe down the remaining table space.
It is recommended to wait 24 hours after washing away any residues with cotton cloths before proceeding with the next step in the refinishing procedure. Meanwhile, work on smaller pieces at a time to get rid of old shine and grime in other areas by applying wax remover to a steel wool pad or coarse cloth. Just give the wax a few minutes to soften, and then use a fresh towel to wipe it off before it hardens again.
Getting Back to the Drawing Board
Use a sanding block and high-quality glass paper to even out the tabletop's texture and remove the elevated wood fibres left over from the stripping operation, working in the direction of the grain. This step must be taken 24 hours after the tabletop was stripped. Dust that may lower the quality of the final product can be removed by shaking the protective covering and then vacuuming it. The final step is to clean the surface using a tack cloth.
Restore Wood That Has Bleached
If you've ever tried to restore furniture, you know that every piece is different. As an example, the table may have been kept in the same spot in front of the window for a long time. Since the wood was bleached by the sun, a mahogany wood dye can be used to restore its original hue to the tabletop. Put on a generous amount with a brush, let it sit while the stain absorbs, and then wipe it off. By working in a well-lit space, you can ensure a uniform appearance.
Improve Wood Refinishing Sheen and Finish
After the finish has dried, apply a coat of finishing oil using a clean paintbrush or rag. After letting the oil sit for ten minutes, wipe off any excess using a towel to prevent the surface from sticking.
Wait at least five hours and then lightly rub the surface with 0000 steel wool before applying a new coat. Apply as many coats as you feel are necessary to achieve the desired effect of a durable and glossy surface.
Restoring Wood's Shine for Good
Finally, use restraint when applying furniture wax and cover the entire table with a thin layer. Wait at least an hour, then use a lint-free towel to buff the surface. Avoid having your furniture near heat sources like fireplaces and radiators to preserve it from warping. Due to the fact that prolonged exposure to sunlight will bleach the wood, keeping it away from any windows is essential.
Restoring Wooden Furniture With Home Remedies
You can also use a few more methods to revive the pieces of furniture in your home. To remove dirt and old wax polish from a surface, try this do-it-yourself solution: mix four parts white spirit with one part linseed oil. If the finish still looks lifeless after buffing, try using a cotton cloth soaked in wood revitalizer. The following is one treatment that has been shown to be useful in recovering wooden furniture:
- 1 part linseed oil
- Two parts crystal meth
- Turps in two equal portions
- Vinegar that has been distilled in equal parts.
Once you've refinished the wood, polish it with beeswax to give your furniture a new lease on life.
How to Fix Wooden Items?
Wooden furniture restoration can be done in two distinct ways. The first is to use wood-care products like cleaners and polishes, and the second is to sand down each piece of wood furniture individually.
Method One
The first method of restoring wooden furniture is described here. If your furniture is made of wood, you should clean it with a soap solution made for cleaning wood. Wood-cleaning soaps like Murphy's oil soap or others like it can be obtained in furniture stores and are commonly used by antique collectors and enthusiasts.
One gallon of water and one spoonful of mild dishwashing detergent can be mixed together to make a homemade cleaning solution. After that, use a rag that has been soaked in the cleaning solution to wipe down all of the wooden surfaces in your home.
When dealing with water stains and white rings on wooden tables, applying petroleum jelly is a reliable method of removal. If you want the jelly to completely remove the stains and watermarks, you should leave it on the surface for an entire night. You should then wait until the next day to give the surface a good wipe down with a clean cloth.
Epoxy putty or wax can cover up minor scratches or dings in your wood furniture so it looks if it was always in pristine condition. To fix the chips in your furniture, just roll some putty or wax into a ball with your fingers and cut it to the right size.
Putty is preferable to wax for smaller cracks and larger cracks when it comes to fixing them. Wood stain and paint can be used to cover the putty and give it a uniform colour with the rest of the wooden furniture. With the application of a gel stain to the affected area, the original colour of wood furniture can be restored. Apply the desired amount of colour with a soft cloth, and let it dry thoroughly overnight.
Put a protective finish on your wooden furniture by wiping it down with a wipe-on wood finish you bought at the store. Shine will be returned to your timber furnishings and accents.
System Two
The second method that can be used to repair wooden furniture is sandpaper. Follow these tips and guidelines for the best results: Start by giving each piece of wooden furniture a good cleaning with a detergent or all-purpose cleaner. You have the option of using a clean towel to wipe the dust and dirt from the wood. The wood must be spotless before you begin sanding the surface.
For best results, use coarse sandpaper and a circular motion to rub the wood's surface. The purpose of sanding is to remove the paint and primer so that the bare wood can show through. Coarse sandpaper usually has grain numbers between 30 and 70. Since sanding can generate quite a bit of dust and particles, safety gear such as a face mask and gloves is recommended.
When you're done sanding, wipe up the dust with a damp towel, brush, or soft broom. Woodworkers and hobbyists in general use tack cloths extensively. See what the web has to say about them.
When you're done with the bulk of the sanding, switch to a finer grit sandpaper so you can polish the hardwood. Higher grit numbers indicate finer grains; therefore, 120 or 240 grit sandpaper is the best choice. Remove any bumps in the wood's surface by sanding them down to make the finish uniformly smooth. Dust, filth, and the microscopic particles left behind after sanding can all be removed with some mineral turps. You can use mineral turps to give the wood a more natural finish if that's what you like. Take care not to inhale the turpentine's vapours.
A natural wooden sheen can be achieved on your furniture by using tung oil, teak oil, or any other form of furniture oil. Use a piece of cloth to apply these oils to your skin. Put it somewhere where it can dry out overnight. Varnish or a wood stain, applied with long, even strokes, can completely transform the look of your wooden furniture. The intended result will occur. Very fine-grain sandpaper can be used to polish the surface after the final coat of stain or varnish has dried.
After the first layer of varnish or stain has dried, apply a second and let it cure completely. You may make your wood furniture even darker by applying multiple coats of varnish or paint. That being said, you need simply apply a single layer if you want your products to appear less heavy.
Everyday Items to Restore Wood Furniture
In order to restore your wooden furniture, you need first examine what you already have in your kitchen. All things considered, your best bets are: Coconut oil is a great choice for maintaining the moisture and sheen of your wood furniture. Vinegars like balsamic vinegar and apple cider vinegar can be used to stain wood a dark colour while maintaining its natural aspect. Combine three parts canola oil (or another cooking oil) with one part apple cider vinegar or white vinegar to repair scratched or dented wood.
A poultice made of walnuts can be used to treat minor wounds.
Nail holes can be pried open using apple sticks, toothpicks, or wooden skewers. They are a classier option than applying glue to seal cracks. The sticks will look like they were meant to be a part of the wooden furniture if you sand them down and make the surface as even as possible.
Conclusion
Unloved, neglected wooden furniture can lose its lustre and colour due to the buildup of dirt and grime. In a relatively short amount of time, wooden furniture can be restored to its original condition. Epoxy putty or wax can be used to fill in minor cracks and blemishes in wood. After the repairs have been made, they can be hidden even more with wipe-on stains and finishes. If the paint on your furniture has chipped or faded, you can restore it by rubbing in a gel stain.
It is recommended to use sanding blocks or an electric sander for this task. Wood can be smoothed with fine-grit sandpaper while a face mask and goggles keep dust out of your eyes. An all-purpose cleaner applied to a damp rag will suffice to restore wood to its original condition. Use furniture oil or mineral turpentine to see if you like the wood's natural colour before deciding to stain or paint it. You can always varnish or stain the wood if you'd rather not have it in its natural state.
Since stripping furniture creates a lot of dust, you should do any wood restoration projects outside. In order for the chemical stripper to remove the finish—a mixture of old varnish and polish—from the wood, it must be left on for five to thirty minutes. Shaking the protective covering and then vacuuming it can help get rid of dust that could otherwise compromise the quality of the final product. There are two distinct approaches to restoring wooden furniture. It's possible to care for your wood furniture in two ways: either by using wood-care products like cleaners and polishes, or by sanding down each piece separately.
After the wood has been refinished, polish it with beeswax to give the piece a new lease on life. Step One: Use a detergent or all-purpose cleaner to thoroughly wipe down the wooden pieces in your home. Method Two: Rub the wood's surface in a circular motion with a piece of coarse sandpaper. Mineral turps can be used to clean up any lingering sanding debris, including dust, dirt, and microscopic particles. After the final coat of stain or varnish has dried, you can polish the surface with fine-grit sandpaper.
Tung oil, teak oil, and other furniture oils can be used to restore the wood's natural sheen. For long-term care of your wood furniture's finish and moisture levels, try coconut oil. Wood can be stained with vinegars like balsamic and apple cider. Apple sticks, toothpicks, or wooden skewers can be used to pry open nail holes.
Content Summary
- When viewed in this context, it's easy to see why so many people with old wooden furniture wonder if and how they can get it looking like new again.
- Last but not least, fixing wooden furniture doesn't take long at all.
- This straightforward guide was written to provide you with all the data you need to give your ageing furnishings a new lease on life.
- As a result of constant innovation, restoration furniture is always a viable option for those looking to update their home's decor.
- DIY refinishing of wooden furniture is a fairly straightforward project, but it requires the use of high-quality products to achieve a polished look.
- Your furniture can be restored with the help of these instructions, and any necessary cleaning can be handled by professional cleaners.
- Fixing Up Old Wooden Stuff Use wood cleaning soap to refresh the furniture.
- Locate a soap designed for cleaning wood, such as Murphy's oil soap, and dilute it with water as directed.
- Watermarks and white rings from glasses and spilt drinks can be removed with a bit of petroleum jelly rubbing.
- If the ring persists after applying petroleum jelly, you could try one of the many products on the market designed to get rid of rings.
- Because of the possibility of a change in finish colour, however, it is important to conduct a small test area first.
- Use epoxy putty or wax to patch any tiny cracks or chips.
- Epoxy putty or a furniture wax repair stick should be chosen that is as close in colour to the wood finish as possible.
- Apply a small amount of the putty or wax and mould it with your fingers to fill the cracks and holes.
- If the old finish has lost its colour, you can restore it with a gel stain. Use a protective finish to bring out the wood's natural beauty and extend its lifespan.
- After letting the revitalisation project dry overnight, excess finish can be removed by wiping in the direction of the wood grain.
- Sanding and Repainting Wooden Objects Use an all-purpose cleaner and a rag to wipe things down.
- The piece of furniture you intend to restore should be thoroughly cleaned before you begin sanding it in order to remove any dirt and grime that may be embedded in the wood.
- Sand the surface in the same direction as the grain to remove all traces of the old paint, varnish, or coating.
- Sand off the coating and expose the wood's natural colour and grain.
- Don't forget to vacuum up the dust after sanding the coating.
- All that sawdust that gathers after sanding can be removed with a cleaning brush or a tack cloth.
- Sanding in the direction of the grain will produce a uniform and smooth finish.
- Make use of mineral turps for the cleaning of furniture.
- With furniture oil, the wood retains its organic appearance.
- Teak oil or tung oil, applied with a clean rag, can keep your furniture in good condition.
- Leave the furniture overnight to dry in the open air after rubbing it in with the grain of the wood.
- At any time that you feel like it would look good, you can apply a new coat of finish.
- You can always varnish or stain the wood if you'd rather not have it in its natural state.
- It is necessary to use a paintbrush when applying the first coat of stain or varnish to a surface.
- In order to finish a refinishing job, it is necessary to apply a second coat of stain or varnish and allow it to dry for a period of time.
- You can stop after the first coat if you want a lighter finish, or you can apply a third coat if you want a deeper finish.
- The table's body finish can be preserved by covering it with plastic and using only the top.
- Then, using an old paintbrush, apply the stripper liberally.
- Layers must be dissolved. A combination of old varnish and polish, the finish must be left on the wood for five to thirty minutes for the stripper to do its work.
- The Lights Must Be Stopped Stripper Chemical To neutralise the surface, rub it with steel wool that has been dampened with white spirit or a proprietary wax and polish remover in the direction of the wood grain.
- When neutralising the stripper, be sure to do so evenly or the chemical may become active again, preventing you from restoring the wood as planned.
- Clear the remaining surface area of the table.
- Wax remover on a steel wool pad or coarse cloth can be used to gently buff away years of built-up shine and grime in other areas while you focus on smaller sections at a time.
- Resuming the Design Process Sand the tabletop in the direction of the grain with a sanding block and fine-grit glass paper to remove the elevated wood fibres that remain from the stripping process and to smooth out the surface.
- After the tabletop has been stripped for a full day, this next step can be taken.
- Finish up by wiping the area down with a tack cloth.
- Keep your appearance consistent by working in a well-lit area.
- Using Natural Remedies to Restore Wooden Objects There are a few other options you have for giving your home's furniture a new lease on life.
- Use this do-it-yourself method to clean a surface of dust and old wax polish: White spirit and linseed oil in the ratio of 4:1.
- Polishing the wood with beeswax after it has been refinished will give your furniture a new lease on life.
- There are two distinct approaches to restoring wooden furniture.
- It's possible to care for your wood furniture in two ways: either by using wood-care products like cleaners and polishes, or by sanding down each piece separately.
- The First Approach This section describes the first approach to restoring wooden furniture.
- Use a soap solution designed for cleaning wood to clean any wooden furniture you have.
- A homemade cleaning solution can be made by combining one gallon of water with one teaspoon of mild dishwashing detergent.
- Then, take a rag and soak it in the cleaning solution, then use it to wipe down all of the wooden surfaces in your house.
- Petroleum jelly is an effective means of eradicating water stains and white rings from wooden tables.
- A bit of epoxy putty or wax can make your wood furniture look as good as new, hiding any dings or scratches that may have occurred over the years.
- Putty or wax can be rolled into a ball with your fingers and then trimmed to fit the size of a chip in your furniture.
- The putty can be painted or stained to match the rest of the wood to conceal any imperfections.
- Wipe your wooden furniture down with a wood finish you bought from the store to give it a protective coating.
- Sandpaper is the second option for fixing wooden furniture.
- Before you start sanding, make sure the wood is completely clean.
- Use coarse sandpaper and rub the wood in a circular motion to achieve the best results.
- It's best to use a damp towel, brush, or soft broom to clean up the dust after you're done sanding.
- After you've done the bulk of the sanding, you can polish the hardwood by switching to a finer grit sandpaper.
- Sand down any rough spots on the wood's surface so that the finish is even throughout.
- Mineral turps can be used to get rid of dirt, dust, and the tiny particles left behind after sanding.
- For a rawer look, mineral turps can be used to seal the wood.
- Tung oil, teak oil, or another type of furniture oil will bring out the wood's natural sheen.
- When applying these oils directly to your skin, use a clean cloth.
- Using varnish or a wood stain and applying it with long, even strokes can completely alter the appearance of your wooden furniture.
- After the final coat of stain or varnish has dried, you can polish the surface with very fine-grain sandpaper.
- A second coat of varnish or stain should be applied after the first has dried and allowed to cure.
- With additional coats of paint or varnish, you can deepen the colour of wood furniture.
- Common Items for Restoring Wooden Objects One must first take stock of what is already in the kitchen in order to restore wooden furniture.
- When all factors are taken into account, your best bets are: For long-term care of your wood furniture's finish and moisture levels, try coconut oil.
- Scratched or dented wood can be repaired by mixing three parts canola oil (or another cooking oil) with one part apple cider vinegar or white vinegar.
- Apple sticks, toothpicks, or wooden skewers can be used to pry open nail holes.
Frequently Asked Questions About Old Wood Furniture
- Remove any hardware.
- Wipe on mineral spirits.
- Clean the surface.
- Fix the white rings.
- Fill small cracks and imperfections.
- Try to fix the dents.
- Restore the colour with gel stain.
- Renew the lustre with a wipe-on finish.
Instructions
- Mix 1 part vinegar to 1 part olive oil.
- Use your lint-free cloth to apply the mixture to the wood in the direction of the wood grain.
- Let the solution sit on the wood for about 10 minutes.
- After 10 minutes, take a dry cloth and wipe the excess moisture away.
You can remove surface dirt and old layers of wax polish with a homemade mix of four parts white spirit to one part of linseed oil. If the finish is still looking a bit lifeless, pour some proprietary wood reviver onto a cotton cloth and buff vigorously.
Use a mix of equal parts distilled white vinegar and extra-virgin olive oil. Use a soft cloth to rub the mixture with the wood's grain and then wipe it off with a clean cloth.
Try mixing a weak solution of water and dishwashing soap. Dip a soft cloth in the solution, wring it out and wipe the entire piece. You want a damp cloth, not a wet one. Don't saturate the wood, and rinse your cloth often.