The type of tile you require in your shower is determined by whether you are tiling the floor or the wall. If you're tiling your floor to create a wet room effect, consider textured tiles for increased traction on the wet floor. Roof Repair & Restoration Systems has the top roof guttering specialists.
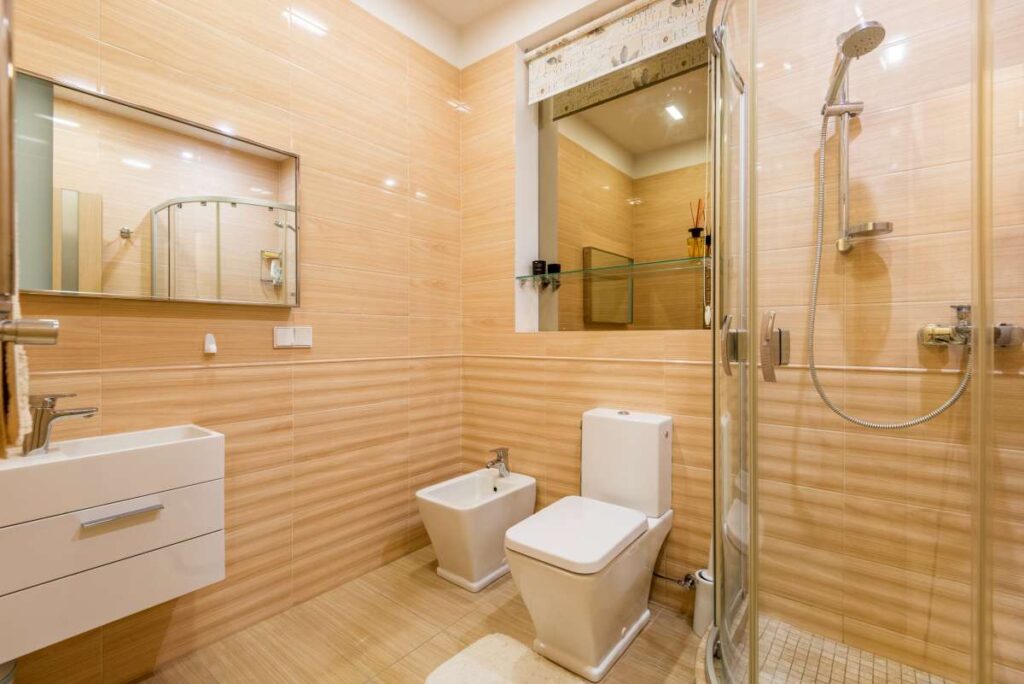
Many possibilities exist when it comes to selecting tiles for your shower wall. Because there is less grout, large tiles look wonderful and are easier to clean. Using trendy tiles in your shower inclosure against a neutral design on the outside produces a wonderful contrast and transforms your shower into a focal point.
Any sort of tile that is suited for extremely damp environments is ideal for shower walls.
Glazed ceramic and porcelain tile, ranging from the basic four 1/4-inch white squares to large-format tiles of practically any size – provided your installer is up to the task.
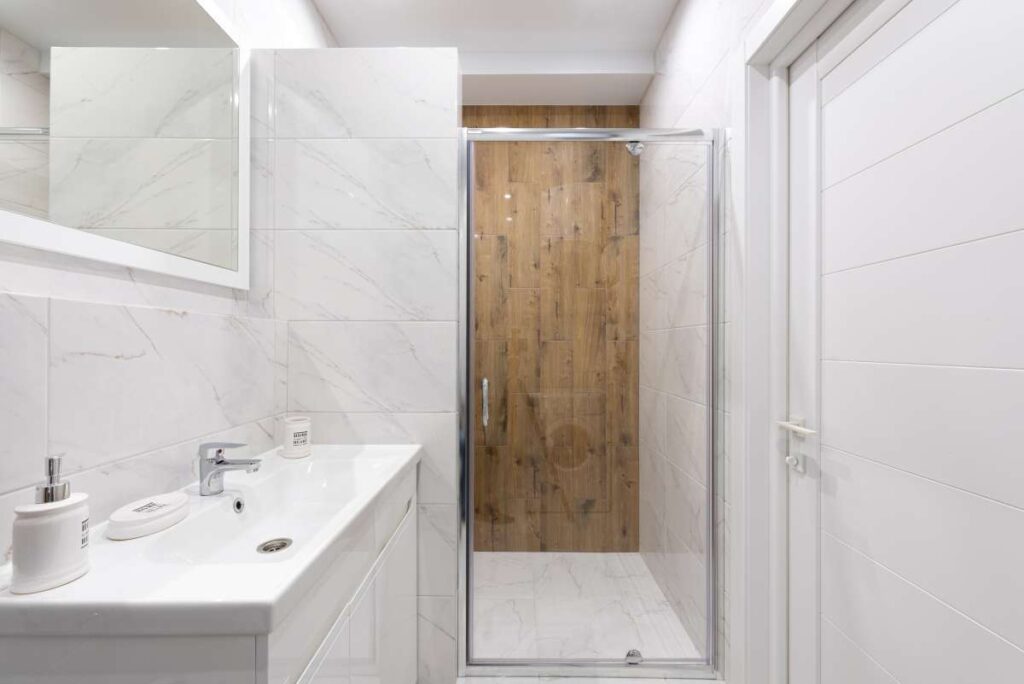
Shower walls can also be tiled with glass or stone. Large, clear glass tiles are difficult to instal and can reveal moisture below the tiles; little, coloured glass is a better option. Stone tiles should be easy to clean and stain-resistant due to mineral content in water. Because the benefit of slip-resistance does not apply to walls (unless you're Spider-Man), the amount of grout joints is determined by wall size, layout, and shape, as well as maintenance: the gritty surface of grout is more difficult to clean than the smooth tile faces.
Proportion is essential with all wall tiles, but it is especially important with shower enclosures. Large, inexpensive tiles, such as basic 12-inch ceramic squares available at any home centre, can look horrible in ordinary showers and scream "DIY work!" especially when the edge tiles must be cut to an uncomfortable size. Bathroom designers and competent tile stores may provide guidance on shower wall tile selection, as can skilled tile installers who understand proportion, installation, and long-term performance.
When it comes to bathroom remodelling, the shower is the focal point of the entire project. Because it is the centre point of the space, many homeowners find it difficult to choose the proper material and look.
Choosing the appropriate tile for shower walls is one of the most important decisions to make. It's the first thing visitors notice, and it sets the tone for the rest of the room's decor.
So precisely what are the greatest tiles to use for shower walls? And how can you know which one is best for your bathroom?
The Best Tile for Shower Walls
Because you don't need to worry about slide resistance for your shower walls, the first thing you should search for are materials that operate well in damp situations.
It's also a good idea to search for materials that complement the design you're striving for and are easy to clean.
Here are our top shower wall tile picks:
Ceramic / Porcelain
Ceramic or porcelain tiles are one of the most common and classic forms of tile used on shower walls.
A baked-on clear protective coating is included with this manufactured material. As a result, it is exceptionally low maintenance and a long-lasting tile solution.
However, just because it is a conventional option does not imply that it must have a traditional appearance. It is available in a variety of sizes, colours, textures, and quality, making it suitable for every design and budget.
Glass
For those looking for a trendy and unique aesthetic in their bathroom, glass has become an increasingly popular option.
It is available in a variety of colours. The colour will show through the tile and reflect light, making the shower appear larger because it is translucent and reflects light.
It is also one of the most simple materials to clean. All you need is a window cleaner to remove the traces of soap scum and restore the window's lustre.
Marble/Stone
Another well-liked option for the shower is to construct it out of marble or natural stone; nevertheless, this is done mostly for aesthetic reasons. Because, despite the fact that it has a nice appearance, it is not as long-lasting as some of the other choices that you may have.
Sealing natural stone is necessary in order to protect it from moisture and stains caused by mineral deposits. If the surface is particularly rough, cleaning it could be more difficult.
Because of its bright and opulent appearance, white marble is a popular choice. If you decide to use marble in the shower, you should select a high-quality kind if you decide to go that route. Less desirable grades feature greater veining and inclusions, both of which can make the material more susceptible to damage.
Other Things to Consider When Choosing Shower Wall Tile

When it comes to purchasing tile for the walls of your shower, the material from which it is made is not the only factor to take into consideration. What you choose to do with it is of equal significance.
When you are picking out the tile that will go in your shower, keep these tips in mind.
Smaller Glass Tiles Work Better Than Larger Ones in a Shower
It is recommended that you stay away from the larger sizes of glass tile if you plan to instal it on the walls of your shower. Even after just a few usage, certain glass titles will begin to collect moisture behind them. This moisture will be apparent, which will make your shower appear unappealing and dirty all the time.
Getting rid of this issue is as simple as selecting smaller glass tiles. In addition, setting them up is a breeze, making this a win-win situation for all parties concerned.
Use a Second Tile Choice for Contrast
The aesthetic of your bathroom can be given more character and interest by including a feature wall into the design of the shower. In order to accomplish this, select a different tile selection for the wall.
Many people do this with the wall that is the largest in the shower or the wall that is at the back, which gives the most effect.
In addition to that, you might put a mosaic on the accent wall. Keep the border and the rest of the walls in the area neutral so that the space does not appear to be overly cluttered.
Alternately, you might try switching up the pattern of the tiles if you're looking for something that's a little bit less obvious. For instance, the pattern that is used on the feature wall should not be horizontal like the patterns that are used on the other walls. Instead, the pattern should be diagonal. You don't need to seek any farther because Roof Repair & Restoration Systems has got you covered if you're looking for the best roofing company to assist you in repairing your roof.
Consider How Much Cleaning You’re Willing to Do
If you enjoy the aesthetic of little mosaic tiles but cringe at the idea of having to clean them, you might want to reconsider the type of tile you put on the walls of your shower.
Tiles with a smaller surface area will have more grout lines, which will require additional cleaning. In addition, the difficulty of cleaning increases in proportion to the narrowness of the grout lines.
Selecting larger tiles and utilising wider grout lines are two ways to reduce the amount of time necessary for cleaning. Which, if cleaning isn't your thing, can have a significant impact on your overall list of things that need to be done.
Add a High-End Look to Your Shower
Installing tile all the way to the ceiling of your shower will create the impression that it was much more expensive than it actually was. Not only will it lend your bathroom an individualised appearance, but it will also create the impression of increased vertical space.
And while you're at it, give the insets of your shower a luxurious look by giving them a contrast of some sort. To add some visual appeal to a wall recess that is used to store bottles and other items, try tiling it with a material or colour that is different from the rest of the wall.
Design the Bathroom of Your Dreams with the Right Shower Wall Tile
Knowing the appropriate tile for shower walls will help you get your bathroom remodelling project off to a good start. And once you've established that starting point, the rest of it can fall into place to create the bathroom of your dreams.
Your shower is a blank canvas on which you may express your individual taste while also creating a highly functional area. Because ceramic and porcelain tiles are the best surfaces for damp areas, they are ideal for showers. Choosing the proper tile for a shower can be difficult when you're just starting out with your concept designs.
There are numerous alternatives available, including mosaics, simple tiles, large size, neutrals, and colours.
We recommend that you visit one of our design consultants in-store who can put together a design or narrow down your options using our research tools first. We have a tile Visualizer where you may swap out our tiles in different room designs or submit your own photo for a more personalised result.
Are matt or glossy tiles best for the shower?
Depending on your taste, you can use either. Gloss tiles offer a brighter, more shiny surface for walls, whereas matt tiles are flat or less reflective. It's worth noting that gloss tiles have a little smoother surface, making them easier to clean while also creating light and the feeling of space. Matt tiles on walls, on the other hand, better conceal streaks, stains, and dried water droplets.
Gloss finishes on walls and fixtures have little effect on safety, however we recommend a matt finish for floors. A non-slip matt coating with a R10 slip rating is an excellent choice. An R10 tile is still non-slip, but it is also very easy to clean. We have a large selection of R10 finish tiles appropriate for inside damp areas in stock.
Gloss tiles have the ability to make even the tiniest spaces appear larger. The effect is akin to adding a mirror to a room. The light reflection expands the space and mislead the eye into perceiving it as bigger and more open than it is. As a result, gloss tiles are a fantastic design choice for smaller and narrower bathrooms.
Matt tiles are the way to go if you want to produce a natural or rustic look. The warm, natural, and earthy tones of the numerous stone, wood, and cement impression tiles all contribute to the rustic effect. Matt tiles provide a relaxing ambience for people looking to rest and unwind.
Should you tile the whole bathroom?
A fully-tiled bathroom is desirable since wet areas are completely covered by an impermeable surface, reducing maintenance and ensuring longevity. Unfortunately, painted surfaces have a limited lifespan in moist environments.
A fully-tiled bathroom features tiles from floor to ceiling and frequently eliminates the need for skirting boards and window sills, which are also tiled for a streamlined finish. It also implies that painting the walls is unnecessary, and therefore less decorating is required. Heated towel rails, for example, can be put directly into tiled walls.
If you want to make your bathroom appear larger, consider installing floor-to-ceiling tiles. This is because multiple tiles allow light to bounce more, giving the impression that the room is larger.
Half-tiled bathrooms include both tiled portions and painted walls. They are often exclusively tiled in wet places such as shower enclosures, bath surrounds, and beneath sinks. Consider the following implications:
- Skirting boards will be required to cover the wall/floor junction in non-tiled sections. This can result in additional costs for the procurement and installation of skirting boards, as well as later painting.
- If the walls in non-tiled sections are to be decorated, they may need to be skimmed.
- Untitled walls will need to be decorated, which will take time and money.
What else do I need to know?
Keep the following tips in mind while selecting shower tile for your bathroom.
First and foremost, tiles are appropriate for places exposed to water on shower walls, as well as grip tiles for flooring, which help to minimise slips and falls.
It is also critical to ensure that your shower flooring is waterproof. A tiled floor or wall is waterproof and protects against water that would otherwise harm your construction underneath when correctly placed utilising appropriate methods and installation materials. Other building products may claim to be waterproof, but they lack waterproof installation methods and processes to achieve a waterproof assembly. This means that the completed installation may leak, trap moisture, and allow residual moisture from splashes to damage your construction.
Bacteria and mould grow in damp environments such as restrooms and showers. Tiles, when cleaned on a regular basis, are unfriendly to bacteria and other hazardous microbes such as mould, fungi, bacteria, and viruses.
Tile for Shower Floor
Aside from aesthetics, an excellent tile for shower floors is:
- slip-resistant
- relatively water-resistant
- proportioned correctly for the available area and the slope of the shower pan
Many porcelain and stone tiles are popular choices, however most glazed ceramic tile is undesirable due to its slickness (unless the tiles are very small).
No tile installation is really waterproof, and having tile designated as "impervious" isn't necessary unless the shower is outside and prone to freezing temperatures, but the least impervious tiles (labelled as "non-vitreous" or "low density") aren't normally suited for shower floors.
The size of shower floor tiles influences both design flexibility and slide resistance. Shower floors normally slope approximately 1/4 inch per foot towards the drain and frequently feature numerous planes to route all water to a single location. This makes it difficult to place tile in a conventional shower pan with anything larger than 6 × 6-inch tiles; 4 x 4-inch or smaller tiles are prefered since they conform easier to slopes and other surface irregularities.
Smaller tiles also have more grout lines than bigger pieces, which translates to increased slip resistance because grout is similar to sandpaper.
However, builders are doing some amazing things with bespoke showers these days, and the traditional rules don't always apply. A curbless shower, for example, might feature large-format tiles covering the floor and a single sloping plane leading to a linear, trench-style drain.
The big tiles and one-way slope provide a pleasant surface for movement – whether on foot or wheels – and the tiles may be extended right into the main bathroom space. The most crucial factor to consider here is slide resistance. The coefficient of friction (COF) is used to rate the slip resistance of tile surfaces; large tiles in wet regions should have a COF of 0.60 or higher.
How to Tile a Shower Enclosure or Tub Surround to Spruce Up Your Bathroom
Because you spend time in your bathroom on a daily basis, why not take the effort to make it look nice? Adding tiling around your shower or bathtub can give your bathroom a more elegant appearance and give you the ability to modify the space to reflect your personal taste. Choose a tile that is vibrant and colourful to make a statement, or if you like a more traditional look, go with a white subway tile treatment.
We will walk you through the process of tiling a shower inclosure or tub surround, including providing guidance on how to achieve a clean appearance and a finish that is watertight. You should plan to spend approximately 20 minutes per square yard on the preparation and setting of the tile, and you should make sure that you are familiar with hand tools, a cordless drill, and trowels.
The amount of time necessary to complete the project is proportional to the dimensions of your shower as well as your level of experience. To learn how to lay tile around a shower or bathtub, simply follow the step-by-step directions that are provided below.
How to do it
eWaterproof And Prep Layout
It is necessary to waterproof the walls as well as the framing when installing a shower inclosure because it is a wet installation. When working with cement backer board, feeling paper should be used, but not when working with green board or waterproofed gypsum board.
When it comes to tiling, working around a bathtub has additional obstacles. If the tub is flat, you can instal a whole tile around the top edge of it. Make sure that the bottom row of tiles is at least three-quarters of a tile high so that you can disguise the odd appearance of a tub that is not level.
Extend the tile and the backer board for a shower inclosure so that they are at least 6 inches higher above the showerhead. Backer board and tile should be installed 12 inches above the tub if you are merely installing a tub surround.
To begin tiling around a tub, place a pencil mark on the vertical edge of the tile that is adjacent to the tub. This will serve as the initial layout line. To snap the remaining lines, follow the instructions in the diagram in the order that they are presented. If the rim of the tub is level, you can begin by placing a whole tile there. In the event that it is not level, begin the first row of full tiles at an elevation that is at least three-quarters of a tile higher than the rim.
Apply Cement
The flange or rim of the tub should be coated in asphalt roofing cement. If water gets into this joint, it will move upwards and down into the floor, which is the point at which the majority of tub and shower surrounds fail. The waterproofing felt or a 4-millimeter poly sheet is adhered to the tub with asphalt cement, which then acts as a sealant.
Apply Felt Paper
Make a cut in a piece of felt paper that is long enough to cover the entire surface in a single pass and turn all of the corners. First, apply asphalt mastic to the studs, and then, after preheating the paper with a hairdryer, press it into the corners. The top pieces should be layered on top of the bottom ones, and the overlap should be sealed using asphalt mastic.
Cut And Fit Backerboard
After the backer board has been cut and positioned so that its edges are centred on the studs, it may be secured with backer board screws. When installing a backer board atop a tub, make sure to provide a gap of at least a quarter of an inch between the bottom edge of the board and the rim of the tub. Caulk will be used at a later time to fill up this space. We are experts in roof repairs and take great satisfaction in providing quality roof repairs to customers all across Melbourne. Explore the Roof Repair & Restoration Systems available here.
Reinforce Corners
Applying tape made of fibreglass mesh to the corners of the backer board will provide them additional support. Apply a skim coat of thin-set over the tape, wait for it to dry, and then sand it until it is smooth. Perform the technique once more, this time feathering the edge of the inset. Make a gap for the bead of caulk that is 1/4 of an inch wide by using gaps.
Conclusion
Many possibilities exist when it comes to selecting tiles for your shower wall. Large tiles look wonderful and are easier to clean, while textured tiles offer increased traction on wet floor. Glass or stone tiles can also be tiled with easy-to-clean, stain-resistant finishes. You don't need to worry about slide resistance for your shower walls, the first thing you should search for are materials that operate well in damp situations. It's also a good idea to search for materials that complement the design you're striving for and are easy to clean.
It is recommended that you stay away from the larger sizes of glass tile if you plan to instal it on the walls of your shower. If you enjoy the aesthetic of little mosaic tiles but cringe at the idea of having to clean them, you might want to reconsider the type of tile you choose. Selecting larger tiles and utilising wider grout lines are two ways to reduce the amount of time necessary for cleaning. Ceramic and porcelain tiles are the best surfaces for damp areas, they are ideal for showers. We recommend that you visit one of our design consultants in-store who can help you narrow down your options.
Gloss tiles offer a brighter, more shiny surface for walls, whereas matt tiles are flat or less reflective. Matt tiles are the way to go if you want a natural or rustic look. If you want to make your bathroom appear larger, consider installing floor-to-ceiling tiles. Skirting boards will be required to cover the wall/floor junction in non-tiled sections. No tile installation is really waterproof, and having tile designated as "impervious" isn't necessary.
Shower floors normally slope approximately 1/4 inch per foot towards the drain. How to Tile a Shower Enclosure or Tub Surround to Spruce Up Your Bathroom. A curbless shower might feature large-format tiles covering the floor and a single sloping plane leading to a linear, trench-style drain. To learn how to lay tile around a shower or bathtub simply follow the step-by-step directions below. If the rim of the tub is level, you can begin by placing a whole tile there.
Backer board and tile should be installed 12 inches above the tub if you are merely installing a tub surround. If water gets into this joint, it will move upwards and down into the floor. A waterproofing felt or a 4-millimeter poly sheet is adhered to the tub with asphalt cement, which then acts as a sealant. Make sure to provide a gap of at least a quarter of an inch between the bottom edge of the board and the rim of the tub.
Content Summary
- The type of tile you require in your shower is determined by whether you are tiling the floor or the wall.
- Many possibilities exist when it comes to selecting tiles for your shower wall.
- Any sort of tile that is suited for extremely damp environments is ideal for shower walls.
- Shower walls can also be tiled with glass or stone.
- Proportion is essential with all wall tiles, but it is especially important with shower enclosures.
- When it comes to bathroom remodelling, the shower is the focal point of the entire project.
- Choosing the appropriate tile for shower walls is one of the most important decisions to make.
- So precisely what are the greatest tiles to use for shower walls?
- And how can you know which one is best for your bathroom?The Best Tile for Shower WallsBecause you don't need to worry about slide resistance for your shower walls, the first thing you should search for are materials that operate well in damp situations.
- It's also a good idea to search for materials that complement the design you're striving for and are easy to clean.
- Here are our top shower wall tile picks:Ceramic / PorcelainCeramic or porcelain tiles are one of the most common and classic forms of tile used on shower walls.
- Marble/StoneAnother well-liked option for the shower is to construct it out of marble or natural stone; nevertheless, this is done mostly for aesthetic reasons.
- When it comes to purchasing tile for the walls of your shower, the material from which it is made is not the only factor to take into consideration.
- When you are picking out the tile that will go in your shower, keep these tips in mind.
- Smaller Glass Tiles Work Better Than Larger Ones in a ShowerIt is recommended that you stay away from the larger sizes of glass tile if you plan to instal it on the walls of your shower.
- Getting rid of this issue is as simple as selecting smaller glass tiles.
- Use a Second Tile Choice for ContrastThe aesthetic of your bathroom can be given more character and interest by including a feature wall into the design of the shower.
- In order to accomplish this, select a different tile selection for the wall.
- For instance, the pattern that is used on the feature wall should not be horizontal like the patterns that are used on the other walls.
- Tiles with a smaller surface area will have more grout lines, which will require additional cleaning.
- Selecting larger tiles and utilising wider grout lines are two ways to reduce the amount of time necessary for cleaning.
- Add a High-End Look to Your ShowerInstalling tile all the way to the ceiling of your shower will create the impression that it was much more expensive than it actually was.
- Design the Bathroom of Your Dreams with the Right Shower Wall TileKnowing the appropriate tile for shower walls will help you get your bathroom remodelling project off to a good start.
- Choosing the proper tile for a shower can be difficult when you're just starting out with your concept designs.
- Are matt or glossy tiles best for the shower?
- Depending on your taste, you can use either.
- Gloss tiles offer a brighter, more shiny surface for walls, whereas matt tiles are flat or less reflective.
- Gloss finishes on walls and fixtures have little effect on safety, however we recommend a matt finish for floors.
- As a result, gloss tiles are a fantastic design choice for smaller and narrower bathrooms.
- Matt tiles are the way to go if you want to produce a natural or rustic look.
- Should you tile the whole bathroom?A fully-tiled bathroom is desirable since wet areas are completely covered by an impermeable surface, reducing maintenance and ensuring longevity.
- If you want to make your bathroom appear larger, consider installing floor-to-ceiling tiles.
- Skirting boards will be required to cover the wall/floor junction in non-tiled sections.
- This can result in additional costs for the procurement and installation of skirting boards, as well as later painting.
- If the walls in non-tiled sections are to be decorated, they may need to be skimmed.
- What else do I need to know?Keep the following tips in mind while selecting shower tile for your bathroom.
- It is also critical to ensure that your shower flooring is waterproof.
- Tile for Shower FloorAside from aesthetics, an excellent tile for shower floors is:slip-resistant relatively water-resistant proportioned correctly for the available area and the slope of the shower panMany porcelain and stone tiles are popular choices, however most glazed ceramic tile is undesirable due to its slickness (unless the tiles are very small).No tile installation is really waterproof, and having tile designated as "impervious" isn't necessary unless the shower is outside and prone to freezing temperatures, but the least impervious tiles (labelled as "non-vitreous" or "low density") aren't normally suited for shower floors.
- The size of shower floor tiles influences both design flexibility and slide resistance.
- The coefficient of friction (COF) is used to rate the slip resistance of tile surfaces; large tiles in wet regions should have a COF of 0.60 or higher.
- Adding tiling around your shower or bathtub can give your bathroom a more elegant appearance and give you the ability to modify the space to reflect your personal taste.
- Choose a tile that is vibrant and colourful to make a statement, or if you like a more traditional look, go with a white subway tile treatment.
- We will walk you through the process of tiling a shower inclosure or tub surround, including providing guidance on how to achieve a clean appearance and a finish that is watertight.
- The amount of time necessary to complete the project is proportional to the dimensions of your shower as well as your level of experience.
- To learn how to lay tile around a shower or bathtub, simply follow the step-by-step directions that are provided below.
- If the tub is flat, you can instal a whole tile around the top edge of it.
- Extend the tile and the backer board for a shower inclosure so that they are at least 6 inches higher above the showerhead.
- To begin tiling around a tub, place a pencil mark on the vertical edge of the tile that is adjacent to the tub.
- If the rim of the tub is level, you can begin by placing a whole tile there.
- Apply CementThe flange or rim of the tub should be coated in asphalt roofing cement.
- The waterproofing felt or a 4-millimeter poly sheet is adhered to the tub with asphalt cement, which then acts as a sealant.
- Apply Felt PaperMake a cut in a piece of felt paper that is long enough to cover the entire surface in a single pass and turn all of the corners.
- First, apply asphalt mastic to the studs, and then, after preheating the paper with a hairdryer, press it into the corners.
- Cut And Fit BackerboardAfter the backer board has been cut and positioned so that its edges are centred on the studs, it may be secured with backer board screws.
- When installing a backer board atop a tub, make sure to provide a gap of at least a quarter of an inch between the bottom edge of the board and the rim of the tub.
- We are experts in roof repairs and take great satisfaction in providing quality roof repairs to customers all across Melbourne.
- Explore the Roof Repair & Restoration Systems available here.
- Reinforce CornersApplying tape made of fibreglass mesh to the corners of the backer board will provide them additional support.
- Make a gap for the bead of caulk that is 1/4 of an inch wide by using gaps.
Frequently Asked Questions About Shower Enclosure
All tiles are rated for different purposes, so be sure you've picked a tile that is appropriate for the shower. Note that tile for the shower floor is a separate rating from tile for the shower wall. - Check the specs on your tile to make sure it is rated for wet applications.
As porcelain is nearly waterproof, porcelain tiles are the best material to use when installing a wet room due to moisture levels. Ceramic is perfect to use all over in a standard bathroom, especially with the wide choice of designs available, including some with anti-slip properties.
If your shower features a surround made from a different material, you can tile the area. Use a waterproof tile adhesive or a mortar-style tile glue. An old tarp inside the shower protects the fibreglass pan and grabs any glue that drops onto the shower.
We always advise fitting the shower tray before tiling the walls or installing wall panels, as this ensures a more watertight seal around the sides of the tray.
Measure the perimeter of the shower tile area if you plan to use border tiles. Divide that number by 12 to determine the total linear feet and then multiply by the length of tiles being used to determine the total tiles needed; for example, a total of 10 linear feet would need 20 6-inch tiles.