Finding the best solution to a leaking basement can be a frustrating ordeal. One of the best things you can do for your home is to have the walls waterproofed so that water can't seep in through the cracks. By doing so, we can stop water from leaking in through the walls. There are many options available to homeowners when it comes to waterproofing their home's walls, but there are also common pitfalls that should be avoided at all costs. Here are some suggestions to help you avoid common pitfalls while waterproofing the outside of your home.
Everything You Should Know About Waterproofing Your Walls
Waterproofing. In spite of how often we've heard it, most of us still have no clue as to why it's important, where it should be performed, or what options are currently at our disposal. Therefore, in this piece, we will discuss the fundamentals of wall waterproofing so that you can do it correctly.
The Need For Waterproofing Arises Because.
Almost everyone here is familiar with the problem of damp or leaking walls in Indian homes. You've probably seen sizable damp areas developing on the walls, particularly the ceilings and adjacent wall regions of bathrooms and in a few particularly perplexing locations elsewhere. In addition, you may notice that the paint on your walls is chipping or that the spotted green fungus has made an appearance. This problem, made worse by the rainy season, can give your home a gloomy aspect and affect the mood of your family. Additionally, dampness fosters the development of mould, bacteria, and fungi all of which can have long-term, detrimental effects on human health.
Where Exactly Do You Suggest We Do It?
Waterproofing efforts should initially concentrate on the bathroom. Clearly, this is how it works. There is a constant seepage of water all year long, and it comes primarily from this spot. As a result, nearby walls are vulnerable to damage from water seepage from these areas. However, there are situations when the damage is caused by the elements, such rain, or occurred before you had the chance to waterproof your bathroom properly. For this reason, it is recommended that you also waterproof the walls in any damp rooms. Remember that any help, no matter how late, is better than none at all in this kind of dire scenario. Lastly, we have ceilings that frequently leak. There is another method you can use to fix these problems: proofreading. Ultimately, this will help you stay clear of a lot of hassles down the road.
How Can You Easily And Quickly Fortify Your Home's Defences?
Finding trustworthy painters to complete this task can be a daunting and time-consuming task, and we understand that. Worse yet would be discovering a month later that the materials used weren't durable or the proofing wasn't done properly, forcing you to start from zero again.
The Best Ways To Prevent Water Damage To A Cinder Block Wall?
Wet rooms can be made into usable space by waterproofing cinder block walls. Then you may cover the waterproof walls with panelling or sheetrock and paint them or wallpaper them any way you choose.
Ensure The Wall Is Dry And Clean.
Strip off any peeling paint and sweep the walls clean of any dust or debris that may have settled there. The wall must be thoroughly cleaned and allowed to dry before work can begin.
Repair Breaks
Fill any gaps in the wall using expanding hydraulic cement. It takes a full day for cement to dry.
To Cover A Wall With Paint
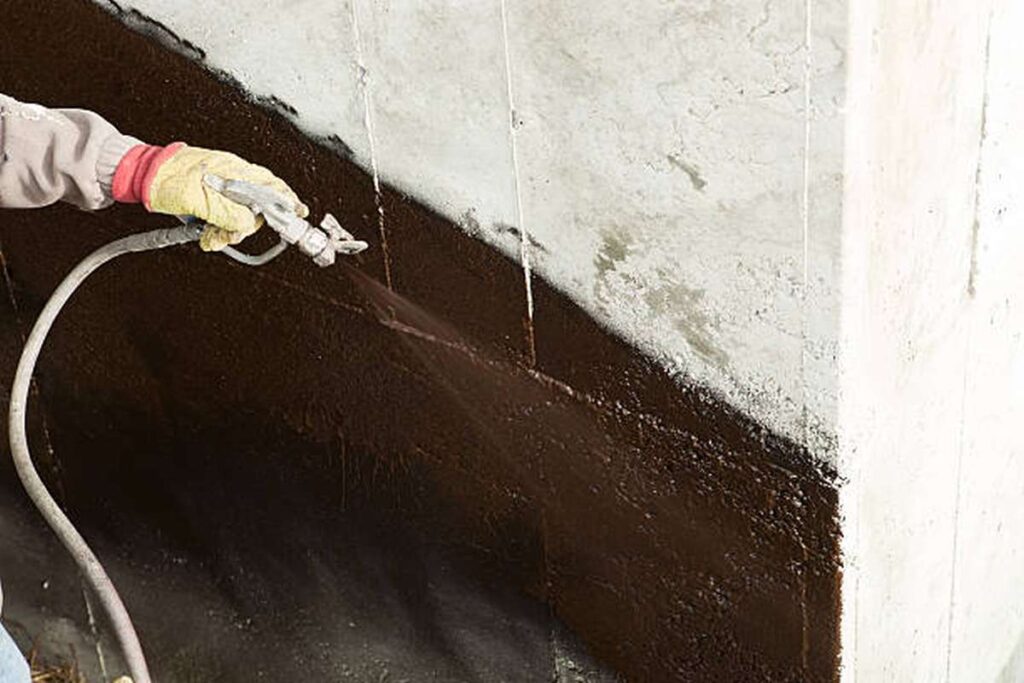
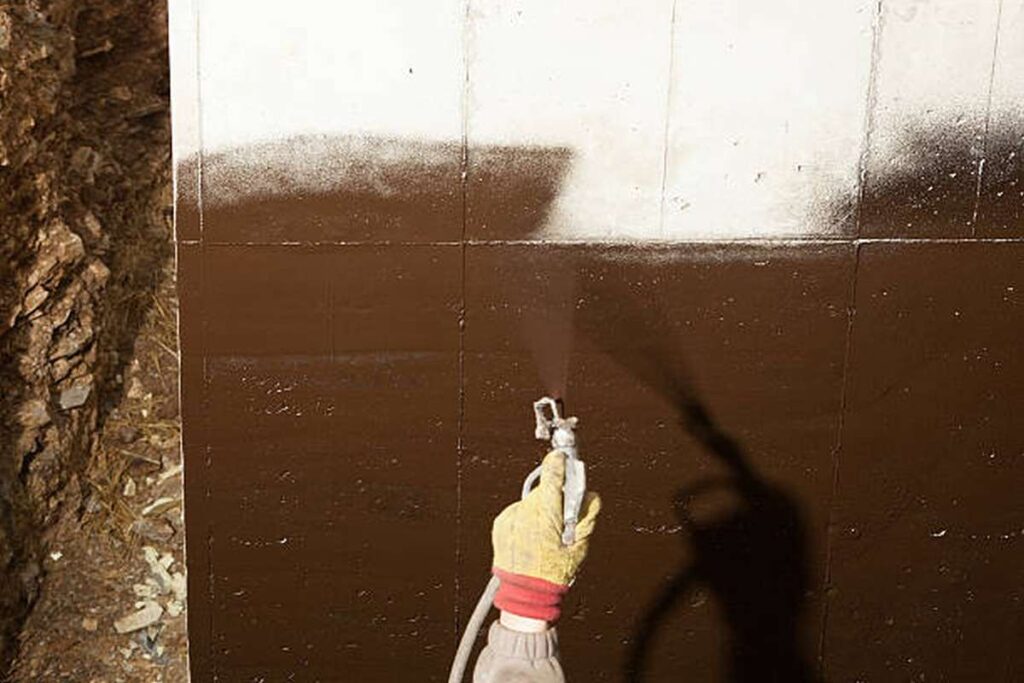
It is important to thoroughly cover the cinder block wall with masonry waterproofing paint and work the paint into all of the cracks and crevices. If you're painting a brick surface, a roller or brush made for that purpose is your best bet. Allow the item to dry for at least 12 hours, ideally overnight, between coats.
The Final Coats Must Be Applied
Brush on another coat of paint, and even a third if it looks like it needs it. The wall can be termed waterproof if the cinder block is entirely covered by the paint and none of the block is visible through the paint.
The Waterproofing Dos And Don'ts: A Beginner's Guide For The Home
Simply Painting Won't Do
Every homeowner should use a paint that is simple to clean on both the inside and external walls of their home. Walls need more than just an occasional coat of paint to remain in good condition. Most people don't realise that moisture is the main cause for alarm.
Plumbing leaks, broken downspouts and gutters, unhealthy roofs and a lack of regular maintenance are the most common causes of moisture buildup. Waterproofing the exterior is unnecessary for these containers. Discovering the source of the leak can help you avoid calling for help. But if you're just thinking about waterproof paints for the sake of building energy-efficient homes, the expert's suggestion might be a good one.
Deep Dive Into The Matrix
Walls with visible cracks are unsightly and could be a sign of danger. If you notice cracks, it's likely that there are major issues with the house's framework. Both the house's integrity and its visual attractiveness are affected by them.
Even if certain cracks are natural and predictable due to the age of the building, the presence of horizontal cracks is cause for concern and should not be overlooked. These cracks are a sign of poor plastering and potential structural problems.
If wall cracks aren't fixed as soon as they're spotted, water can seep in through them. Furthermore, water that penetrates inside the house through the exterior walls could potentially impair the main construction of the house. Therefore, it is critical to mend the structural flaws so as to avoid any unnecessary complications.
Sealing the cracks and holes in your home's interior and exterior is essential to maintaining its beauty and efficiency. Using products like Dampstop and Waterproof Putty, which both feature a watertight coating, throughout the construction phase might help reduce the possibility of such issues occuring. Dampstop's unique formulation of re-dispersible and flexible polymers makes it capable of protecting an entire wall.
Cracks And Seal Leaks
Both the walls and the terrace are crucial parts of the building's framework. Therefore, it's crucial to build the terrace and walls properly and keep them in good condition. Contrarily, leaks are silent killers that cause extensive roof damage and ultimately weaken the entire building.
The improper slope of the terrace and the fractures in the walls are two of the main causes of water seepage in the terrace and the walls. Damage of this sort must be addressed without delay to prevent the building from rotting from the inside out due to extended exposure to moisture. Accordingly, the best way to guard against leaks and other forms of moisture damage to the roof is to conduct routine inspections of the terrace.
It's far more challenging to ensure that the terrace tiles are watertight. In order to achieve a high quality outcome, a finish that is both shiny and smooth is required. If you want the best results, priming the surface first is a must. Tiled terraces can be protected from water damage with just one coat of primer.
In The Absence Of Any Interior Condensation
Your home's most attractive feature is its time-tested walls. However, water damage could kill off any life forms clinging to the walls. So, even if you use the most costly paint, the result may still be subpar. The most common causes of dampness include unsuitable slope, bathrooms, exterior walls, spaces between tiles, and water gathering on the floor. Furthermore, leaks can be a factor.
Take care of your walls as soon as you notice any moisture so that their appearance and stability are not jeopardised. Applying Homeshield Dampstop to the inside and outside of a building's walls is the most efficient way to keep moisture out. Cement-based solution that produces durable, elastic, and watertight covering on the wall's surface. Washable paints are made using cutting-edge technology to give you beautiful, long-lasting results, so they're a great option for painting your walls.
What Not To Do When Waterproofing Your Home
Homeowners would rather not have a house that is constantly leaking due to excess moisture. In the event that the home sustains any kind of damage, however, removing it might prove to be a difficult task.
- Get to the bottom of it by conducting your own research. Waterproofing a basement can be accomplished in three different ways: drainage, interior sealants, and outside coatings. Before deciding on a course of action for your property, you should do a thorough evaluation.
- It's not good to let water sit around for a long time, especially if it's been hanging about for a while. This is the only way to protect your home from mould, which can cause major damage to the structure and even affect your health if left unchecked.
- Determine the Source of the Water Damage: You need to track down the source of the leak so that you can fix it. Is there a broken pipe, or is water coming in via the window? If you were given the opportunity, would you be able to identify the cause of the issue and find a solution?
- Homemade sealants are not acceptable. Never use homemade sealants without first getting advice from a professional, no matter how handy you are. Most of these quick fixes are merely band-aids, and they could eventually lead to more expensive foundation work.
- Don't let dirt and leaves collect in your gutter, as this will cause water to flow away from your house and into the drains instead of collecting in the gutter. You can avoid this issue altogether by maintaining clean gutters. It's because of this that the fractures have appeared. Because of this, you should keep the gutters tidy.
- Keep Plants at Least a Meter Away from the Building's Foundation: Plants and seeds should be placed at least a few feet away from the base of the structure. Make a slope that declines 6 inches for every 10 horizontal feet.
- Utilize Waterproofing Products Designed for Their Intended Room: Using products made for that purpose alone will ensure a watertight home. To give one specific example, Latex Shield is a great choice if you need a waterproofing solution for indoor moist areas like pools and water tanks. If you need a solution to waterproof these areas, you've come to the right place.
Basement Wall Waterproofing Do's And Don'ts
Finding out what's making the basement walls damp and taking steps to rectify it are top priorities if you want to maintain your home in one piece. Groundwater is a common problem in basements because they are built below grade. This can lead to damp walls, puddles, and, worse case, a flooded basement during heavy rains. Humidity, dampness, or even complete flooding in a basement can lead to peeling paint, the development of mildew, and mould rotting wood, and damage to any belongings kept down there.
There may be cracks in the basement walls over time due to the house settling, even if measures were taken during construction to ensure that the basement was waterproof. When the ground outside gets wet, water might seep in through these crevices. The basement walls may be structurally sound, but they may also appear damp because they absorb water from the soil outside and transfer it inside. Evaporation of the water from the walls will increase the humidity level in the basement. Quality dehumidifiers can help with the problem of too much moisture in the basement, but waterproofing the walls is the best long-term solution.
While a simple DIY fix might be all that's needed to fix the moisture problem, it's also possible that a foundation contractor will need to get involved. If you're thinking of waterproofing your basement walls, the following guidelines will get you off to a solid start.
To Track Down Its Water Supply's Origins.
Because concrete is permeable, wet lines can often be seen leading to the source of water damage. Look for stains near water or sewer lines, as well as along cracks, window sills, mortar joints, and other points of entry and exit for pipes. Be on the lookout for striations in the midst of mortar joints as well (for cement block walls).
But if all of the walls are wet, then more research is needed. A simple condensation test involves wiping down a portion of wall with a rag and then attaching a square of aluminium foil measuring one foot in size to the wall with duct tape. After 24 hours, take a look at the foil's underside and feel it to see how it's holding up. A leak somewhere outside the wall would cause this dampness. A basement shower is the most likely cause of dampness if the rest of the basement is dry; installing a vent fan in the shower will quickly remedy the situation by dispersing the steam outside.
Don't Repair Basement Walls If They're Flooded.
When the weather outside is moist, even a small hole in the basement wall might let two inches of water in. However, all water must be removed from the floor before any attempt is made to repair the fracture. There is a higher risk of electric shock or death when working in a flooded basement. Turning off the basement's electricity and using a utility pump to remove the water is a better option (with extension cables that reach an outlet upstairs). The water will be dispensed from the pump and sent to your lawn through garden hose. The basement walls may be inspected, repaired, and waterproofed effectively once the water has been removed.
Don't Forget To Use Hydraulic Cement To Patch Up Any Holes.
The footings of the basement's walls are another frequent site for the emergence of fractures. The footing, a wide, flat base consisting of concrete and reinforced steel that is supposed to support the walls, is poured first during the foundation pour. After the footings have set, the walls are poured directly on top of them. Although this is standard procedure, it can cause what is known as a "cold joint" in the building industry. A cold joint is an area of the foundation where the wall meets the footing and is therefore particularly vulnerable. There is potential for cracking here due to lateral strain from the earth and foundation movement and settling.
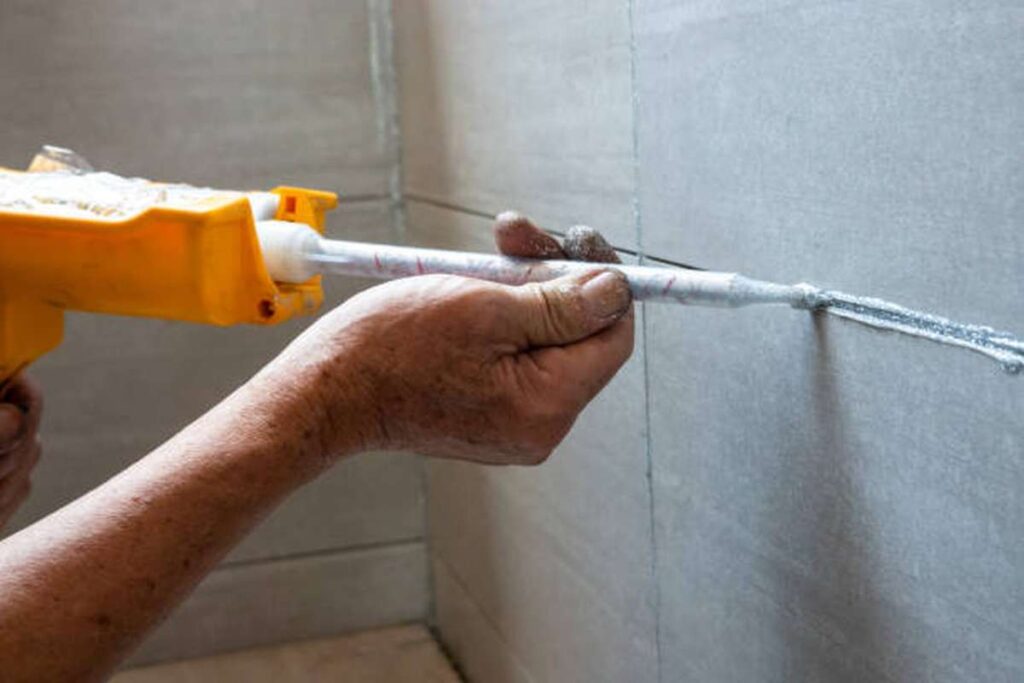
Hydraulic cement crack filling is a fairly simple DIY project that may be done to effectively seal cracks. First, hydraulic cement—which has additives that help the cement to rapidly expand and set—is combined with water to the consistency of a thick putty, and then, either using gloved fingers or a putty knife, cracks are filled. Additives in hydraulic cement speed up the setting time and also cause the cement to expand. Growing hydraulic cement drives itself deeply into crevices and cracks, forming a bond that is impenetrable to moisture. It begins to set within three minutes of being combined, so only make what you'll need at once.
Fixing Any Leaks In The Window Wells Should Be A Top Priority.
Window wells are a common source of basement wall leaks due to the water that accumulates in them. When a house is built without a proper drainage system installed beneath the window well, this can occur. This can lead to water collecting at the base of a basement window, which can eventually leak into the room above.
Since it is hard to retrofit a window well with a drainage system, you can fill the space left by digging down about two feet with gravel. Doing so will reduce the likelihood of water collecting in the window well after a rainstorm. Follow it up by caulking the stone around the window.
Do Waterproof Bare Basement Interior Walls.
The basement walls should be painted on the inside with a high-quality waterproof paint if the foil test revealed that water was penetrating the walls and leaving them damp. Apply the paint with a brush or roller in a thick enough layer to fill all the tiny surface holes in the basement walls, then let it dry completely before applying a second coat to ensure watertightness. When the sealant has fully dried, it forms a watertight seal that stops water from getting through. A five-gallon container is sufficient for treating a wall measuring about 500 square feet.
Don't Seal Paint Or Efflorescence.
If you or a previous owner painted the basement walls, you'll need to remove the paint before applying a sealer. Sealers work best when applied to bare brickwork. Blasting contractors are the people that use sandblasters to remove the paint from older buildings, which may have numerous layers of paint. Wire brushing is another option for getting rid of it, albeit it is a time-consuming and inexpensive DIY effort.
Do Prevent Basement Flooding.
The solution to the issue of damp basement walls is sometimes straightforward. Avoid having water seep into your basement by, for instance, removing water-intensive landscaping from around your home's foundation, such as bushes and flowerbeds. In addition, you should check the condition of the gutters and downspouts around your home and fix them if they aren't doing a good job of diverting water away from the building. When sloping your yard away from the structure, a two percent grade is recommended as a minimum.
In addition to the aforementioned measures, you may choose to have an outdoor drain tile system installed. The hefty cost of this approach—which may reach $10,000 or more—means it is usually only used as a last resort. When digging around the exterior of your basement to instal a perforated drain at the footing level, you'll need to remove some of the soil. The external basement wall is typically equipped with a watertight membrane. In addition, a sump pump is buried as part of the system to collect water for later pumping out. Only a foundation contractor should attempt this, but if successful, it might greatly reduce basement flooding.
Don't Overlook Interior Drainage.
Another option for achieving dry walls in the basement is to create a drainage channel beneath the floor. The drain is similar to the exterior drain tile mentioned earlier, but it is installed inside the basement walls. The old basement walls are then covered up, and new ones are built inside the drain. This is another job for the foundation contractor, and it will run you at least $5k. Once everything is finished, you will have brand new walls that are completely watertight, and any water that still seeps through the old basement walls will be directed to the drain channel and removed by a pump.
Conclusion
Homeowners have various wall waterproofing choices. There are additional hazards to avoid. Here are some tips for waterproofing your home's exterior. Trustworthy painters can be hard to find. Proofreading can fix these issues.
This will save you time and money afterwards. Cracked walls are unattractive and dangerous. Cracks indicate problems with the house's framework. Dampstop and Waterproof Putty may assist prevent such problems. Drainage, inside sealants, and outside coatings can waterproof a basement.
With one layer of priming, tiled terraces are water-resistant. Applying Homeshield Dampstop to a building's inside and outside walls keeps moisture out. Because basements are below grade, groundwater is prevalent. Basement humidity, wetness, or floods can cause peeling paint, mildew, and decay. Determine what's causing moist basement walls and fix it.
If the rest of the basement is dry, a shower may induce moisture. A simple condensation test includes washing down a wall and taping a one-foot square of aluminium foil to it. Crack sealing with hydraulic cement is a straightforward DIY technique. Prioritize fixing window well leaks. Additives in hydraulic cement hasten setting and cause expansion.
If water is invading basement walls, use waterproof paint. A 5-gallon container treats a 500-square-foot wall. Before sealing the basement walls, remove any paint. A 2% gradient is advised for sloping your yard away from the structure. You can also instal outdoor drain tile. If effective, a foundation contractor can reduce basement flooding.
Content Summary
- Waterproofing the walls prevents water from seeping in through cracks.
- So, we can prevent wall leaks.
- There are various choices for waterproofing residential walls, but there are also traps to avoid.
- Wall Waterproofing 101 Waterproofing.
- This article will teach you how to waterproof walls properly.
- Damp or leaky walls in Indian homes are a common concern.
- Dry and clean the wall.
- Cover the cinder block wall with waterproofing paint and work it into cracks and crevices.
- Good walls require more than an occasional application of paint.
- These containers don't need waterproofing.
- Find the leak's source to avoid calling for help.
- Cracks indicate problems with the house's framework.
- Cracks indicate inadequate plastering and structural issues.
- Fixing structural defects prevents unneeded problems.
- Sealing your home's interior and exterior cracks and holes maintains its beauty and efficiency.
- The building's walls and terrace are both important.
- It's important to maintain the patio and walls properly.
- The terrace's uneven slope and wall fissures generate water seepage.
- This damage must be repaired quickly to avoid the building from deteriorating from the inside out due to moisture exposure.
- Waterproofing patio tiles is difficult.
- Prime the surface for optimal results.
- With one layer of priming, tiled terraces are water-resistant.
- Water damage could kill any wall-clinging life.
- Leaks can also contribute.
- If you spot moisture on your walls, act quickly to preserve their beauty and stability.
- Washable paints are designed with cutting-edge technology to give you attractive, long-lasting effects.
- Investigate it yourself.
- Drainage, inside sealants, and outside coatings can waterproof a basement.
- No homemade sealants allowed.
- Dirt and leaves in your gutter will divert water away from your property and into the drains.
- Clean gutters prevent this problem.
- Keep gutters clean.
- Finding out what's causing moist basement walls and fixing it are top considerations for home maintenance.
- Moisture problems may be fixed with a simple DIY fix, but a foundation contractor may be needed.
- These tips can help you waterproof your basement walls.
- Wet lines often lead to the source of water damage in permeable concrete.
- Look for stains near water or sewer lines, as well as cracks, window sills, and masonry joints.
- Check mortar joints for striations (for cement block walls).
- Having moist walls requires further investigation.
- This wetness comes from an exterior leak.
- Installing a vent fan in the shower will rapidly address the condition by distributing the steam outside.
- Don't fix flooded basement walls. A little hole in the basement wall can let two inches of water in during wet weather.
- Before repairing a floor fracture, all water must be removed.
- Flooded basements increase the risk of electric shock or death.
- Turning off the basement's electricity and utilising a utility pump is best (with extension cables that reach an outlet upstairs).
- Once water is removed, basement walls can be inspected, repaired, and waterproofed.
- Fractures also appear in basement footings.
- After footings set, walls are poured on top.
- Although normal, this can generate a "cold joint" in construction.
- A cold joint is a susceptible location where the wall meets the footing.
- Crack sealing with hydraulic cement is a straightforward DIY technique.
- Additives in hydraulic cement hasten setting and cause expansion.
- Prioritize fixing window well leaks.
- Window wells absorb water, causing basement wall leaks.
- This can happen if a house is built without a window well drainage system.
- This can cause water to gather at a basement window, leaking into the room above.
- Since retrofitting a window well with a drainage system is difficult, fill the space with gravel.
- Doing so will reduce rainwater accumulation in window wells.
- If the foil test revealed moist basement walls, they should be coated with a high-quality waterproof paint.
- Apply paint thickly enough to fill all the tiny surface gaps in the basement walls, then let it dry before adding a second coat to assure watertightness.
- Seal paint and efflorescence.
- Before sealing the basement walls, remove any paint.
- Don't flood basements.
- Damp basement walls can be easily fixed.
- Remove bushes and flowerbeds from around your home's foundation to prevent water seepage.
- Check the gutters and downspouts around your property and fix them if they're not channelling water away from the structure.
- You may also instal an outdoor drain tile system.
- You'll need to remove some soil when installing a perforated drain at the basement footing.
- Create a drainage tunnel under the floor to achieve dry basement walls.
- Similar to outside drain tile, but laid inside basement walls.
- New basement walls are created inside the drain, covering the old ones.
- Once everything is finished, you'll have brand new waterproof walls, and any water that still seeps through the old basement walls will be removed by a pump.
Frequently Asked Questions About Waterproofing
Concrete waterproofing coating is a cement-like product that permanently adheres to concrete and masonry; it can be applied to any surface, including painted walls; ... In addition, the product can be applied to surfaces previously painted.
DRYLOK loses its waterproofing ability when applying the chemical over painted walls or flooring containing latex or oil-based paint. You can still apply DRYLOK over latex or oil-based paint, but the chemical will not prevent moisture from seeping in through the concrete wall or flooring.
How to Damp-Proof a Wall. The most common source of dampness on external walls is penetrating damp, often due to exposure to wind-driven rain. Treating penetrating damp and damp-proofing brick walls can easily be achieved with Stormdry Masonry Protection Cream.
Epoxy paint is most commonly used for basement or garage flooring because of the paint's durability and water-resistant capabilities. Epoxy is a type of plastic resin added to the paint to create a rapidly hardening compound applied to a surface.
Solution: The best way to fix damp walls which are caused due to condensation is to use a combination of ventilation and heating. Avoid using wall coverings and non-porous paints, and it is advisable to use a dehumidifier as weak in this case.