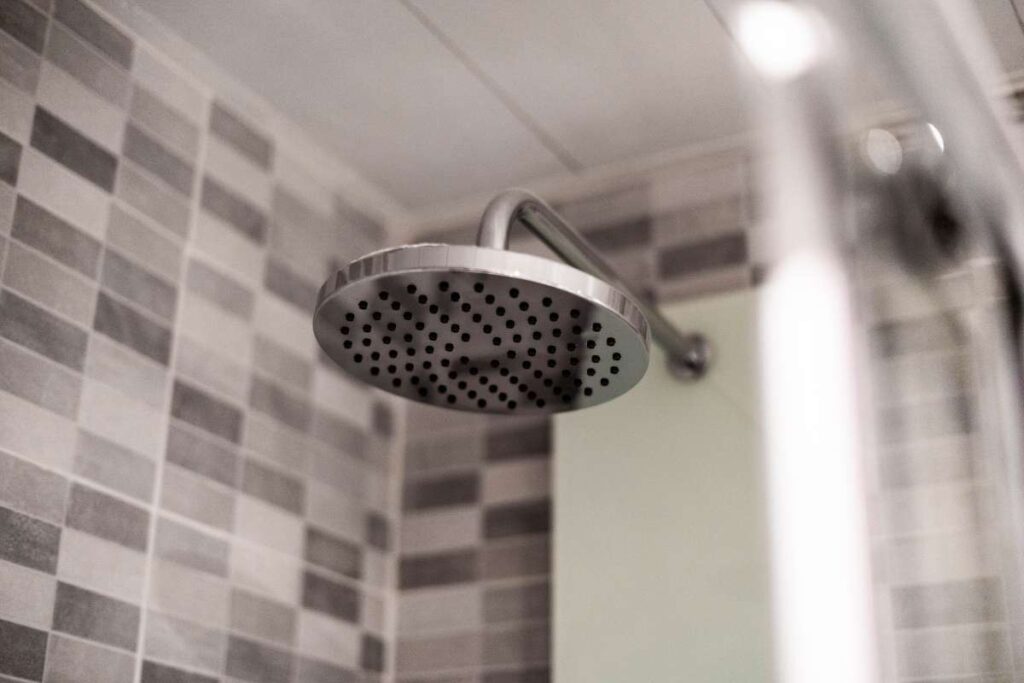
The failure of the grout in the shower is almost always the cause of leaks in the shower. The presence of water almost ensures the presence of tiles that are leaking. The water leak in the shower needs to be fixed as soon as possible; otherwise, there will be a buildup of standing water, which will result in mould and dampness under the tiles. Find the most qualified experts in Solar Panel System repair and installation right here at Roof Repair Roofing Systems.
The failure of the grout in the shower is almost always the cause of leaks in the shower. The presence of water almost ensures the presence of tiles that are leaking. The water leak in the shower needs to be fixed as soon as possible; otherwise, there will be a buildup of standing water, which will result in mould and dampness under the tiles. This presents a significant risk to people's health. Additionally, dampness has the potential to compromise the structural integrity of walls. If water seeps under the tiles, it can damage the adhesive that is keeping the structure together, and this can cause the title to come loose. It is possible for the tile to get loose and even come off. Therefore, it would be in your best interest to move in as soon as possible in order to fix the leaks.
Even though you may be able to pinpoint the exact location where the grout failed, it is in your best interest to hire a professional to ensure that the new grout will hold up for a considerable amount of time.
The level of damage determines the kind of maintenance that must be performed on the item. If the amount of water leaking from the shower is not excessive, it is conceivable that the grout can be repaired without having to remove the tiles first. However, if the amount of water seepage is significant, it is possible that it will be necessary to remove the tiles in order to fix the waterproofing system.
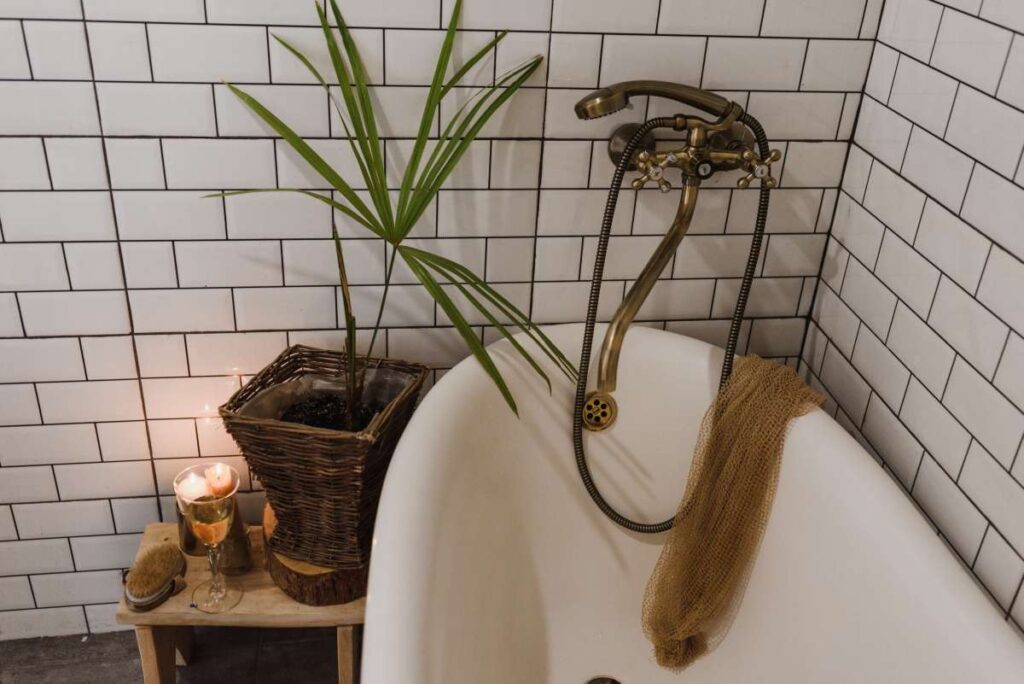
Look check the shower caulking and the grout around your bathtub or shower before concluding that there is a problem with the pipes in your home. It is important to do maintenance on the grout and the caulking on a periodic basis. It is possible for the caulking or the grout that is in between the tiles to crack if it is not maintained properly. Because of this, moisture will be able to penetrate the surface.
It is essential to put a halt to the leak as soon as possible to prevent any more damage, in particular to the material that is located below the tiles and the wall. If you discover the problem early enough, you can remedy a leaky shower without having to remove the tiles. However, this requires that you catch the problem before the damage has become extensive.
How to Stop Grout Leakages?
You are going to need to use a grout sealer if you want to keep the grout looking as good as new. After one to two years, you will need to reapply the sealer in order to keep the grout in good condition and ensure that it is waterproof. It is essential to seal grout because, in the absence of a waterproof covering, it readily absorbs not only water but also bacteria and stains as well. This is due to the fact that gout is composed of a combination of sand and cement.
Because it has been sealed, the grout will be protected from bacteria and moisture. In addition to this, the sealing process will add to the aesthetic value of the grout. Because of this, the grout will be more durable, and it will even look nicer. In the presence of a sealer, mould and mildew will not be able to accumulate on it. Epoxy grout, on the other hand, is an entirely separate material, thus this does not apply to it in any way. Epoxy grout is more expensive than other types and is typically used to secure glass tiles.
Epoxy grout is hardy and waterproof, however it cannot be used with all types of tiles due to its limited compatibility. Grout made of epoxy is a good choice for non-porous materials like glass and tiles. Epoxy grout is more flexible than grout made from cement, which is the traditional material. As a result, it is more resistant to damage from chips and cracks. Epoxy grout benefits from these properties, making it more resistant against stains and water.
After you have finished putting in your brand new tiles, you will need to give the grout between 48 and 72 hours to harden. It is important to do an inspection of the grout before applying the sealer. It is important that the grout be completely dry, clean, and free of any chipping or cracking.
Do you have a leak in your shower floor? It doesn't matter if the area is a shower, a kitchen splashback, or a wet room; tiles can develop leaks in any setting where water is used. As a result of the fact that they frequently result in the development of mould and moisture within the surfaces that lie below tiles and even pose a threat to the structural integrity of the walls, it is essential to address the problem as soon as the first symptom of a leak appears.
If water gets underneath the tiles, it can also harm the adhesive that holds them in place, which can lead to the tiles falling and possibly even loose completely off the wall. The question now is, what are some ways to prevent water from getting behind tiles? You can seal your tiles without removing them first by following the steps outlined in this article to reapply the silicone and grout. But if the leak is significant, you'll need to take up the tiles and put in a waterproofing system first.
If the grout between your tiles is clearly worn or crumbling, there is a good chance that water is getting trapped behind them. Even though your grout does not appear to be broken, if it is not water-resistant, it is still a possibility that it is the cause of the leak. In any case, removing and replacing the grout is probably a good idea; in particular, any grout that is obviously broken should be replaced.
Both manual grout removal tools and power tools with an oscillating motion are widely available at hardware stores and may be acquired for a reasonable price, allowing for the manual removal of grout. Before you begin the process of removing the grout, it is recommended that you tape off the grout lines so that you do not damage your tiles in the process.
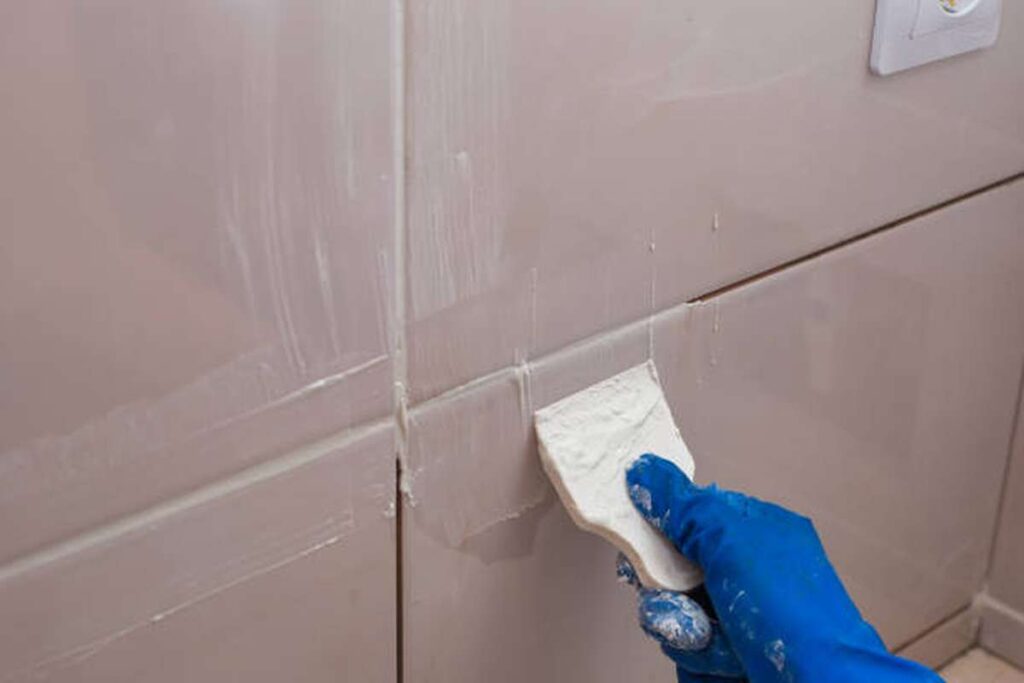
Before applying new grout, you need to make sure that the tiles are attached tightly and that the spaces between them are clean. After that, you can apply water-resistant grout to small parts of the tile using a squeegee or a rubber float. Make sure that there is no. A finish that is even and free of gaps, which could lead to further complications in the future, is produced.
The excess grout should be removed from the tile surfaces as quickly as possible, and then the surface should be left to dry for approximately half an hour. Finally, any leftover grout residue on the tile surface can be removed from the surface of the tile by using a damp emulsifying pad or sponge.
- First, you should thoroughly clean the locations that are leaking. It is necessary to clear the entire region of any soap scum and mould in order to examine the grout that is between the tiles and the tiles themselves. You are able to chip away at any portions of grout that are loose or fractured until you reach solid grout. Remove the joints by scraping and brushing them so that you can see what you are working with. After ensuring that the area is completely dry, start the application of the fresh grout using a sponge. You can use pre-mixed grout in squeeze tubes or tub containers.
- After following the instructions on the bottle, let the grout dry completely before removing any excess with a sponge that has been dampened with water.
- It would be in your best interest to seal the seams where the tile meets the floor of the bathtub or shower. Remove the old caulk with a scraper and then apply the new caulk. Silicone caulk is an excellent choice because it does not crack or break even when the tub is subjected to expansion and contraction. Be cautious to seal around the escutcheons of the faucets as well as the tub. It will be impossible for water to get behind the tiles if you do this.
- Give the grout time to cure for the amount of time specified in the directions. After the grout has had time to cure, you may then apply a sealer to it. There are types of epoxy grout that do not have to be sealed, however sealing it is recommended since it prevents moisture damage and can lengthen the life of your grout.
Even while each phase isn't very complicated on its own, the majority of homeowners probably won't want to tackle the project on their own. There are several situations in which having professional assistance would be advantageous. They are beginning by determining what the issue is. If you hire a specialist in hard surface restoration like Sir Grout, they will be able to establish right away whether the leak is caused by a problem with the tile grout or the caulking. Because of this, the property owner will have absolute certainty regarding the origin of the water damage.
Employing a professional to carry out the work also means that you can be certain that the task is done correctly from beginning to end, which increases the likelihood that the finished product will be durable. Let's face it. The term "do it yourselfer" does not apply to each and every homeowner. There are some things that are better off being handled by trained experts.
Having a leak in your shower can result in the growth of black mould, which is something that no homeowner ever wants to see happen in their home. Sir Grout is able to guarantee that there will be no black mould and that the conditions that promote black mould will be improved. Because of this, the client may feel at ease knowing that their loved ones won't be in danger. You will find in this post the reasoning behind why it is in your best interest to hire a professional to regrout your tile.
Shower Caulking and Grout Restoration Professionals
In the field of hard surface restoration, Sir Grout is the industry leader. We provide a wide variety of services, such as tile and grout cleaning, recoloring and sealing, caulking, stone cleaning and sealing, stone countertop sealing, deep cleaning of hardwood floors, and high durability coatings. We are able to repair or replace broken grout, as well as clean up any damage that has been left behind by old grout or caulking. This includes removing any and all evidence of the black mould that poses a potential health concern to you and your family.
It is not necessary to wait for leaks or any other damage to occur before calling Grout. Improvements can be made to grout even if it has not yet begun to exhibit signs of degradation.
Because of the accumulation of dust and dirt, the appearance of your tile and grout in the shower may become less than desirable. Grout's restoration services can immediately bring your shower back to life when the grout or caulking begins to look like this. They can also undertake preventative maintenance to stop severe issues from occuring in the first place.
Identifying the Source of the Leak
You will need to start with a clean and dry shower in order to figure out what is causing water to travel where it shouldn't be going in the shower.
- Applying a layer of duct tape over the shower drain will prevent any water from escaping. Use at least a six-inch barrier around the drain to prevent water from getting in.
- The shower should be filled with water all the way to the top of the shower pan before turning on the showerhead. Make use of a different water supply in addition to buckets or a hose.
- Now, wait for around fifteen to twenty minutes, and then check to see if the leak has appeared. When you look in the basement or crawlspace, you can see watermarks there. You might also find them on the ceiling below.
Showers that are leaking water provide a potentially serious hazard for structures and call for immediate action to contain the water damage. The first thing that has to be done is to recognise the warning indications of a leaky shower, followed by locating the source of the leak, and then repairing it.
This tutorial will first explain the indications and symptoms of a leaky shower, then it will describe the steps that you can take to locate the cause of the leak. In a different instruction on how to fix a leaky shower, the steps for repairing and waterproofing the shower with the help of masonry waterproofing product are described in detail.
The following are some of the symptoms that may be caused by leaking showers, which can cause structural damage to any and all building materials:
- Rotting flooring, skirtings, and door frames
- Walls and ceilings in rooms that are close to each other exhibit signs of water damage such as moisture, mould, mildew, sogginess, and discoloration.
- Mold, cockroaches, or silverfish may also show up next to the shower, in addition to dampness that occurs in nearby carpets, closets, and clothes.
- The presence of termites and ants, both of which are drawn to wood that has become wet.
- Timber used in structural construction can decay, buckle, or swell.
- problems with the lighting fixtures and the wiring of the electrical system
Despite the fact that all of this can be observed in the area surrounding the shower, water has the ability to travel larger distances along surfaces, which might result in difficulties in other areas. Observing these symptoms in close proximity to the shower could be an indication that the shower itself is the source of the issue. However, there is a possibility that water damage in other parts of the structure can also be traced back to the shower. At Roof Repair Roofing Systems, we have a wide variety of roof restoration experts for you to choose from.
Preventing Shower Leaks
We have generated a significant amount of revenue by correcting the errors of other contractors. Many of those errors are made more than once, and a good number of them take place in showers or in the area surrounding them. The great news is that when you keep fixing the same problem in the same way, you'll ultimately figure out how to solve it properly the first time around. In this essay, we will examine the areas that have the highest rate of failure and share the solutions that have been successful for our organisation.
Showers absolutely need to have a full-fledged waterproofing system installed in order for them to be useful. Natural stone and glazed tile are not waterproof, which is a fact that seems to go against common sense. Even if there are no flaws on the surface, moisture is still able to seep through both of those materials. In addition to being porous, thinset and setting mud have the same property.
The water passes through these materials each time the householder takes a shower, and if any of that water finds its way into the wooden structure, it can cause mould and decay. (In one instance, we were able to make out the water hidden below the glass tile.) As a consequence of this, showers have to be made watertight prior to the installation of the tile (for more information, see "Secondary Drainage System").
Curb Flashing
Although we notice the greatest issues in flat places, such as half-walls and drains, benches and especially curbs are extremely susceptible to damage from water. At these constructions, many planes come together to generate corners where water does not drain freely, such as curbs. These corners are caused by the fact that curbs are constructed using multiple planes. A number of corners are formed in close proximity to one another at or near the floor of the shower, which is the location of a great deal of standing and splashing water. A kerb will not have a long lifespan if it is not properly waterproofed.
One of the limitations of waterproofing membranes is that they are typically supplied in the form of flat sheets, which can be challenging to neatly bend around interior and exterior corners. In its place, we like the use of three-dimensional patches. They work well not just on benches and curbs but also on shampoo nooks and half walls. Outside and inside corner patches can be purchased from USG Durock, Schluter-Kerdi, Oatey, Noble, and other retailers and manufacturers.
Bathtub Stopper
The large hole in the middle of the shower pan, which is where the drain will eventually go, is the most important link in the shower floor. The drain that should be utilised is referred to as a "bi-level drain," and it comprises the following four components: the grate, the beauty ring, the drain body, the clamp ring. The plumber's pan is secured in place between the drain body and the clamp ring using the clamps. Following the completion of the installation of the beauty ring up to the tile level, the grate is then inserted into the beauty ring.
It is typical for the instructions that come with the drain to state that the drain body should be glued to the bottom of the pan. Because the clamp ring will typically serve to seal the connection, a lot of plumbers skip this step, but because the instructions demand glue, we insist that it be done. However, make sure not to use excessive amounts of adhesive. Do not glue the top of the membrane to the clamp ring; Water that gets behind the tiles can flow out of the pan and into the drain through the weep holes if you don't seal them. Do not adhere the top of the membrane to the drain body; instead, only adhere the bottom of the membrane.
The off-gassing of plasticizers used to make flexible vinyl shower pans is a cause for worry because it could make the pan brittle and lead to cracks over time. This is because plasticizers are used to make flexible vinyl shower pans. Due to this particular reason, we have decided to switch to a shower pan liner made of CPE (chlorinated polythene), such as Noble Chloraloy.
Valves
There are sufficient water losses at shower valves for us to consider addressing the issue. If it is practicable to do so during the waterproofing stage, valve openings are sealed. Schluter-little Kerdi's gasket-like fittings have been difficult for us to instal at valves, despite the fact that these fittings work wonderfully for tub spouts and showerheads due to their compact size. After the tile has been laid, the hole around the valve is caulked for added protection afterwards.
When working with a huge escutcheon, we caulk the tile underneath the escutcheon the majority of the way around, but we leave the bottom uncovered so that water can drain. Are you looking for roofers in Melbourne who have a reputation for dependability? No need to be concerned; Roof Repair Roofing Systems is able to supply you with specialised servicing and repairs to meet all of your roofing requirements.
Conclusion
The presence of shower water almost guarantees the presence of tiles that are leaking. Without addressing the leak as quickly as possible, a pool of water will form. Because of this, mould and humidity will develop under the tiles, creating a serious health hazard. How much water is leaking from the shower can tell you what kind of repair is needed. If the caulking or grout between the tiles isn't properly maintained, it can crack.
Sand and cement are mixed together to make grout. Although epoxy grout is strong and watertight, it is not compatible with all tile materials. Epoxy grout works well with smooth, nonporous surfaces like tile and glass. Before using grout sealer, it's vital to check its condition. Water may be collecting behind your tiles if the grout between them is visibly damaged or cracking.
Putting a seal on your tiles doesn't require removing them first. In the event that the leak is severe, however, a waterproofing system will need to be installed, which will require the removal of the tiles. Before laying grout, the problem areas must be properly cleaned. It is highly recommended that you seal the joints where the tile meets the floor of the shower or tub. In spite of the fact that not all epoxy grout must be sealed, sealing is highly suggested.
No homeowner wants to deal with the unsightly and even dangerous black mould that can develop if their shower springs a leak. If the grout or caulking in your shower ever starts to look like this, Sir Grout's professional cleaning and restoration services can get it looking like new in no time. Having a leaking shower can be a major risk to buildings. The first step in fixing a leaking shower is realising there is a problem. The next step is to find the water seepage point and seal it with a masonry waterproofing compound.
Installing a proper waterproofing system in a shower is a must if you want to utilise it. Even if there are no visible faults, natural stone and glazed tile are not watertight. A waterproof seal must be created in the shower before tile can be installed. Flat sheets of waterproofing membrane are the standard delivery format, making it difficult to shape the material to fit around obstacles like pipe penetrations and building corners. However, we prefer the use of three-dimensional patches, which may be used to shampoo nooks and half walls in addition to benches and curbs.
Roofing needs? Melbourne's Roof Repair Roofing Systems has you covered with expert maintenance and repairs. Inflexible vinyl shower pans pose a threat of cracking and breaking due to off-gassing from the plasticizers used to produce them.
Content Summary
- Most leaks in showers can be traced back to deteriorating grout.
- Leaking tiles are practically a certainty anywhere there is water.
- Without prompt attention, standing water in the shower will accumulate, leading to the growth of mould and the formation of moist areas under the tiles.
- The tile could become unfastened and fall off entirely.
- Therefore, it is in your best advantage to relocate quickly so that you can attend to the leaks.
- A specialist should be hired to assure that the new grout will last for a long time, even if you know exactly where the previous grout failed.
- Tiles may need to be removed if the waterproofing system needs to be repaired because of excessive water seepage.
- The extent of the damage will dictate the nature of the repairs that must be made.
- Repairing the grout may not necessitate removing the tiles if the shower's water loss is not too great.
- Before assuming there's a problem with your pipes, have a look at the caulking and grout surrounding your shower.
- Maintenance on the grout and caulking should be performed on a regular basis.
- Inadequate maintenance might cause the grout or caulking between tiles to crack.
- It's critical to stop the leak as quickly as possible to prevent more damage, especially to the substrate behind the tiles and the wall.
- If you want your grout to look as good as new for as long as possible, you'll need to seal it.
- Grout will be safe from mould and mildew now that it has been sealed.
- The sealing process also improves the grout's aesthetic value.
- As long as there is a sealer present, mould and mildew will be unable to grow on it.
- Epoxy grout works well with smooth, nonporous surfaces like tile and glass.
- Give the grout at least 48 hours, and preferably 72 hours, to solidify after installing new tiles.
- Before using grout sealer, it's vital to check its condition.
- Grout must be fully dry, clean, and in good condition with no chips or cracks.
- If you follow the instructions in this article to reapply the silicone and grout, you can seal your tiles without having to remove them first.
- However, if the leak is severe, you will need to remove the tiles and instal a waterproofing system first.
- Water may be collecting behind your tiles if the grout between them is visibly damaged or cracking.
- Even if there are no obvious cracks in your grout, it could still be the source of the leak if it is not water-resistant.
- Taping off the grout lines before removing the grout is a good precaution to take to ensure the tiles are not damaged.
- Next, using a squeegee or a rubber float, fill up the grout joints between the tiles with water-resistant grout.
- Before doing anything else, make sure the leaking areas are completely dry.
- First, make sure the surface is totally dry, and then use a sponge to begin applying the new grout.
- Apply the new caulk after scraping off the old.
- You must wait the recommended amount of time for the grout to cure.
- To determine if the leak is due to damaged tile grout or caulking, engage a hard surface restoration expert like Sir Grout.
- No homeowner wants to deal with the unsightly and even dangerous black mould that can develop if their shower springs a leak.
- In addition to eliminating black mould, Sir Grout can also enhance circumstances that encourage its growth.
- This post will explain why it is advisable to have a professional do the tile regrouting for you.
- When it comes to fixing damaged hard surfaces, nobody does it better than Sir Grout.
- There is a risk that the tile and grout in your shower will start to seem less than stellar due to the buildup of debris and dust.
- When grout or caulking starts to look worn, you can call Grout right away to get it restored.
- In order to figure out why your shower is leaking in unexpected places, you need first make sure everything is dry and clean.
- You may stop water from escaping the shower by taping over the drain.
- In order to keep water out of the drain, a perimeter of at least six inches should be created around it.
- Before turning on the showerhead, make sure the water level in the shower pan has reached the very top.
- Use something besides buckets and a hose as your primary method of water collection.
- Water seeping from a shower can pose a major threat to buildings and requires prompt attention.
- First, you'll need to know what to look for in terms of leaky shower symptoms; second, you'll need to track down the source of the problem; and third, you'll need to fix the problem.
- This guide will begin by describing the telltale signs and symptoms of a dripping shower, then move on to detail the steps you may take to fix the problem.
- The processes for repairing and waterproofing the shower with the aid of a masonry waterproofing compound are covered in full in a different set of instructions on how to fix a leaky shower.
- While this is clearly visible in the shower's immediate vicinity, it's important to remember that water can travel considerable distances along surfaces, which could lead to problems in other locations.
- Seeing these signs right next to the bathroom's shower could be a clue that the shower is the problem.
- Water damage in other parts of the building may, however, have originated in the shower.
- By fixing the mistakes of previous contractors, we have been able to gain substantial cash.
- It's not uncommon for people to make the same mistakes multiple times, and many of them occur in or around showers.
- The good news is that if you keep patching up the same hole with the same tool, you'll eventually find the one that lets you in.
- This paper will analyse the problem areas where our company experiences the highest failure rates and discuss the effective measures we've taken to address those problems.
- Installing a proper waterproofing system in a shower is a must if you want to utilise it.
- Benches and especially curbs are extremely vulnerable to damage from water, even though we perceive the largest concerns in flat spots like half-walls and drains.
- Many planes converge at these buildings, creating corners where water cannot freely drain, such as curbs.
- Curbs have sharp angles because they are built from several different planes.
- Water pools and splashes in several nearby corners of the shower floor.
- Waterproofing membranes have a few drawbacks, one of which is that they usually come in the shape of flat sheets, making it difficult to properly bend them around interior and exterior corners.
- In addition to being useful on seats and curbs, these are also effective in shampoo alcoves and along half walls.
- The main connection in the shower floor is the huge hole in the middle where the drain will be installed.
- The recommended drain is a "bi-level drain," which consists of four parts (the grate, beauty ring, drain body, and clamp ring).
- According to the drain's standard installation instructions, the drain body must be adhered to the pan's base.
- Water that gets behind the tiles can drain out of the pan and into the drain through the weep holes if the top of the membrane is not glued to the clamp ring.
- Adhere only the bottom of the membrane to the drain body, not the top.
- A major concern with regards to the durability of flexible vinyl shower pans is that the plasticizers used in their production may off-gas into the air, hardening the material and causing cracks to appear over time.
- For this reason, we have shifted to using a CPE (chlorinated polythene) liner for the shower pan, such as Noble Chloraloy.
- The amount of water wasted through leaking shower faucets is significant enough for us to think about doing something about it.
- Valve openings are sealed if it is possible to do so during the waterproofing process.
- The hole for the valve is caulked after the tile has been installed as an extra precaution.
- Need dependable Melbourne roofers?
- There is no need to worry since Roof Repair Roofing Systems can provide expert maintenance and repairs for any type of roof.
Frequently Asked Questions About Water Leak
Loose, chipped, missing, and cracked grout will let water through, ultimately damaging your tile floor unless the problem is remediated. Damaged grout is a source of other problems as well. It can become the site of mould growth if it is not cleaned properly.
Moisture that gets behind tiles can cause all sorts of problems. It can destroy the drywall backing, it can cause rot, and it can cause the tiles to begin to fall off if left too long. Worst-case scenario, water damage behind your tiles can lead to mould problems.
Sealing grout is necessary because, without a waterproof covering, it absorbs not just water but bacteria and stains. The reason for this is that grout is a mixture of cement and sand. The sealing will protect the grout against germs and moisture.
The Splash Leak Test
If you have a shower door, pour water around the door frame. Wait at least five minutes to see if water seeps out. Look for gaps between the rubber door sweep or gaskets if your door has them. And if the shower door is joined to the wall or floor with caulking, look for gaps there too.
If you see stains on the ceiling below your bathroom, don't assume it's from leaking water or a drain pipe. Check the ceramic tile walls surrounding your tub or shower. This tile needs periodic maintenance; cracks can develop in the grout between the tiles, allowing moisture to seep through.